Multi-Factor Authentication with SlashID
In this tutorial, you will build an essential (but functional!) React application to explore SlashID’s Multi-Factor Authentication (MFA) capabilities. You will build a simple UI that first authenticates a user, and then prompts them for an additional authentication step through a different factor, and you will also explore a few use cases.
With phishing and credential theft always on the rise, simple authentication with username and password is no longer enough to ensure your users are secure. For this reason, you may want to implement MFA on your platform. SlashID can help you do so easily and with minimal impact on user experience. Read this tutorial to learn how!
You can also find the complete source code of this tutorial in our CodeSandbox!
Requirements
- Sign up to SlashID, create your first organization and retrieve the ORGANIZATION_ID.
- Install:
- Like our Core SDK, all examples in this tutorial use TypeScript. SlashID ❤️ TypeScript!
- Set up a new React app. We’ll use Vite to bootstrap the project:
npm create vite@latest slashid-mfa -- --template react-ts
cd slashid-mfa && npm install
Now, run the dev server:
npm run dev
You should now have a React application running on your local machine.
Check out this tutorial for a more detailed, step-by-step guide to our React SDK.
Step 1: Setup the project and the SlashID SDK
Now that we have the basic setup done, we are ready to get started.
- Install the SlashID Core SDK and React SDK packages:
npm install @slashid/slashid @slashid/react
- Create a basic configuration with SlashID providers:
import React from "react";
import ReactDOM from "react-dom/client";
import { SlashIDProvider, ConfigurationProvider } from "@slashid/react";
import App from "./App";
import "./index.css";

ReactDOM.createRoot(document.getElementById("root") as HTMLElement).render(
  <React.StrictMode>
    <SlashIDProvider
      // your organization ID, received upon requesting access
      oid="ORGANIZATION_ID"
      baseApiUrl="https://api.slashid.com"
      tokenStorage="localStorage"
    >
      <ConfigurationProvider theme="light">
        <App />
      </ConfigurationProvider>
    </SlashIDProvider>
  </React.StrictMode>
);
Step 2: Build the MFA flow
First of all, let’s review a basic passwordless MFA user flow which uses email address as the first authentication factor, and phone number as the additional authentication factor:
- The user starts to log in using their email address and a magic link
- Upon success, the user is prompted to input their phone number, which they provide
- They receive an SMS with a one time password (OTP)
- Once the user inputs the OTP, the MFA flow is completed and the user is fully authenticated and able to do access the main app (e.g., to make a purchase, access their profile, etc)
- If at any point the MFA challenge fails, the user sees an error message and can retry
SlashID React SDK offers a first-class MFA experience through the <MultiFactorAuth> component: let’s use it to build a Multi-Factor Authentication flow.
To specify the factors for each step, use the steps property:
import { MultiFactorAuth, LoggedIn } from "@slashid/react"

export default function MultiFactorAuthFlow() {
  return (
    <>
      <MultiFactorAuth
        steps={[
          { factors: [{ method: "email_link" }] }, // first factor: email magic link
          { factors: [{ method: "otp_via_sms" }] }, // second factor: SMS OTP code
        ]}
      />
      {/* render children only if the user is authenticated with all required factors */}
      <LoggedIn withFactorMethods={["email_link", "otp_via_sms"]}>
        You're logged in with MFA{" "}
        <span role="img" aria-label="sunglasses-emoji">
          😎
        </span>
      </LoggedIn>
    </>
  )
}
Let’s quickly recap what you just built:
- An MFA form with two authentication factors: the first is an email magic link, the second an OTP code
- A success message displayed after completing the two MFA steps, rendered using the SlashID
<LoggedIn>component
You can learn more about available authentication factors on our developer portal 🤓
Now, let’s use our newly created component in your App.tsx:
import MultiFactorAuthFlow from "./MultiFactorAuthFlow"
import "./App.css"
import "@slashid/react/style.css"

function App() {
  return (
    <div className="App">
      <div className="FormWrapper">
        <MultiFactorAuthFlow />
      </div>
    </div>
  )
}

export default App
Minimal CSS setup:
#root {
  max-width: 1280px;
  margin: 0 auto;
  padding: 2rem;
}

.FormWrapper {
  width: 390px;
}
You should now see the MFA Form with the first factor:
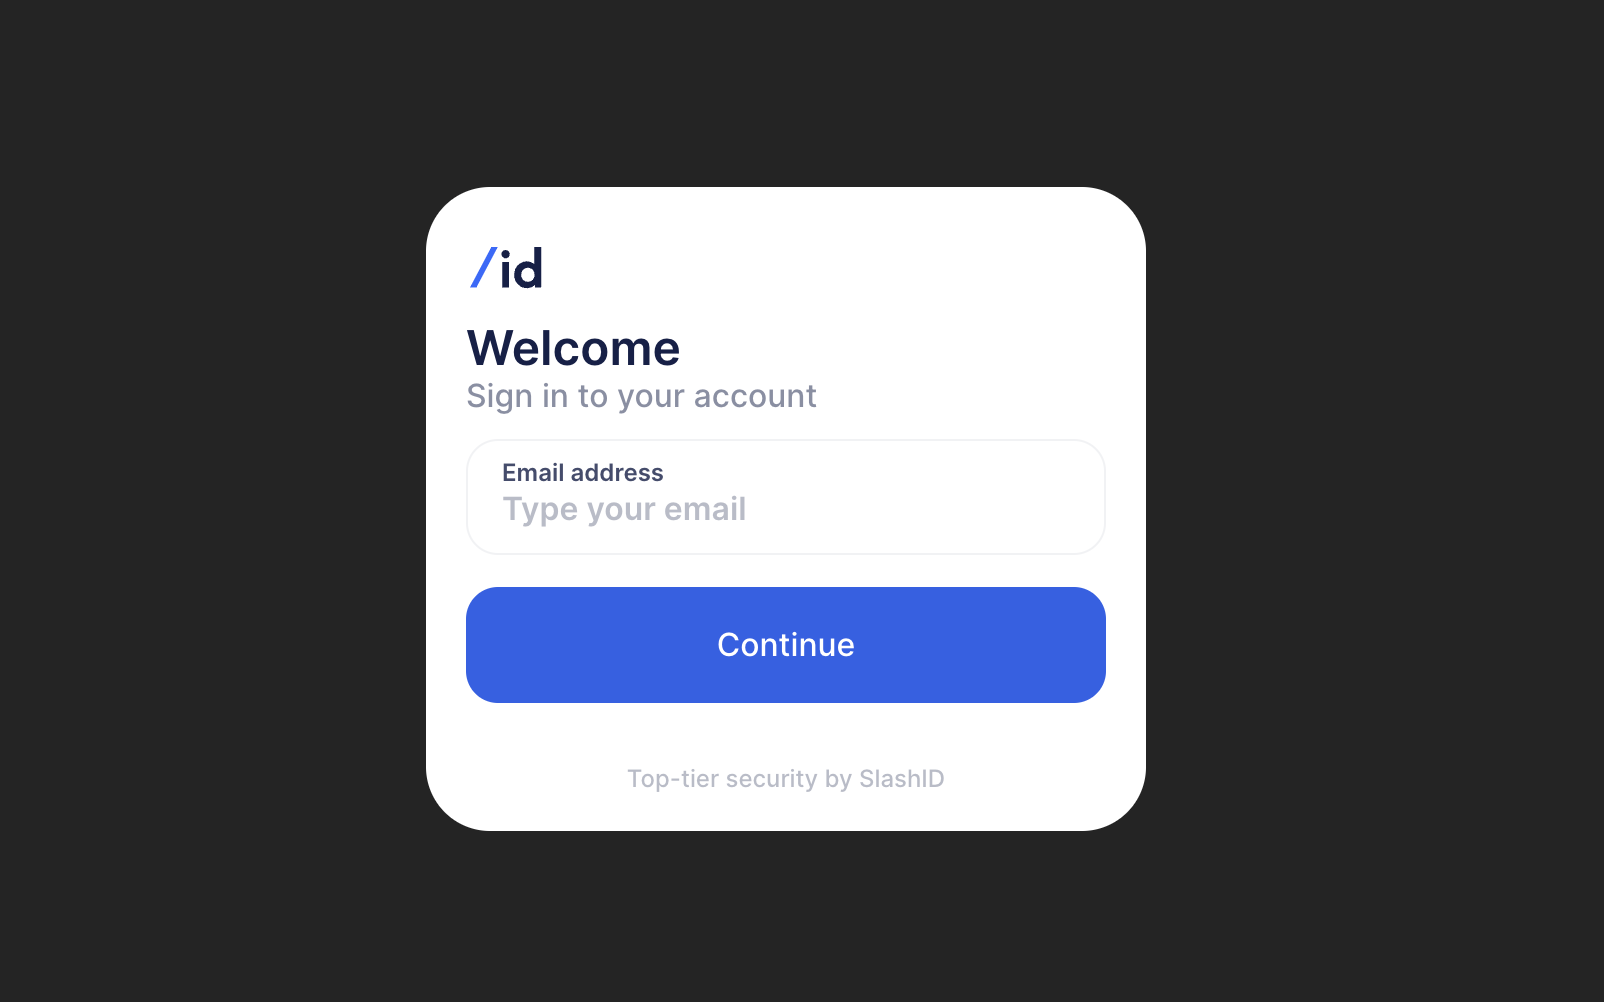
To sign in, enter the email address associated with your SlashID organization (see Prerequisites). You should receive an email with a magic link – use it to log in!
When you’re done, you should be presented with second authentication challenge, as specified in:
<MultiFactorAuth
  steps={[
    { factors: [{ method: "email_link" }] }, // first factor: email magic link
    { factors: [{ method: "otp_via_sms" }] }, // second factor: SMS OTP code
  ]}
/>

Now, input your phone number to receive an OTP via SMS. Once you get it, use it to complete the authentication flow! You should see this success message:

Step 3: Add Step-Up Authentication
Sometimes, an immediate MFA is not what you want. Consider the following scenario:
- The user initially logs in with email and magic link, which is an acceptable level of security to perform basic operations on your app
- The user wants to perform a sensitive operation within the system, such as editing or deleting their personal details
- Before they can do that, they are prompted to input their phone number, which acts as a second authentication factor
- After they submit a phone number, they receive an SMS with an OTP challenge
- Once the challenge is completed and sensitive operations can be performed
- In case the MFA challenge fails, the user sees an error message and can’t perform the deletion
This is what we call Step-Up Authentication. It can be used to grant access to high-risk resources or sensitive data. If this is your use case, SlashID has got you covered with the <StepUpAuth> component!
Create a <StepUpAuthFlow> component:
import type { Factor } from "@slashid/slashid";
import { LoggedOut, Form, StepUpAuth } from "@slashid/react";
export default function StepUpAuthFlow() {
// Before the user can perform a sensitive operation,
// they have to authenticate via a one-time password.
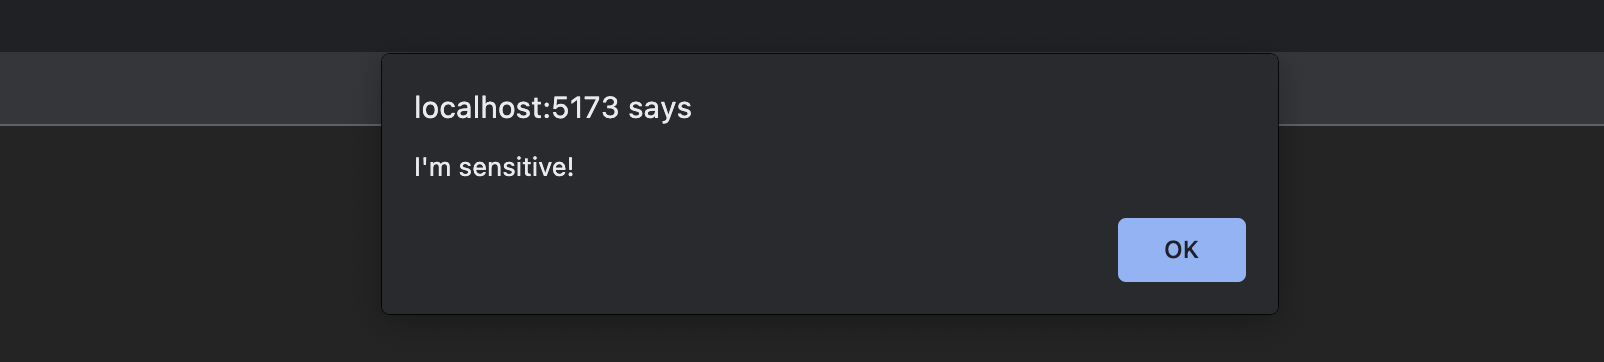
const stepUpAuthFactors: Factor[] = [{ method: "otp_via_sms" }];
const sensitiveOperation = () => alert("I'm sensitive!");
return (
<>
{/* We add a login form for convenience here */}
{/* It will only show up in case you're not authenticated already */}
<LoggedOut>
<Form />
</LoggedOut>
{/* We can pass the sensitive operation callback to the `<StepUpAuth>` */}
{/* component via the `onSuccess` prop - this way we ensure that it will */}
{/* only be performed after successful Step-Up Authentication. */}
<StepUpAuth factors={stepUpAuthFactors} onSuccess={sensitiveOperation} />
</>
);
}
Import the <StepUpAuthFlow> component in your <App>:
import MultiFactorAuthFlow from "./MultiFactorAuthFlow"
import StepUpAuthFlow from "./StepUpAuthFlow"
import "./App.css"
import "@slashid/react/style.css"

function App() {
  return (
    <div className="App">
      <div className="FormWrapper">
        {/* <MultiFactorAuthFlow /> */}
        <StepUpAuthFlow />
      </div>
    </div>
  )
}

export default App
Once you’re authenticated with the first factor, you should be able to see the Step-Up Authentication challenge:

This is exactly what you have seen in the previous flow – the second MFA step! Proceed with OTP code and you should finally be able to see a sensitive operation being performed:
Congratulations! You have successfully built a Multi-Factor Authentication flow and added Step-Up Authentication capabilities to your web app. These two complex scenarios are fully covered by SlashID React SDK, so you can sit back and focus on your application logic. Feels good, doesn’t it?
Check out this CodeSandbox with code from this guide for more details, as well as our full SDK documentation.