Gate on AWS as Lambda Authorizer with API Gateway
In this guide, we will show you how to deploy Gate on AWS as a Lambda Authorizer with API Gateway. If you aren't already familiar with Gate, we recommend reading our [getting started page](/docs/gate/getting-started.
Limitations
Due to the way Lambda Authorizer is integrated with API Gateway, it doesn't have access to the request body, nor can it edit the response. When running as a Lambda Authorizer, Gate cannot access the request body nor modify the response, due to the way Lambda Authorizer is integrated with API Gateway. As such, plugins that change request body or response are not supported. Currently this includes the Authorization Proxy and PII detection plugins.
To alter request or response headers, you need to configure them manually.
Currently, Gate supports AWS Gateway v2 only. Support for v1 will be added in the future.
Deploying
In this guide, we will use Gate as a Lambda Authorizer to protect a Lambda function by validating a JSON Web Token (JWT). This is a basic example designed to demonstrate the deployment steps. For a list of use cases supported by Gate, see our use cases page.
AWS API Gateway can be configured to use Gate as an Authorizer using the AWS Console or with Terraform.
A misconfiguration may prevent Gate from functioning correctly, and so we recommend following each step in this guide, which includes information on how to verify each step. If you encounter issues, please check the Troubleshooting page section at the end of this guide.
If you already have a working AWS Gateway, you can jump to the Configuring Gate section.
Creating Example Lambda
We will use an example Lambda function that simply echoes back the received HTTP request in the response body. This can help you to verify that your setup is correct and to experiment with different Gate configurations.
In this guide, we will demonstrate how to set up Gate as an Authorizer using both the AWS Console and the AWS provider for Terraform.
- Terraform
- AWS UI
You can learn more about the AWS provider for Terraform (for example, how to authorize with AWS) in the Terraform documentation.
Initial configuration:
terraform {
  required_providers {
    aws = {
      source  = "hashicorp/aws"
      version = "~> 5.0"
    }
  }
}

provider "aws" {
  # example value, feel free to change
  region = "us-east-1"
}

data "aws_region" "current" {}
terraform init
Lambda roles
- Terraform
- AWS UI
First, we need to define the IAM role for the Lambda. This allows the Lambda to write logs to CloudWatch.
resource "aws_iam_role" "lambda_exec" {
  name = "serverless_lambda"

  assume_role_policy = jsonencode({
    Version   = "2012-10-17"
    Statement = [
      {
        Action    = "sts:AssumeRole"
        Effect    = "Allow"
        Sid       = ""
        Principal = {
          Service = "lambda.amazonaws.com"
        }
      }
    ]
  })
}

data "aws_iam_policy_document" "lambda_logging" {
  statement {
    effect = "Allow"

    actions = [
      "logs:CreateLogGroup",
      "logs:CreateLogStream",
      "logs:PutLogEvents",
    ]

    resources = ["arn:aws:logs:*:*:*"]
  }
}

resource "aws_iam_policy" "lambda_logging" {
  name        = "lambda_logging"
  path        = "/"
  description = "IAM policy for logging from a lambda"
  policy      = data.aws_iam_policy_document.lambda_logging.json
}

resource "aws_iam_role_policy_attachment" "lambda_logs" {
  role       = aws_iam_role.lambda_exec.name
  policy_arn = aws_iam_policy.lambda_logging.arn
}
You can now check if everything is working by running:
terraform apply
If it succeeds, you can proceed to the next step.
If you are interested in more details about IAM roles, you can check the Terraform docs.
Lambda function
- Terraform
- AWS UI
You need to provide the function that the Lambda will run as a zip file.
You can build your own or use one provided by us. To prepare your own, you should check the AWS documentation describing how to do that for multiple languages.
We can use Terraform to download the SlashID example function:
data "http" "echo_lambda" {
  url = "https://storage.googleapis.com/slashid-sandbox-ad6b-cdn/static/echo-lambda.zip"
}

resource "local_sensitive_file" "echo_lambda" {
  content_base64 = data.http.echo_lambda.response_body_base64
  filename       = "${path.module}/echo-function.zip"
}
When you run terraform apply, Terraform will store the function in the file ./echo-function.zip.
After downloading or building your function, you must create a Lambda resource:
resource "aws_lambda_function" "echo" {
  function_name = "echo"
  handler       = "echo.handler"
  role          = aws_iam_role.lambda_exec.arn


  runtime       = "provided.al2"
  architectures = ["arm64"]

  filename         = "echo-function.zip"
  source_code_hash = sha256(data.http.echo_lambda.response_body_base64)

  depends_on = [
  aws_iam_role_policy_attachment.lambda_logs,
  local_sensitive_file.echo_lambda,
  ]
}


output "echo_lambda_logs" {
  description = "Echo lambda logs"
  value       = format(
    "https://%s.console.aws.amazon.com/lambda/home?region=%s#/functions/%s?tab=monitoring",
    data.aws_region.current.name,
    data.aws_region.current.name,
    aws_lambda_function.echo.function_name,
  )
}
> terraform apply

Outputs:

echo_lambda_logs = "https://us-east-1.console.aws.amazon.com/lambda/home?region=us-east-1#/functions/echo?tab=monitoring"
This Terraform configuration included output, which will print links to the Lambda's logs (echo_lambda_logs).
In the output, you should receive a link to the logs of the Lambda.
Navigate to https://console.aws.amazon.com/lambda/home. and click the Create function button.
In the next screen:
- Choose Use a blueprint
- Ensure that Blueprint name is set to Hello world function (NodeJS)
- Set the function name to
echo - Click the Create button
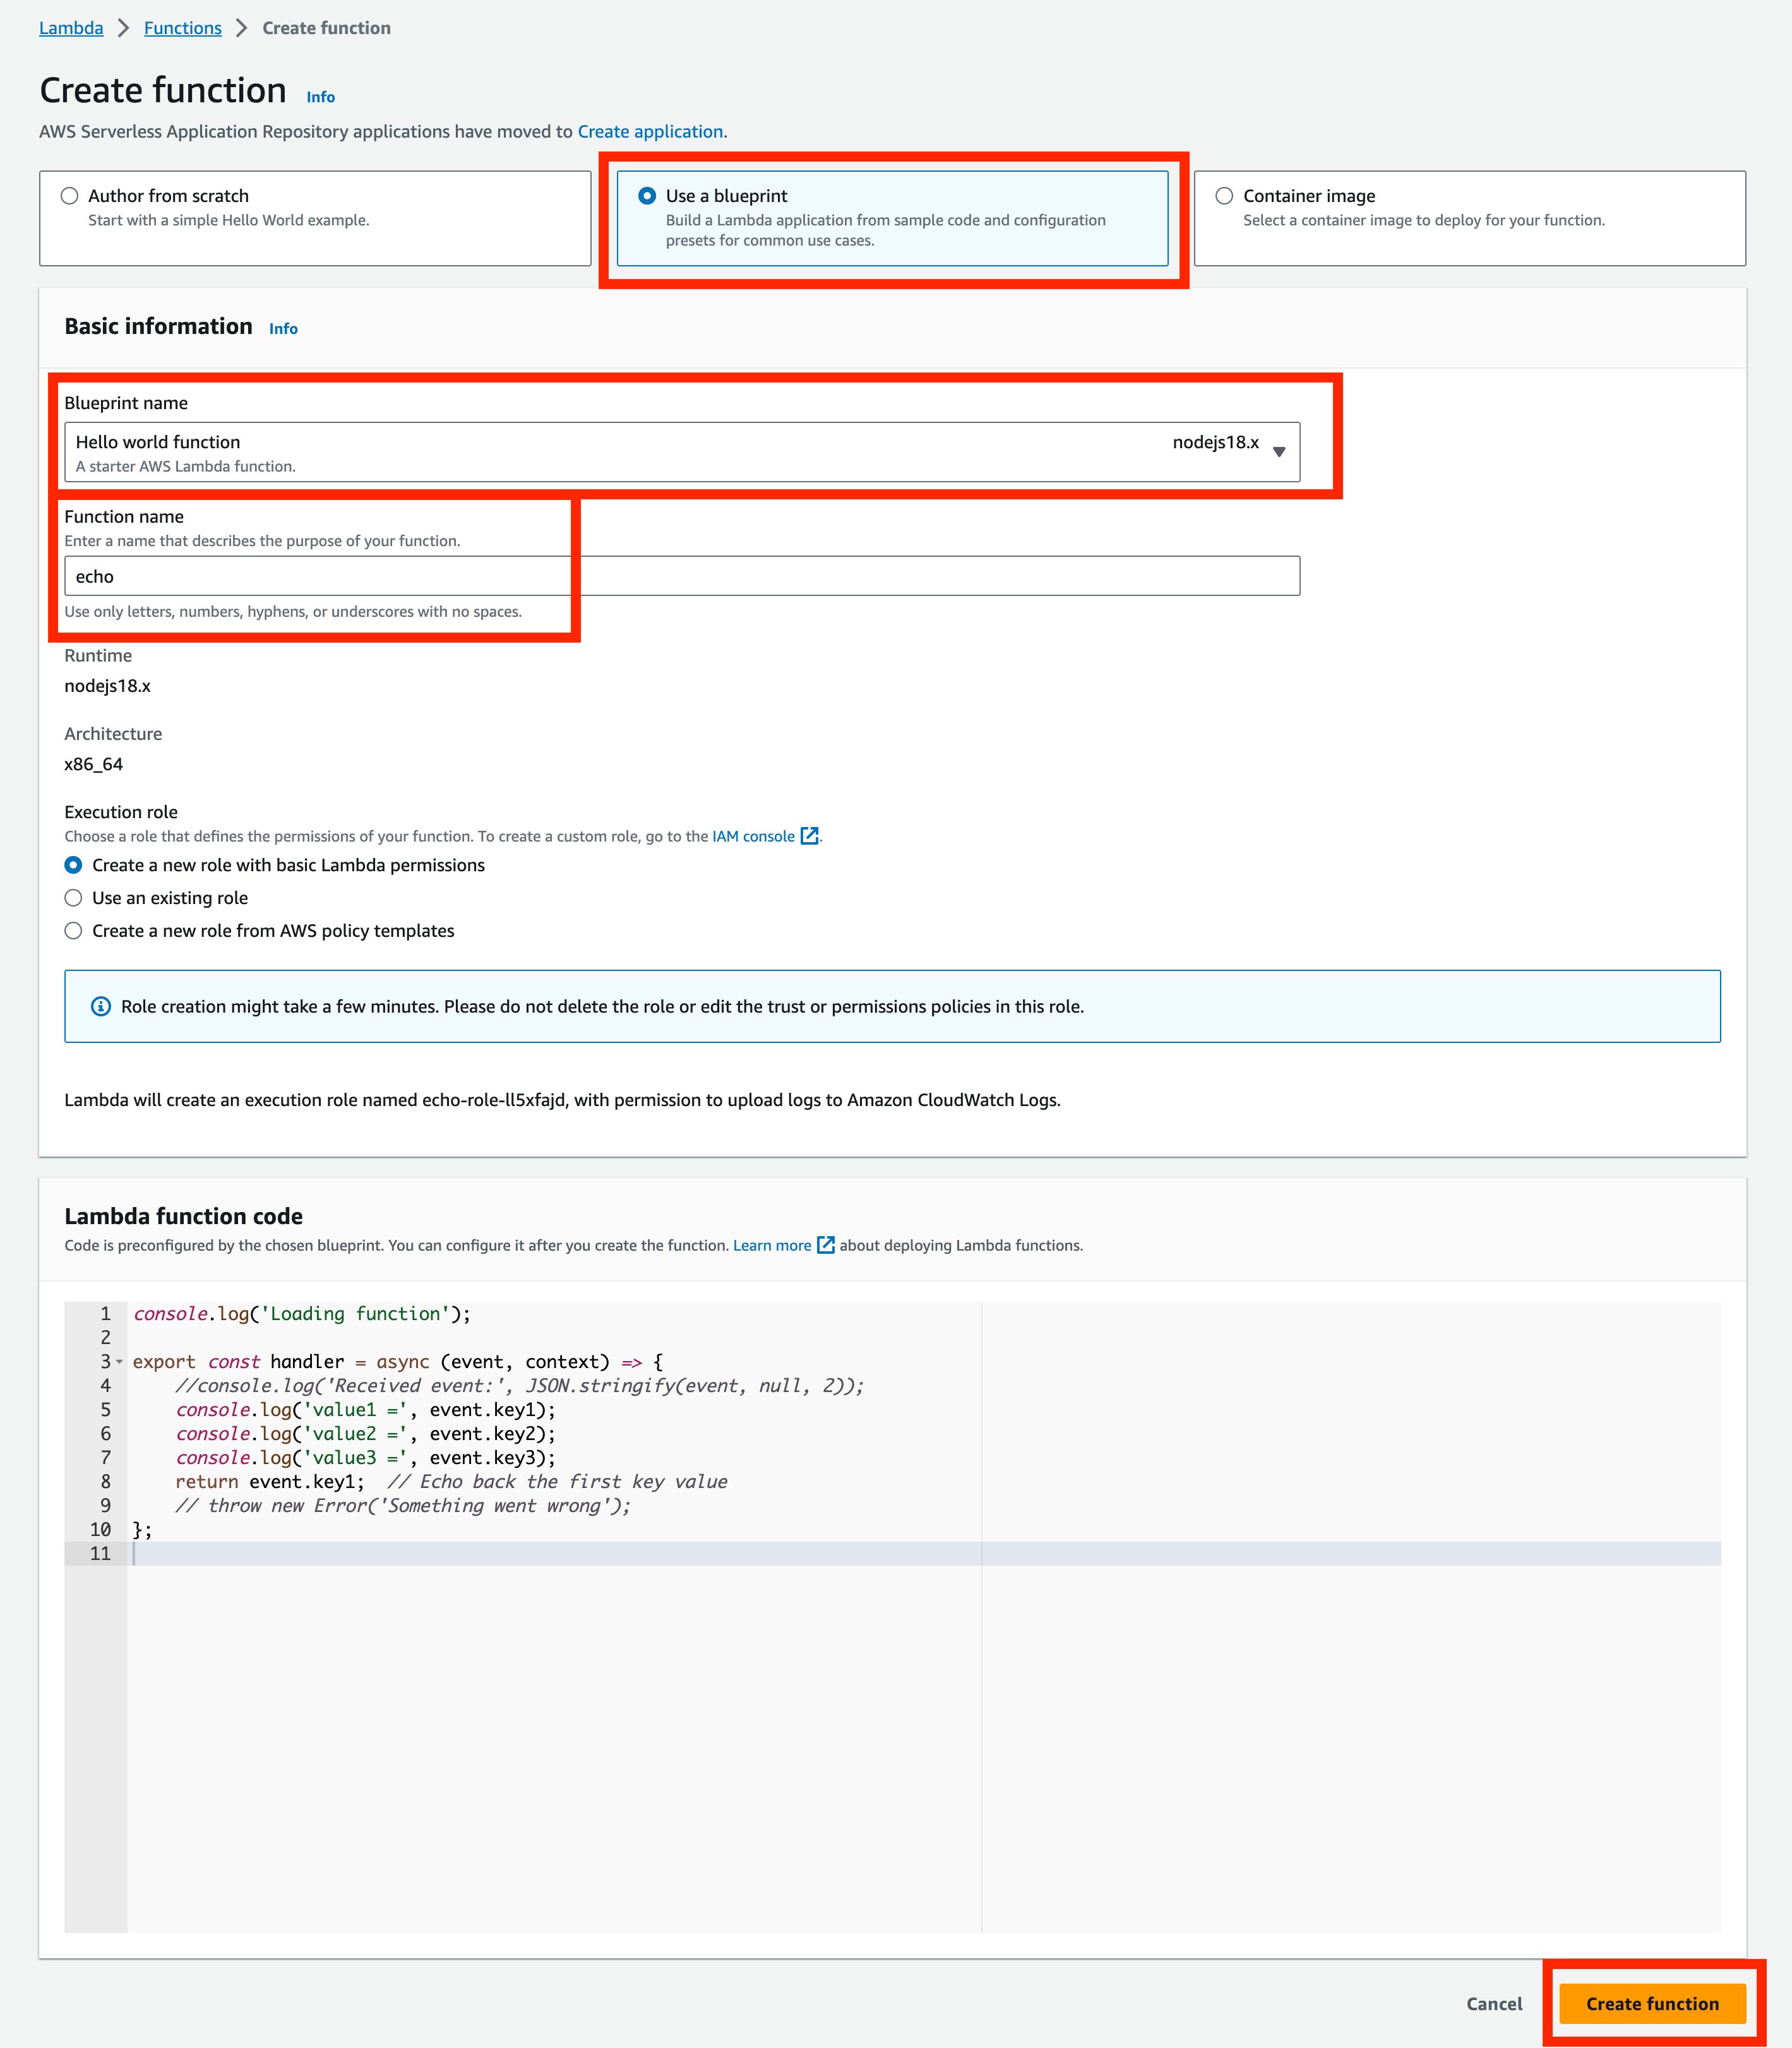
Now, in the Code tab, you can update the code to:
console.log('Loading function');

export const handler = async (event, context) => {
  console.log("EVENT: \n" + JSON.stringify(event, null, 2));

  return {
      statusCode: '200',
      body: JSON.stringify({
          "message": "Hello World!",
         "event":   event,
         "context": context,
      }),
      headers: {
        'Content-Type': 'application/json',
        'Foo': 'bar',
      }
  }
};
After pasting the code, click the Deploy button.
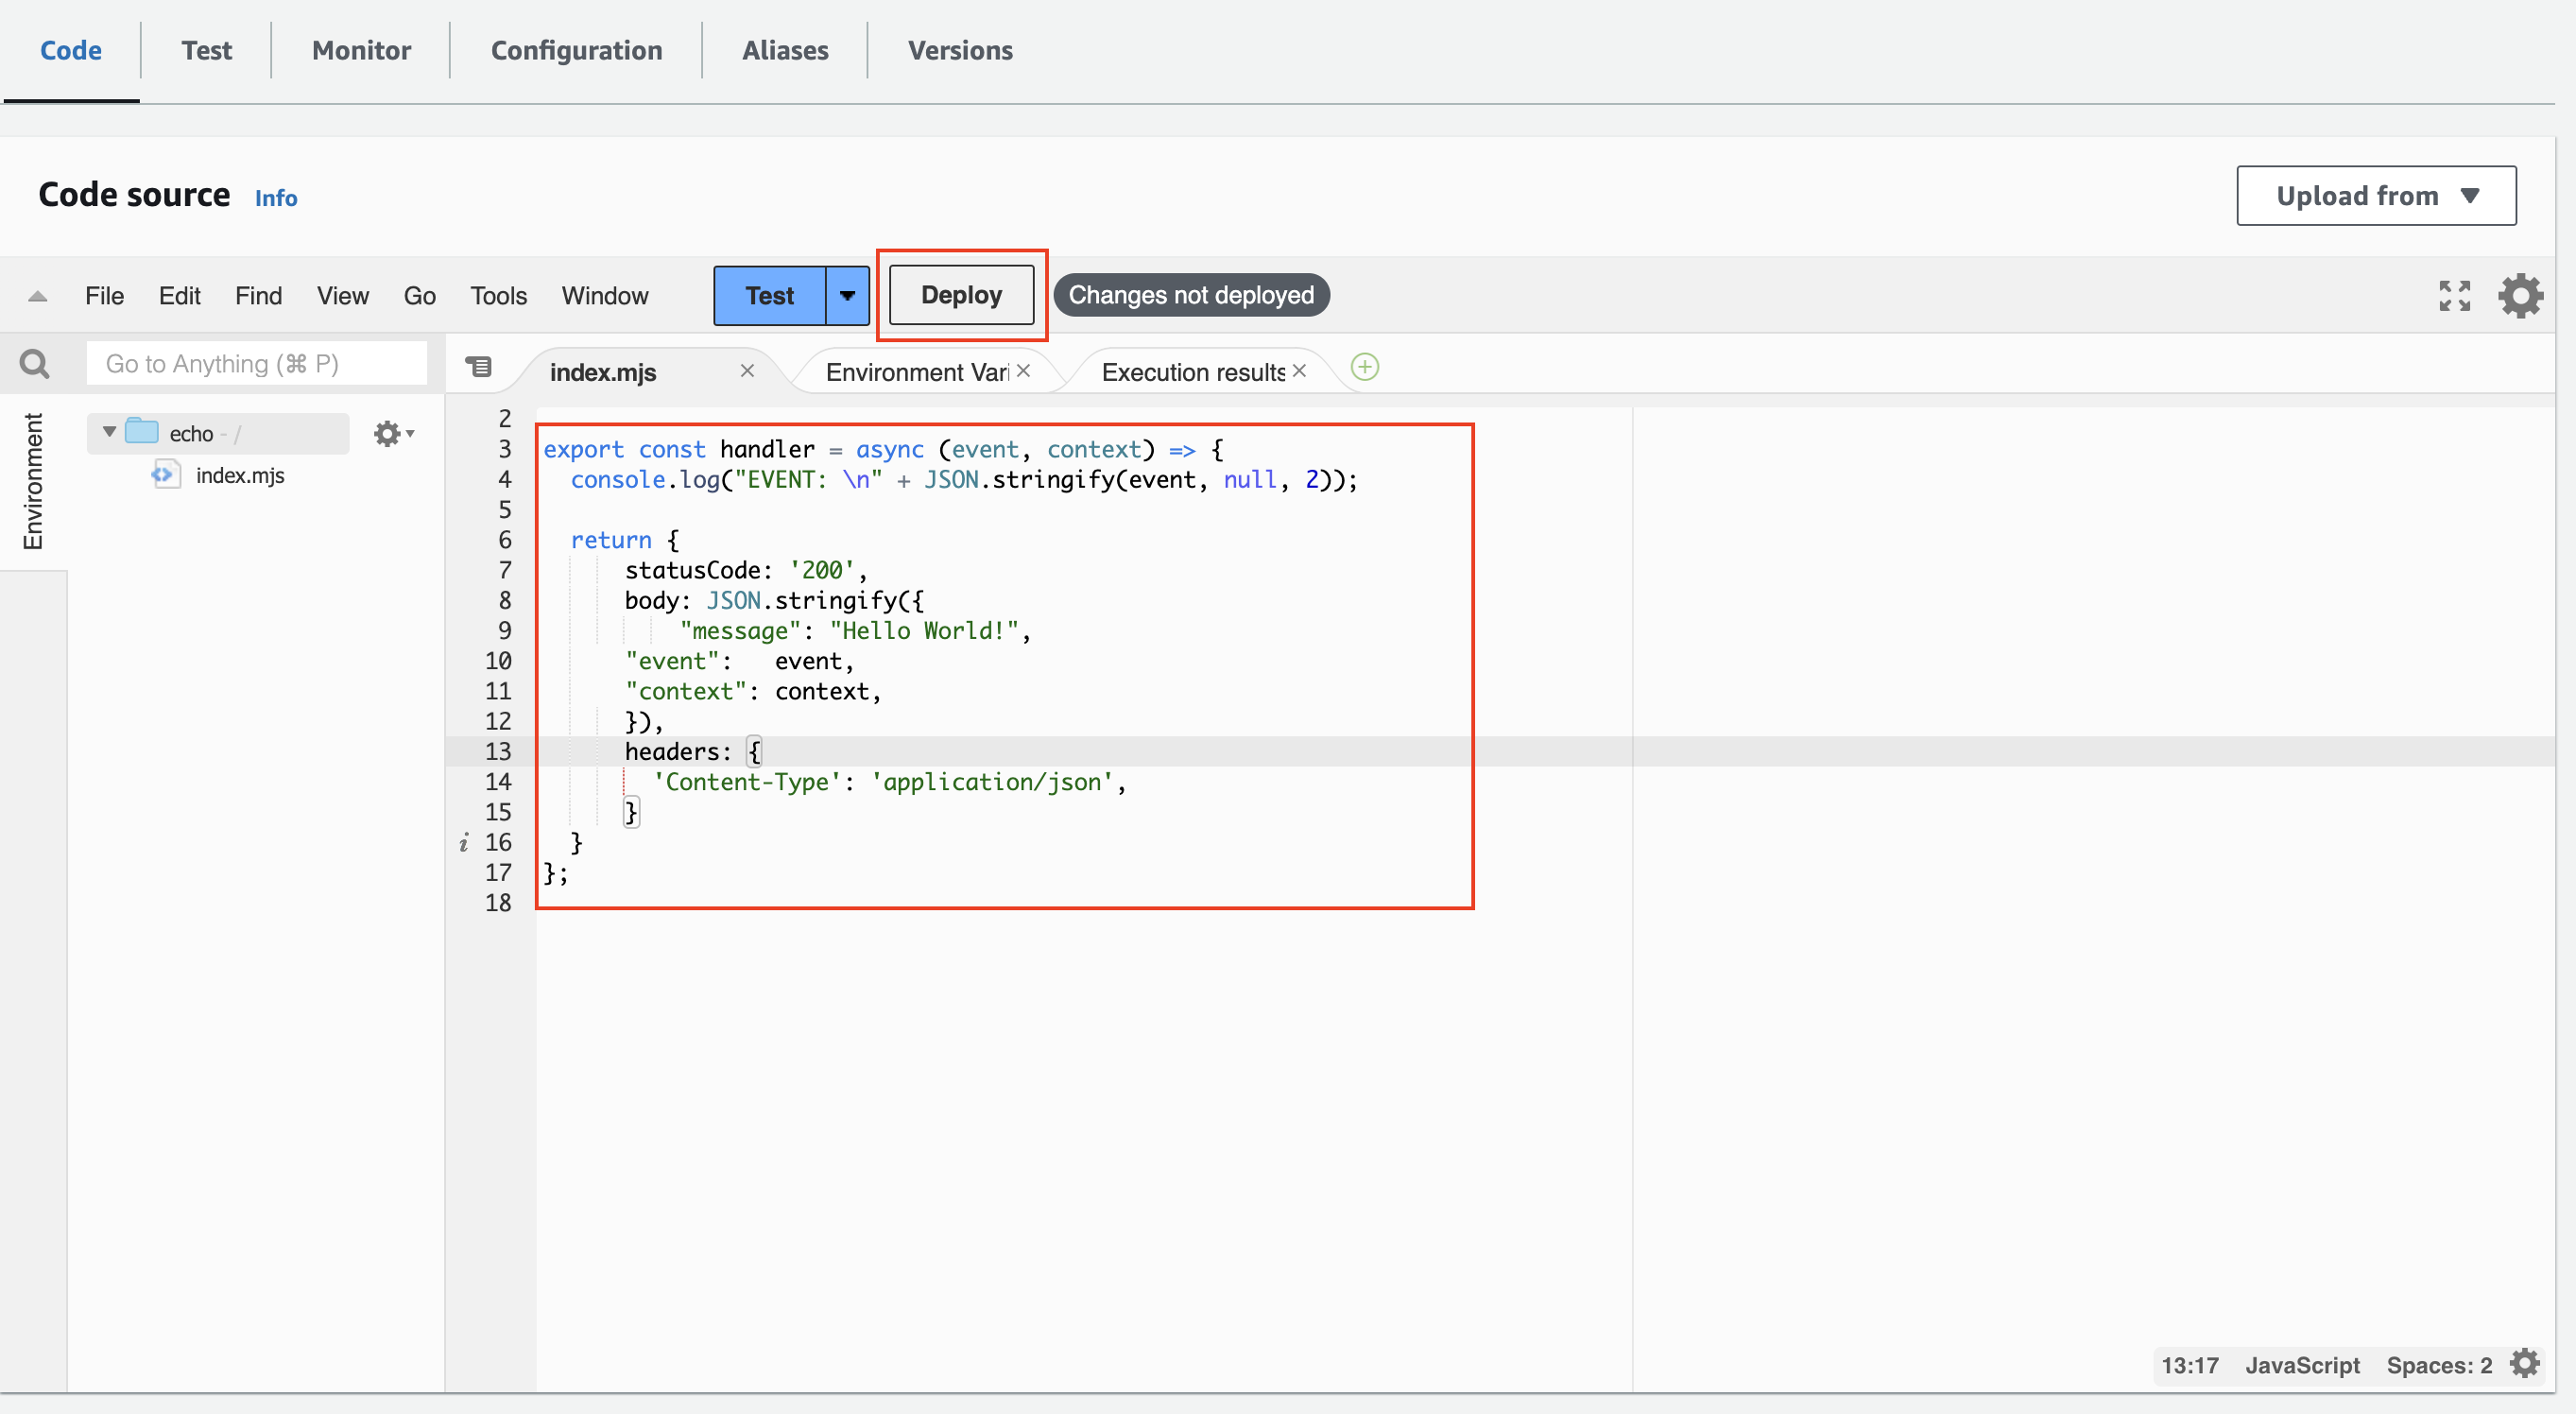
Testing lambda
Let's verify that the function is working.
You should look for the echo Lambda in AWS Console, go to the Test tab, and click the Test button.
If you configured everything correctly, you should see something like this:

Configuring Gateway
Let's now expose our Lambda via API Gateway.
- Terraform
- AWS UI
resource "aws_apigatewayv2_api" "lambda_gateway" {
  name          = "lambda_gateway"
  protocol_type = "HTTP"
}

resource "aws_apigatewayv2_integration" "echo_lambda" {
  api_id = aws_apigatewayv2_api.lambda_gateway.id

  integration_uri    = aws_lambda_function.echo.invoke_arn
  integration_type   = "AWS_PROXY"
  integration_method = "POST"
}

# This is required to allow API Gateway to invoke the Lambda.
# If it is missing or incorrect, you will receive Internal Server Error responses.
resource "aws_lambda_permission" "lambda_permission" {
  statement_id  = "AllowExecutionFromAPIGateway"
  action        = "lambda:InvokeFunction"
  function_name = aws_lambda_function.echo.function_name
  principal     = "apigateway.amazonaws.com"

  source_arn = "${aws_apigatewayv2_api.lambda_gateway.execution_arn}/*/*"
}

resource "aws_apigatewayv2_route" "echo" {
  api_id = aws_apigatewayv2_api.lambda_gateway.id

  route_key          = "GET /echo"
  target             = "integrations/${aws_apigatewayv2_integration.echo_lambda.id}"
  authorization_type = "NONE"

  depends_on = [
    aws_apigatewayv2_integration.echo_lambda,
  ]
}
Navigate to https://console.aws.amazon.com/apigateway/main/apis, and click the Build button in the HTTP API section.
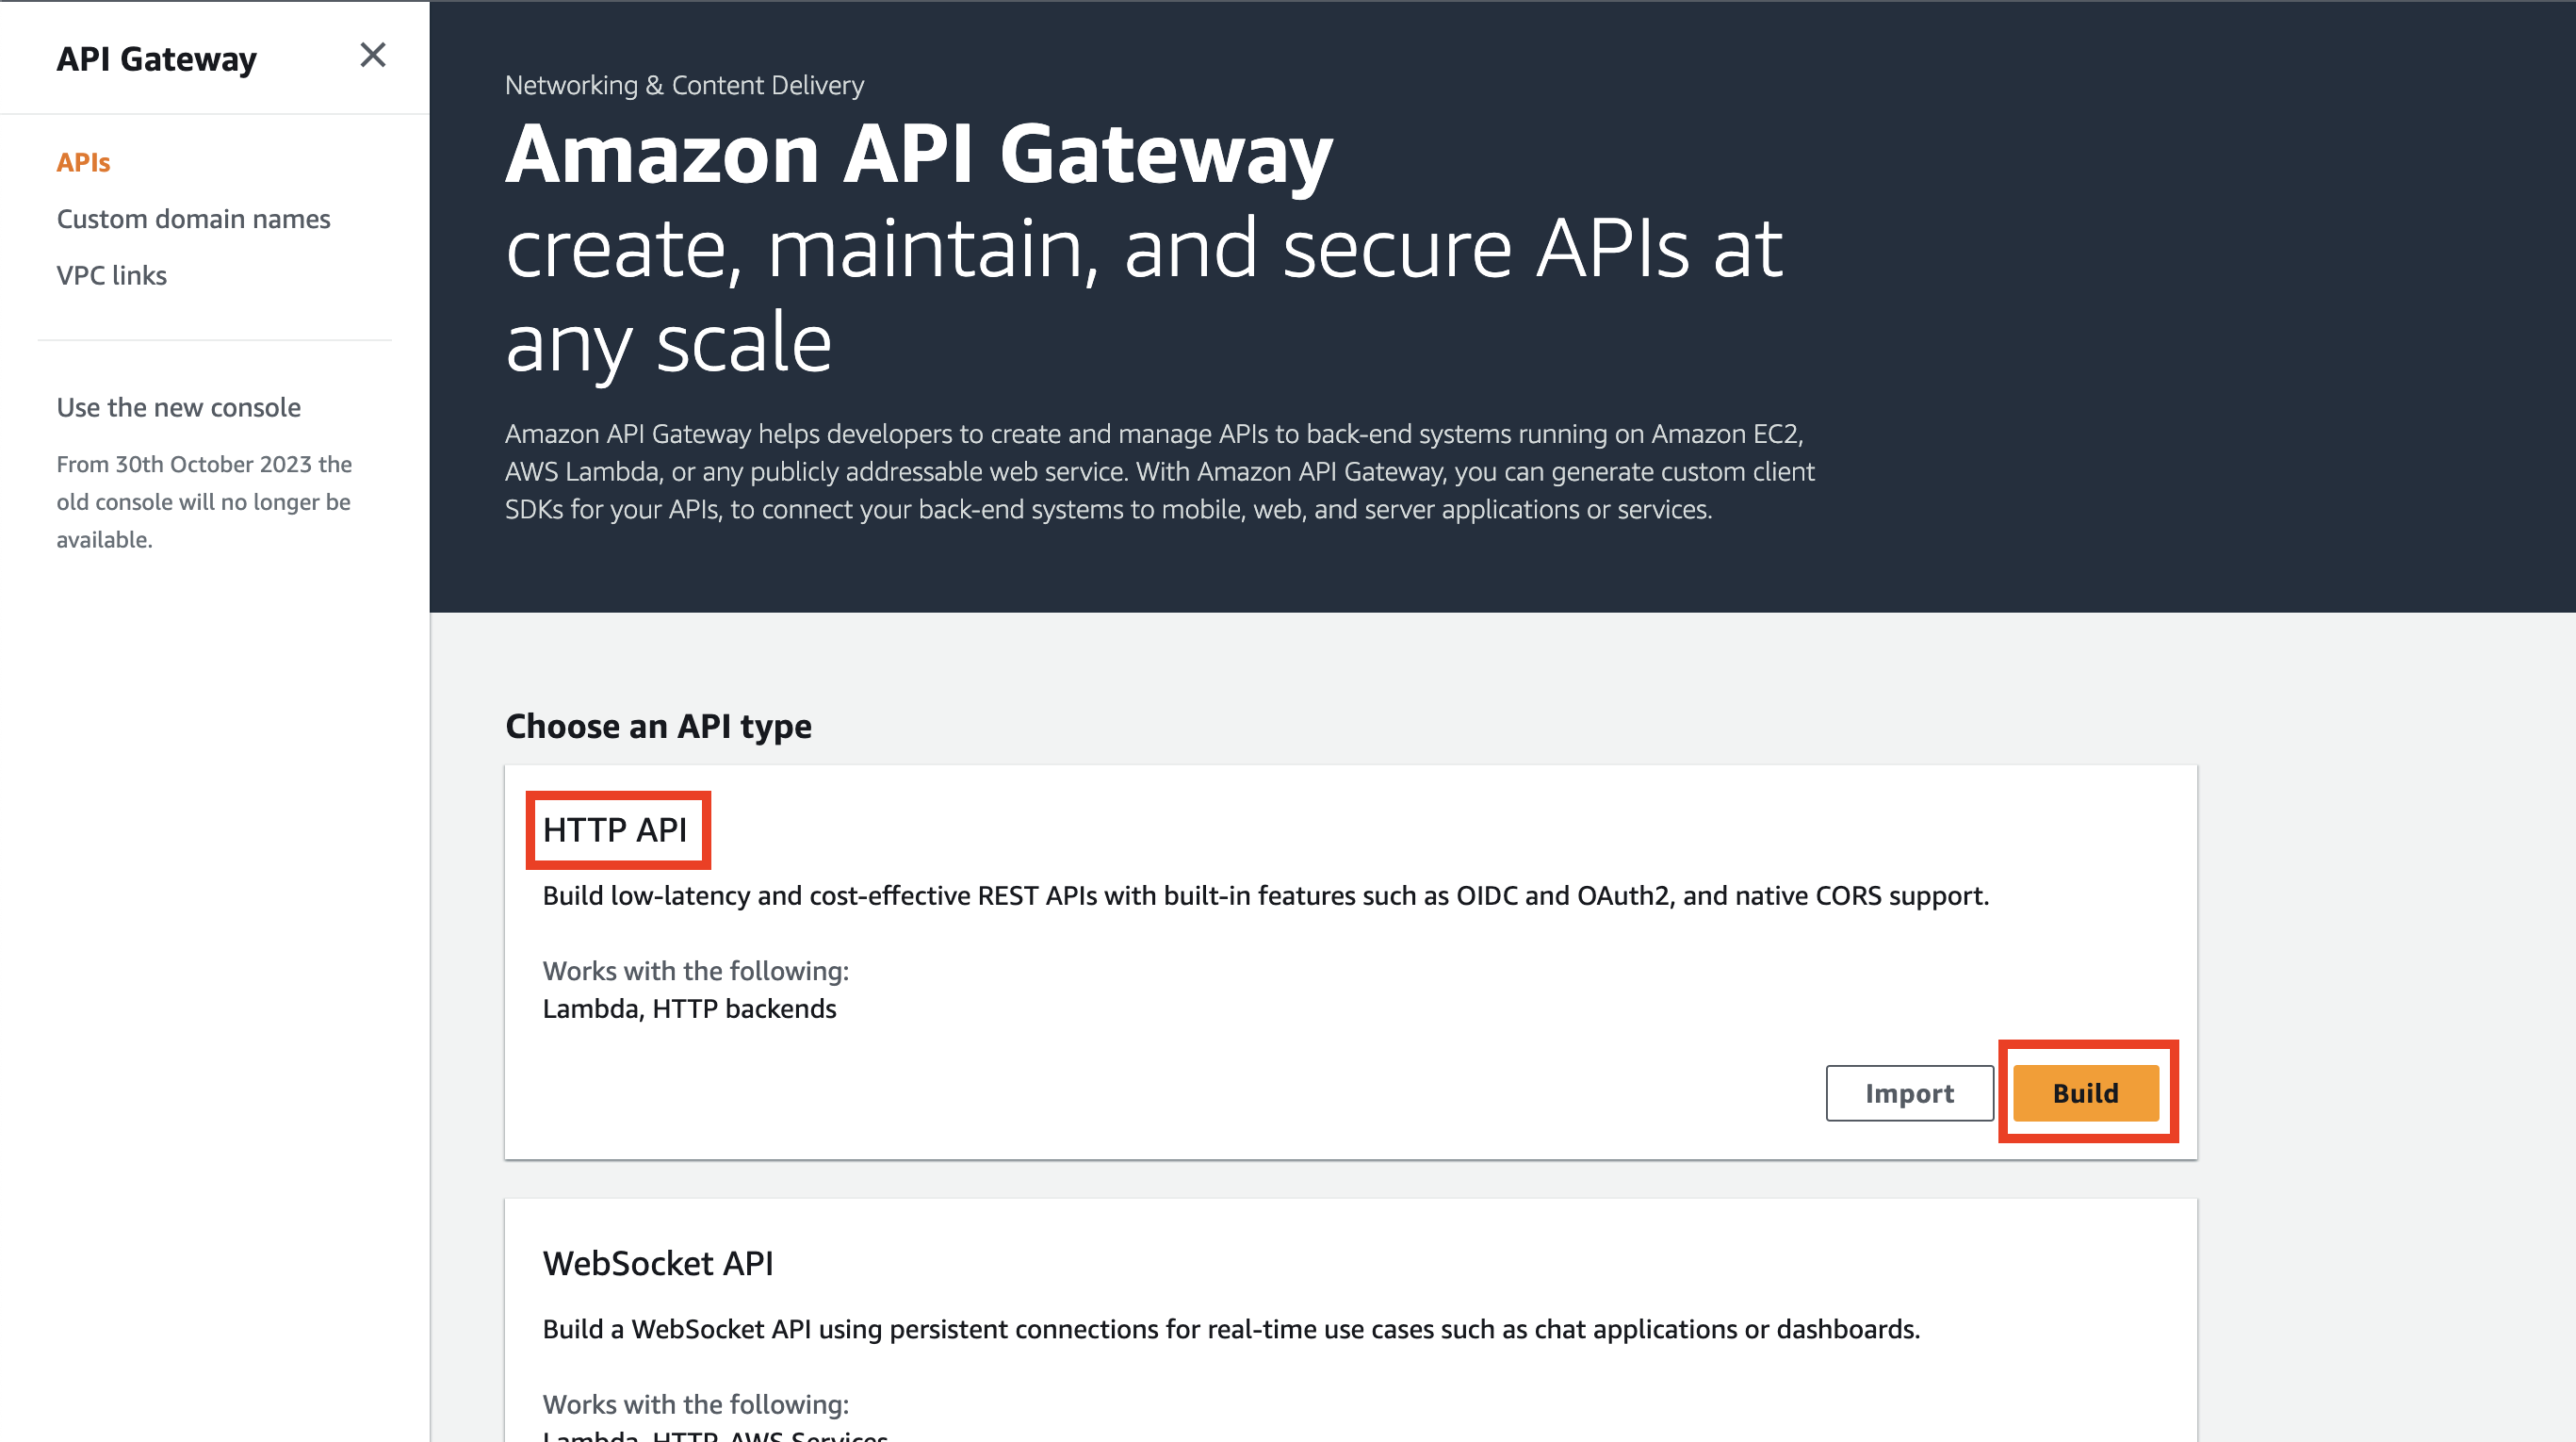
In the next screen, click the Add integration button.
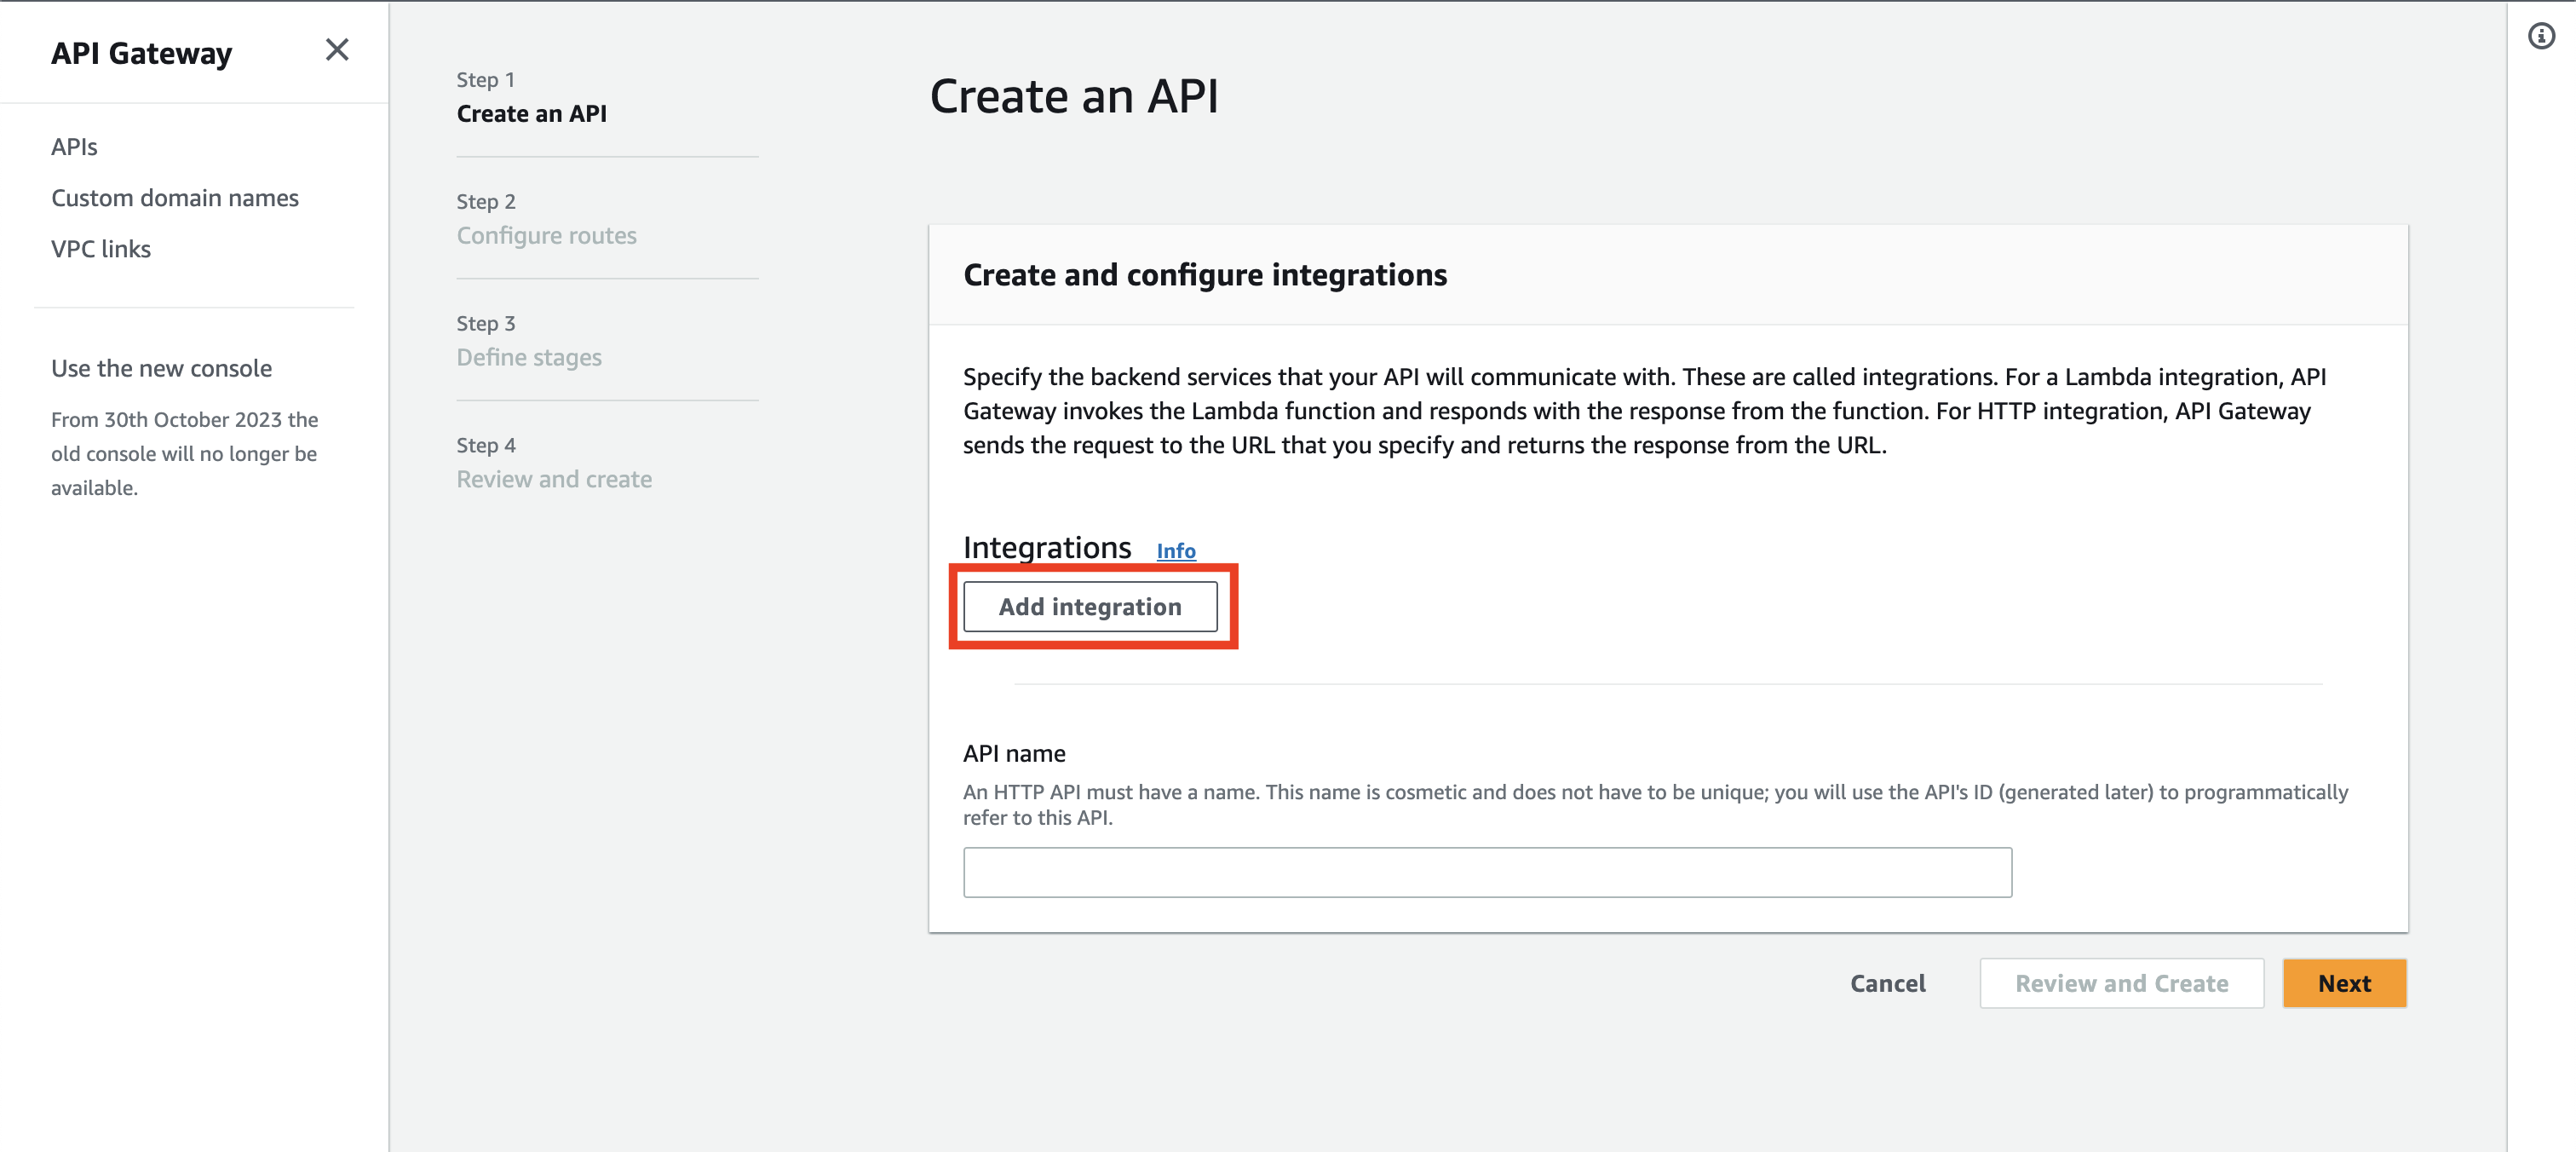
You can choose the integration type - we want to use Lambda.
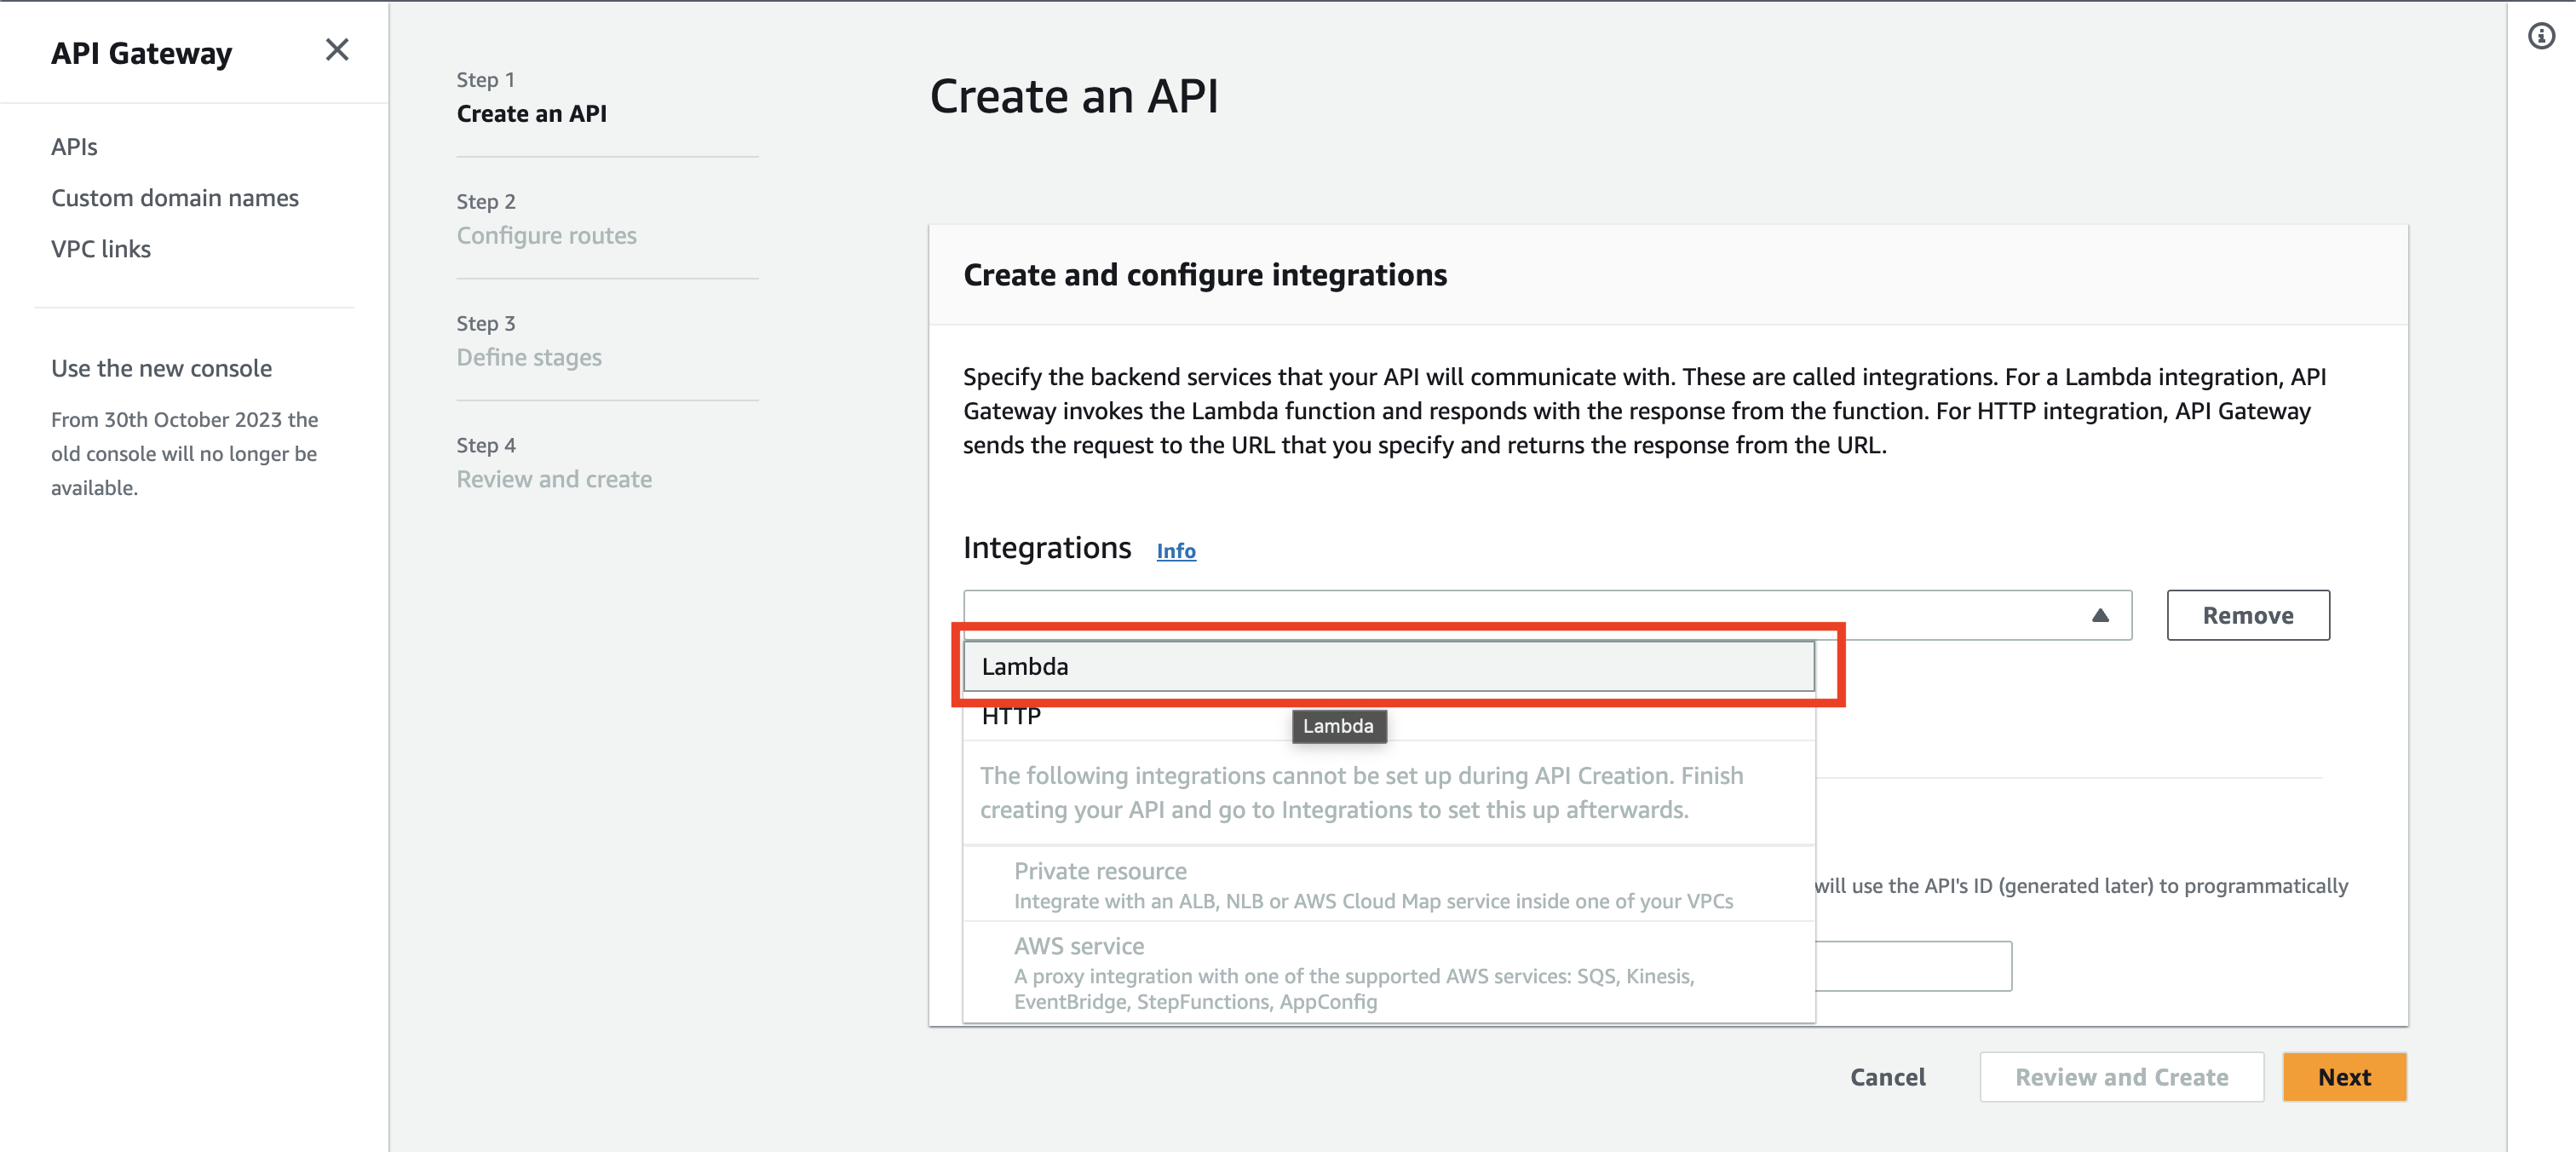
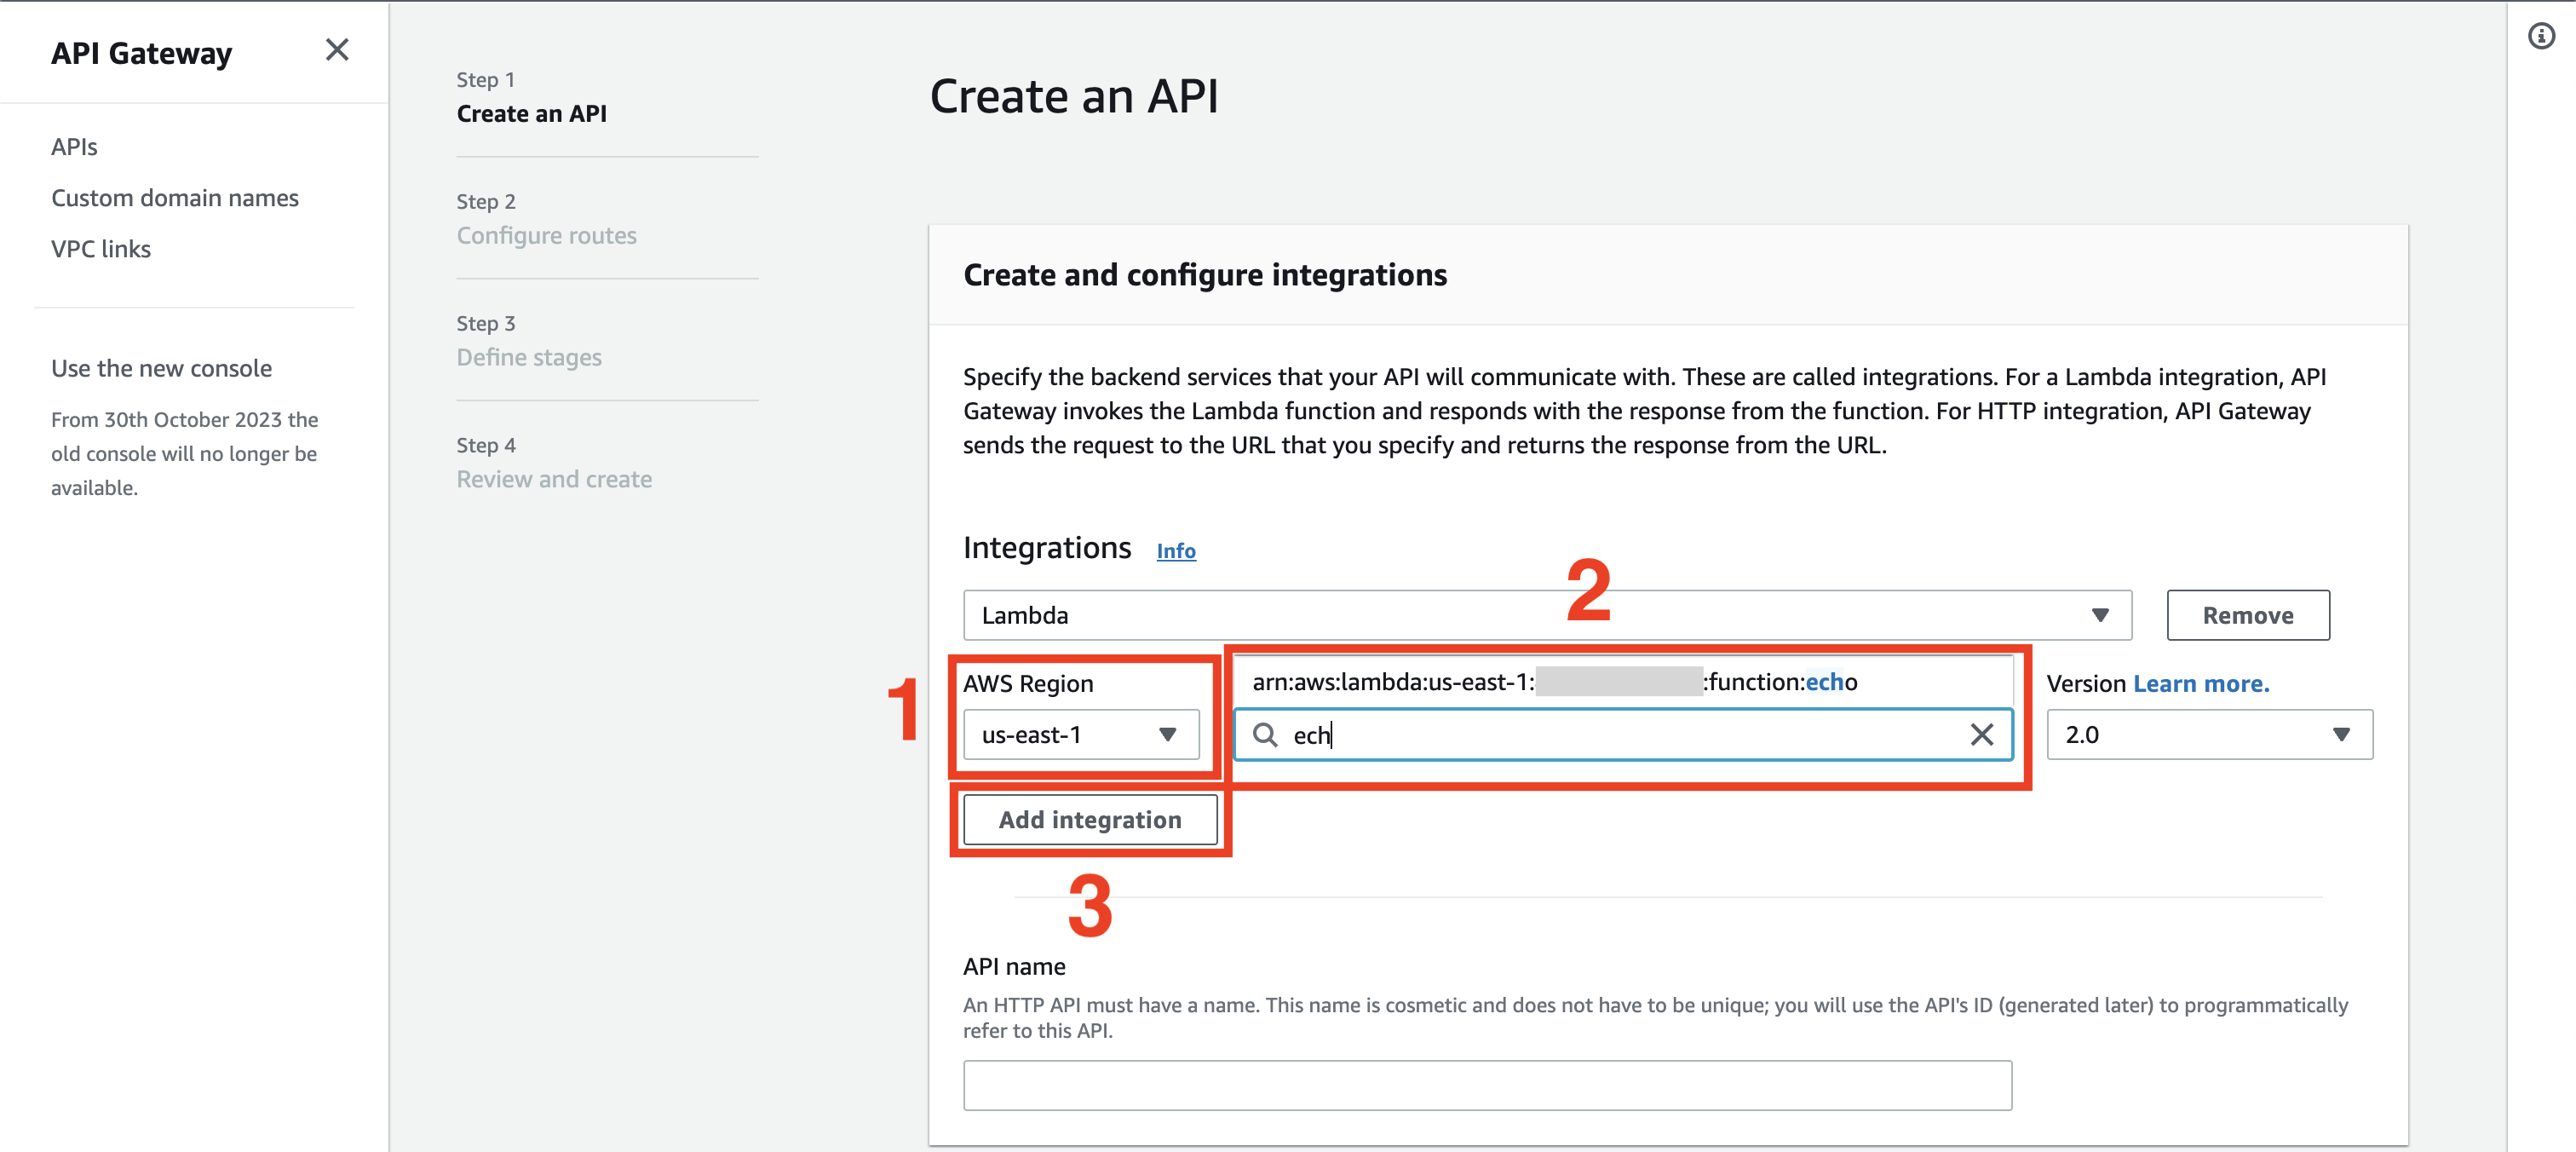
After that, you will be prompted to choose the Lambda. Please ensure that the selected regions are the same as the region of the Lambda.
In the input field, you can type echo and select the function from the list.
After that, click the Add integration button.
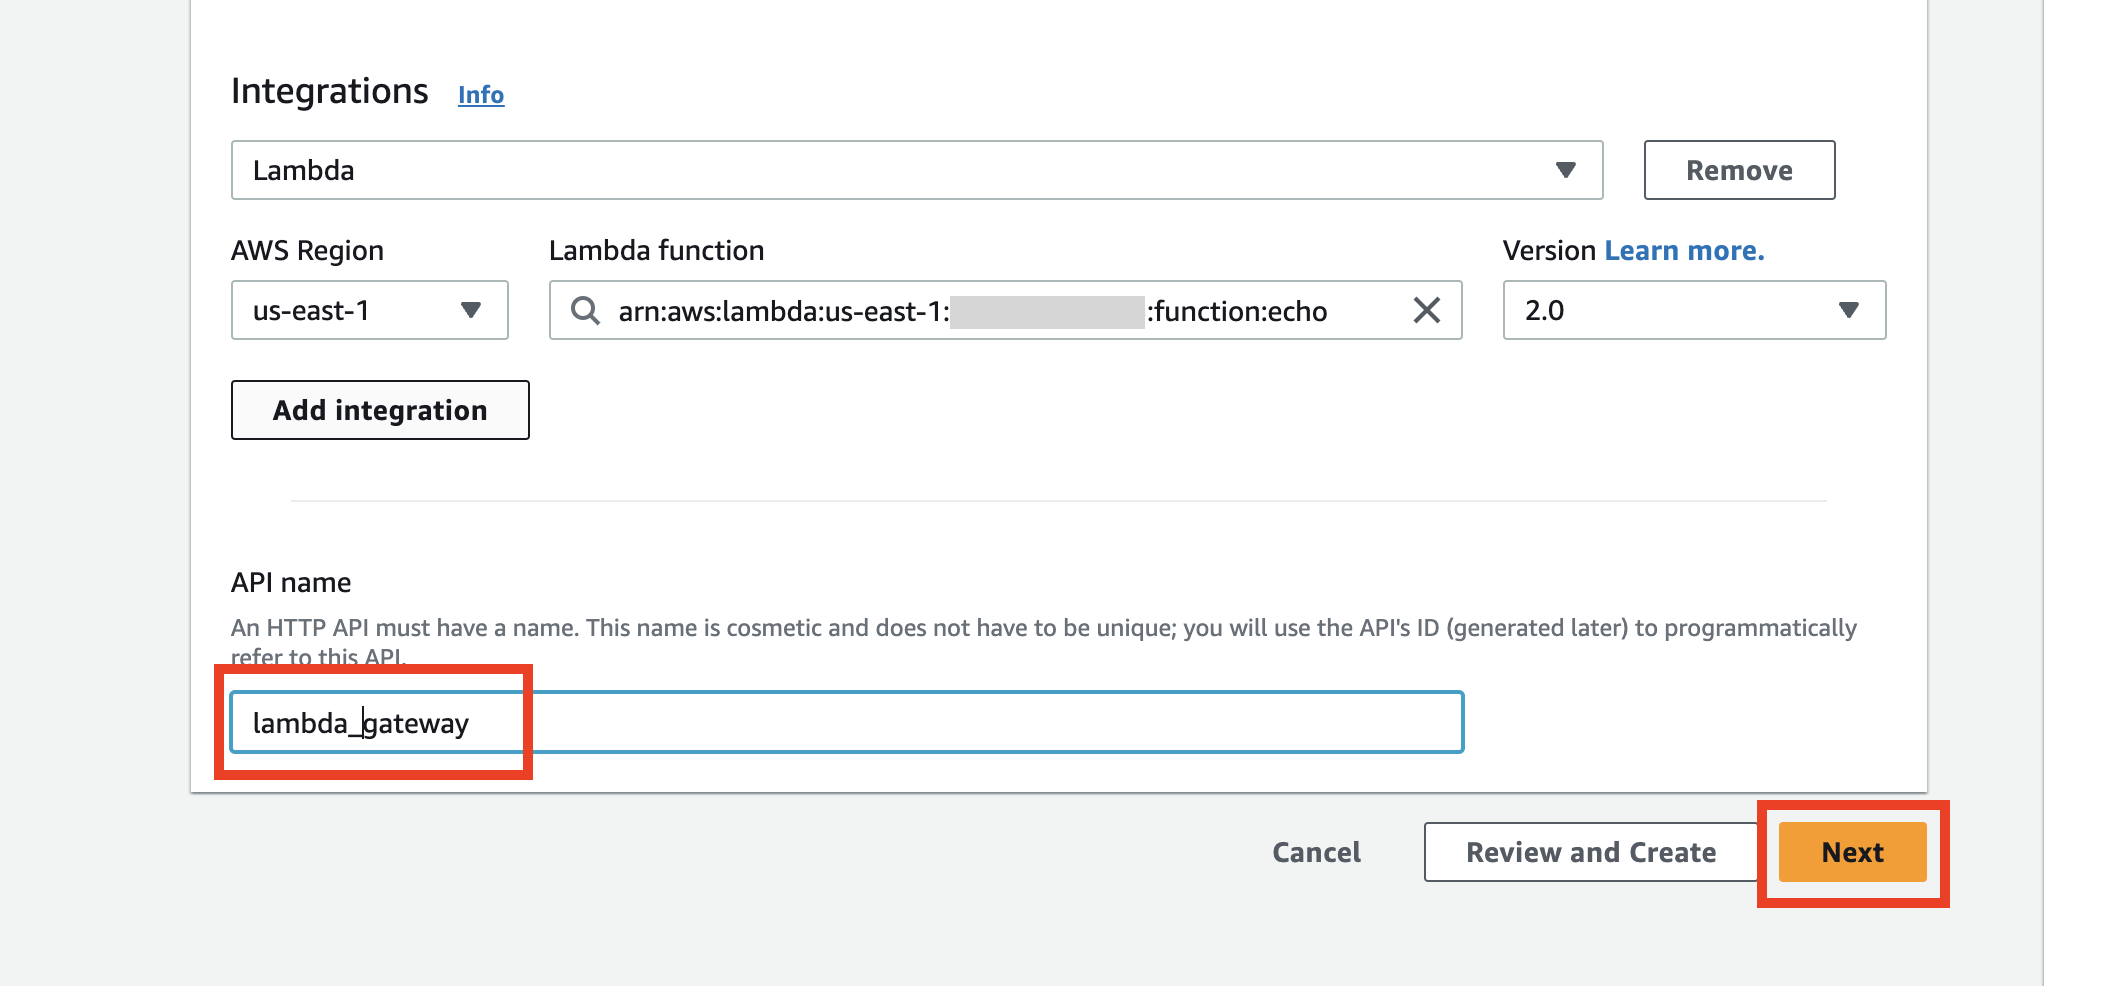
Now you need to specify the Gateway name - let's use lambda_gateway and click the Next button.
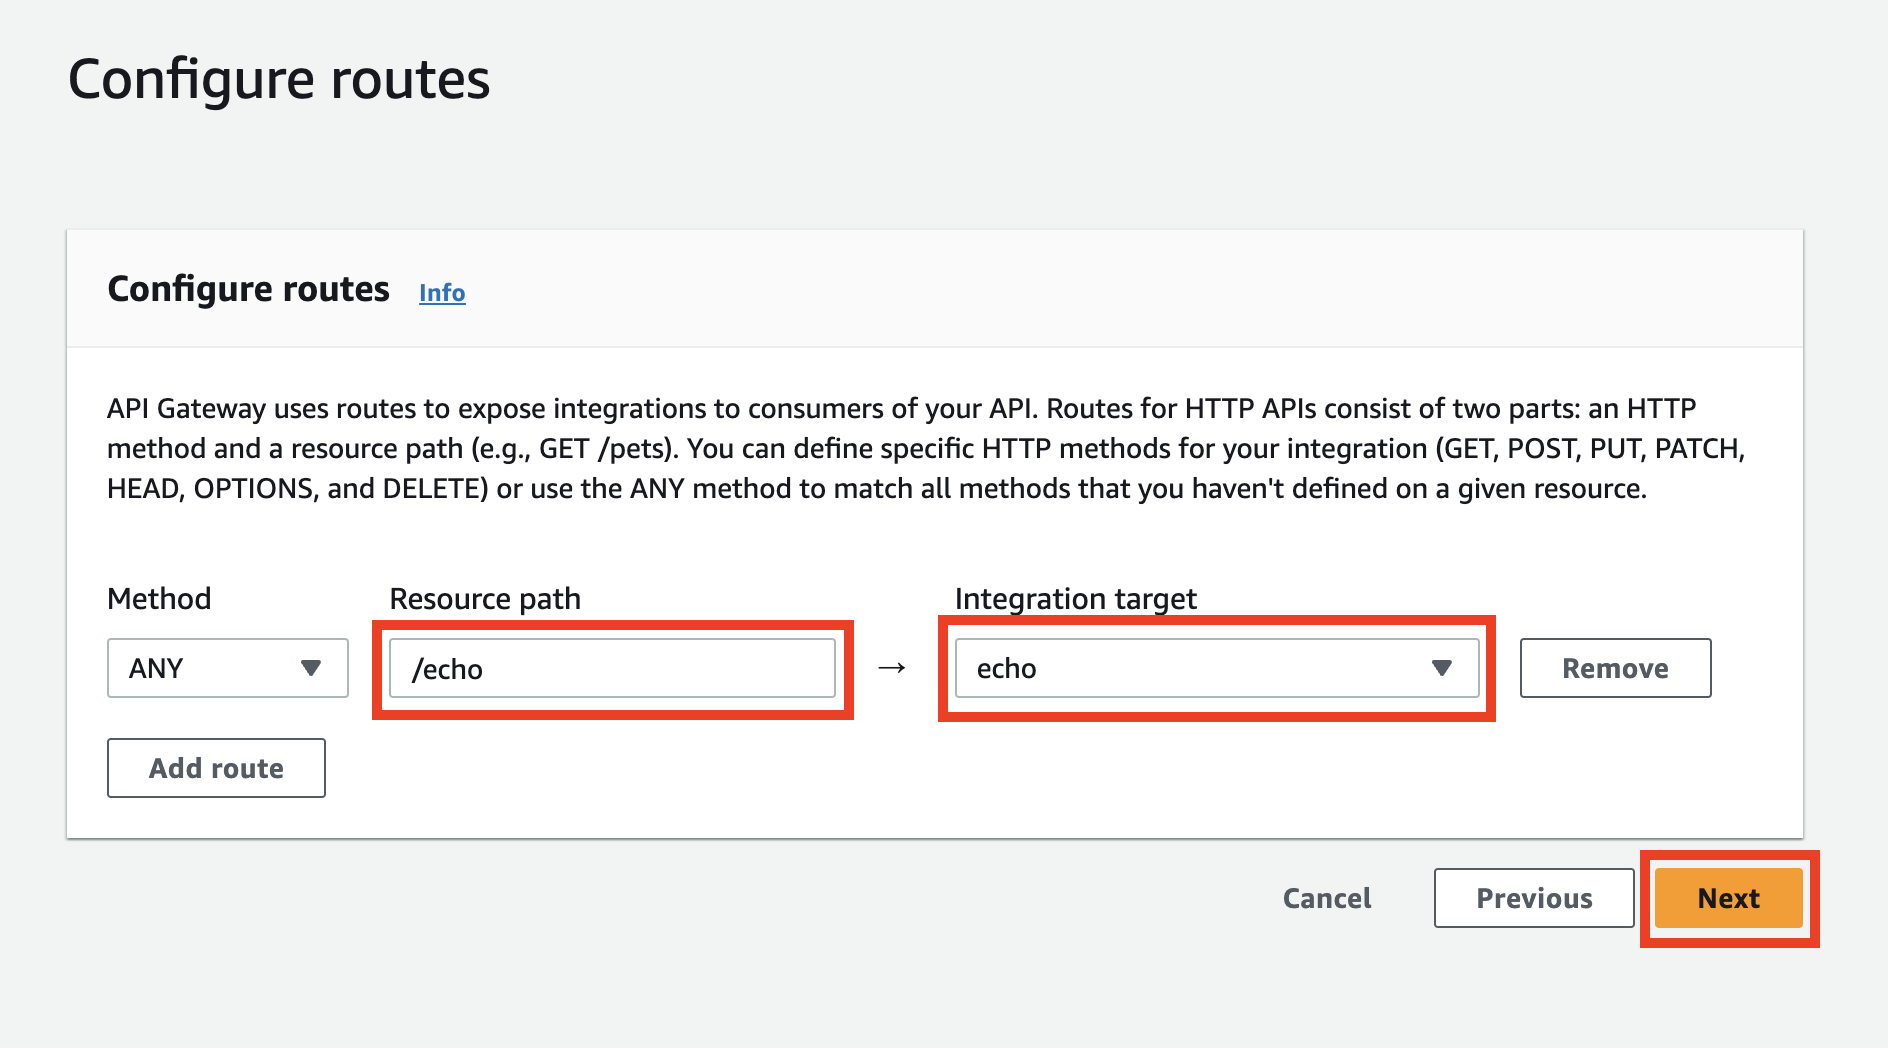
In the next step, you should see a pre-configured route. Double-check the settings and if they are correct, click the Next button.
Adding a stage
The next step is adding a stage to our API Gateway.
- Terraform
- AWS UI
resource "aws_apigatewayv2_stage" "lambda_test" {
  api_id = aws_apigatewayv2_api.lambda_gateway.id

  name        = "test"
  auto_deploy = true

  default_route_settings {
    data_trace_enabled       = true
    logging_level            = "INFO"
    detailed_metrics_enabled = true

    # you need to set it
    throttling_rate_limit  = 100
    throttling_burst_limit = 100
  }
  access_log_settings {
    destination_arn = aws_cloudwatch_log_group.lambda_gateway.arn
    format          = "$context.identity.sourceIp $context.identity.caller $context.identity.user [$context.requestTime] \"$context.httpMethod $context.resourcePath $context.protocol\" $context.status $context.responseLength $context.requestId"
  }
}

resource "aws_cloudwatch_log_group" "lambda_gateway" {
  name = "/aws/apigateway/lambda_gateway"

  retention_in_days = 30
}

output "echo_url" {
  description = "Base URL for API Gateway stage."
  value       = format("%s/%s", aws_apigatewayv2_stage.lambda_test.invoke_url, "echo")
}
> terraform apply

Outputs:

echo_lambda_logs = "https://us-east-1.console.aws.amazon.com/lambda/home?region=us-east-1#/functions/echo?tab=monitoring"
echo_url = "https://[API ID].execute-api.us-east-1.amazonaws.com/test/echo"
You should see in the output the echo_url with the URL where the Lambda is exposed.
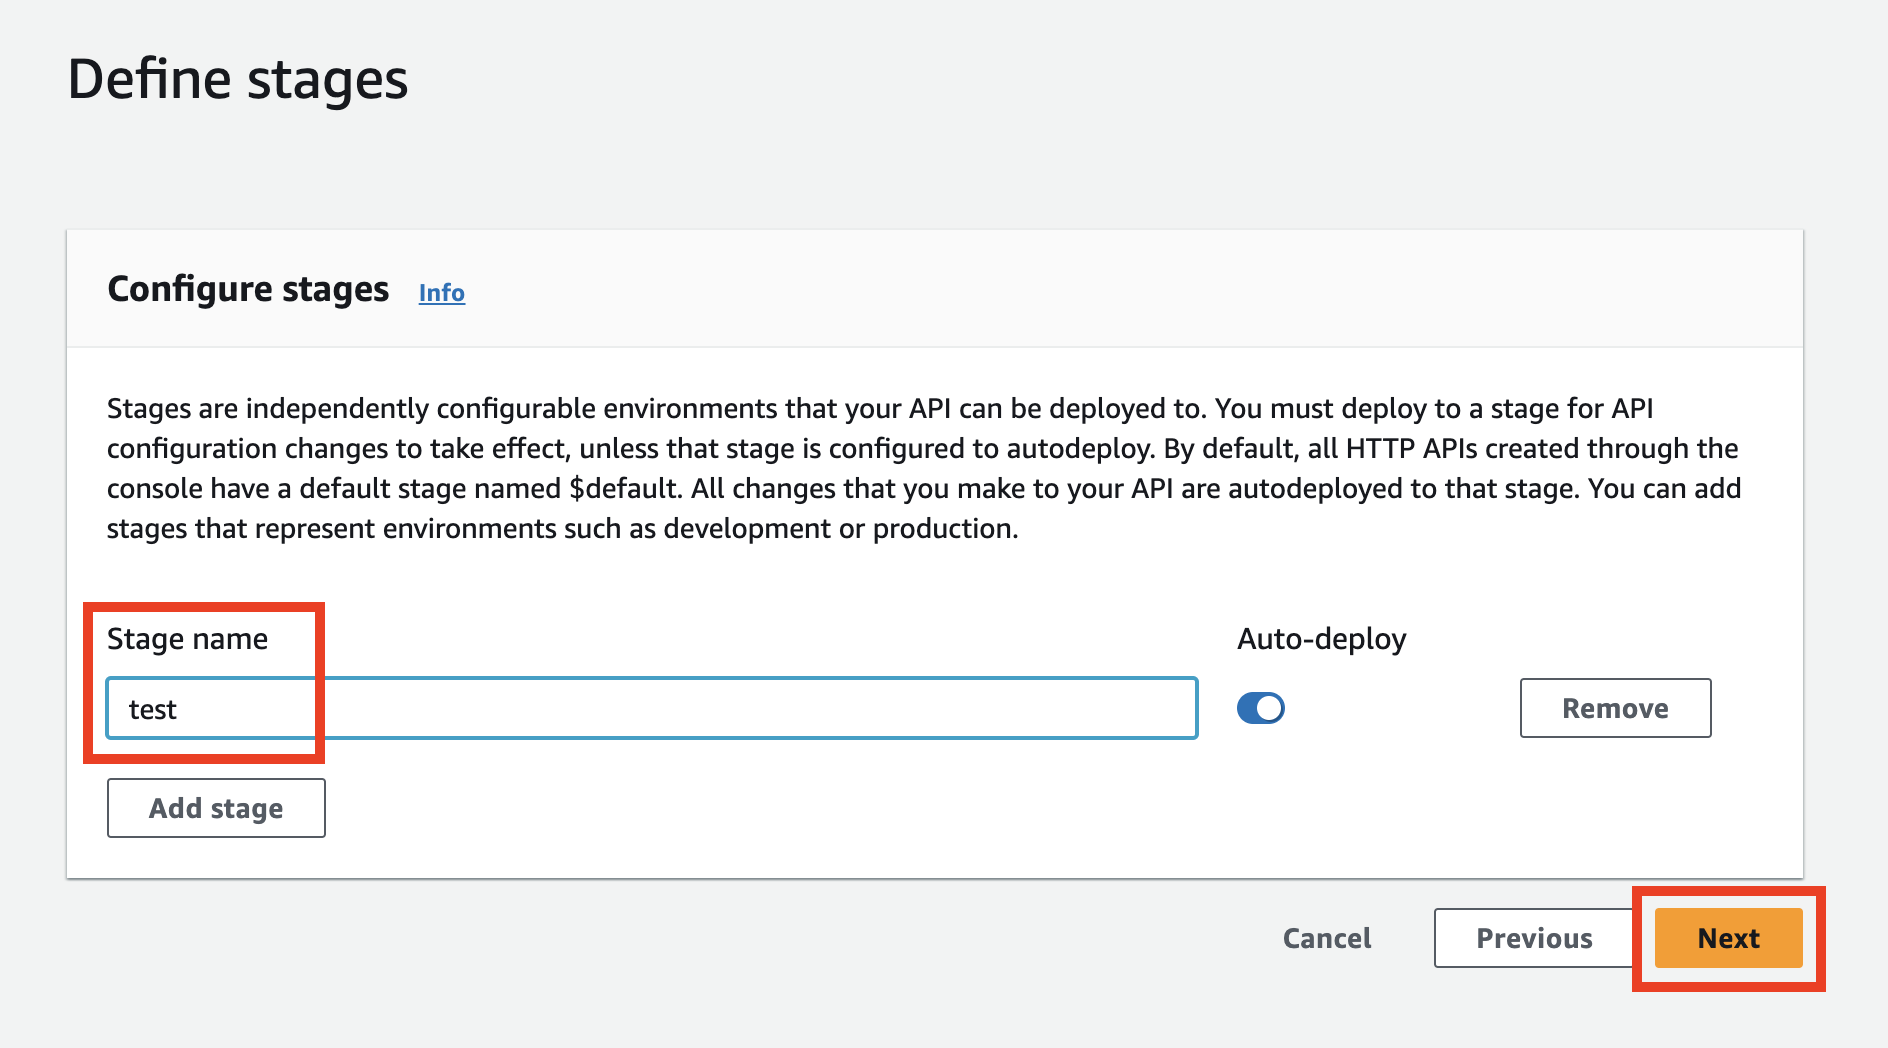
In this step, you need to specify the stage name. Let's use test and click the Next button.
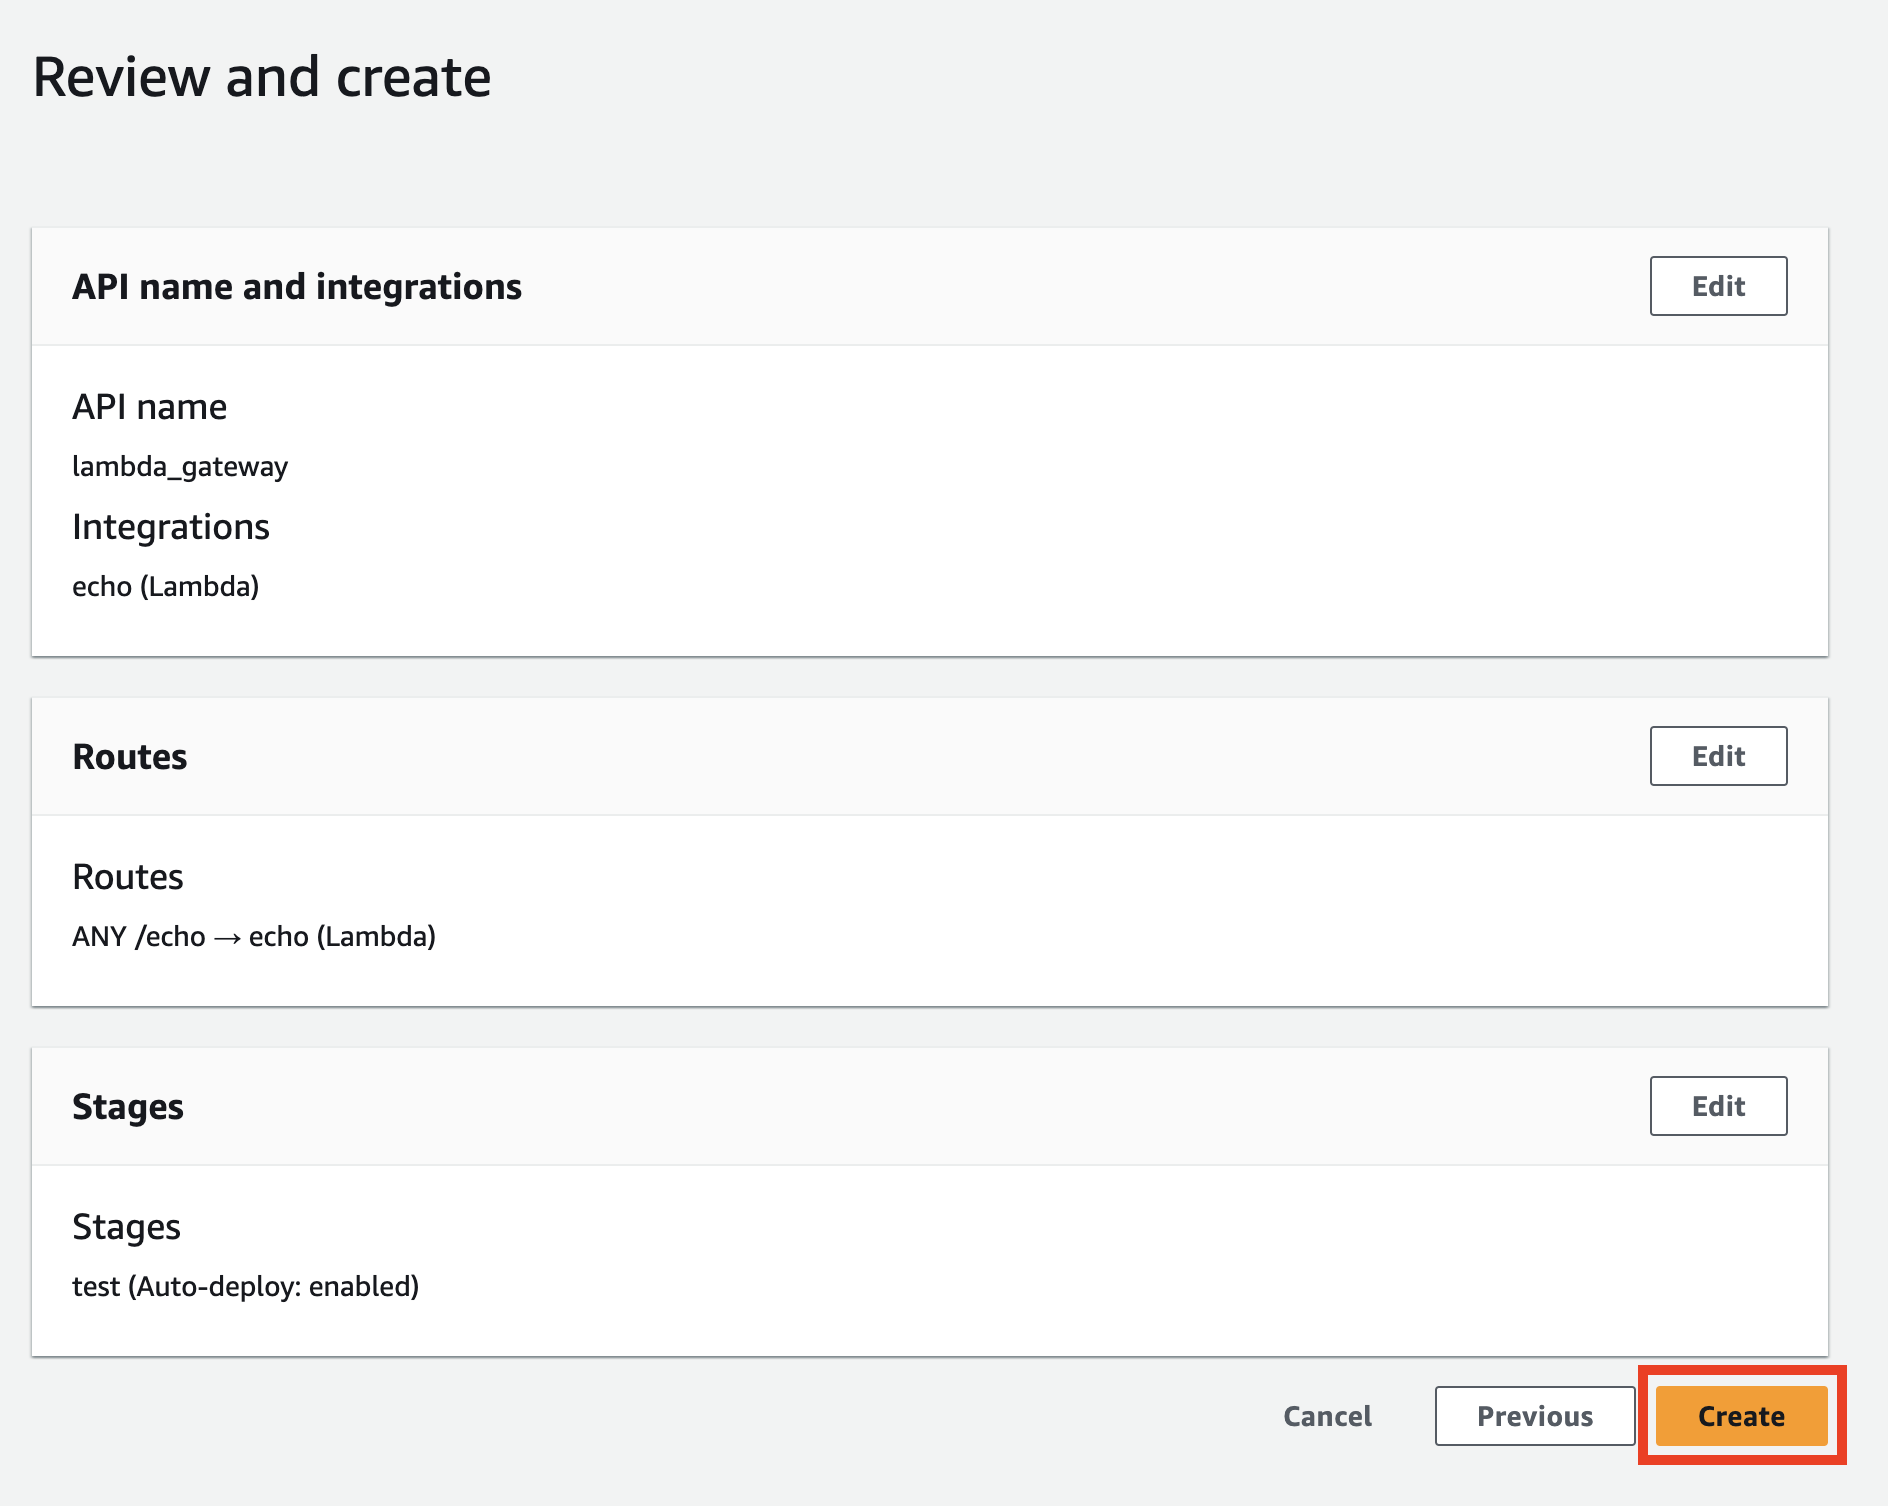
In the previous step, you can see the summary of the configuration.
After verifying everything is correct, click the Create button.
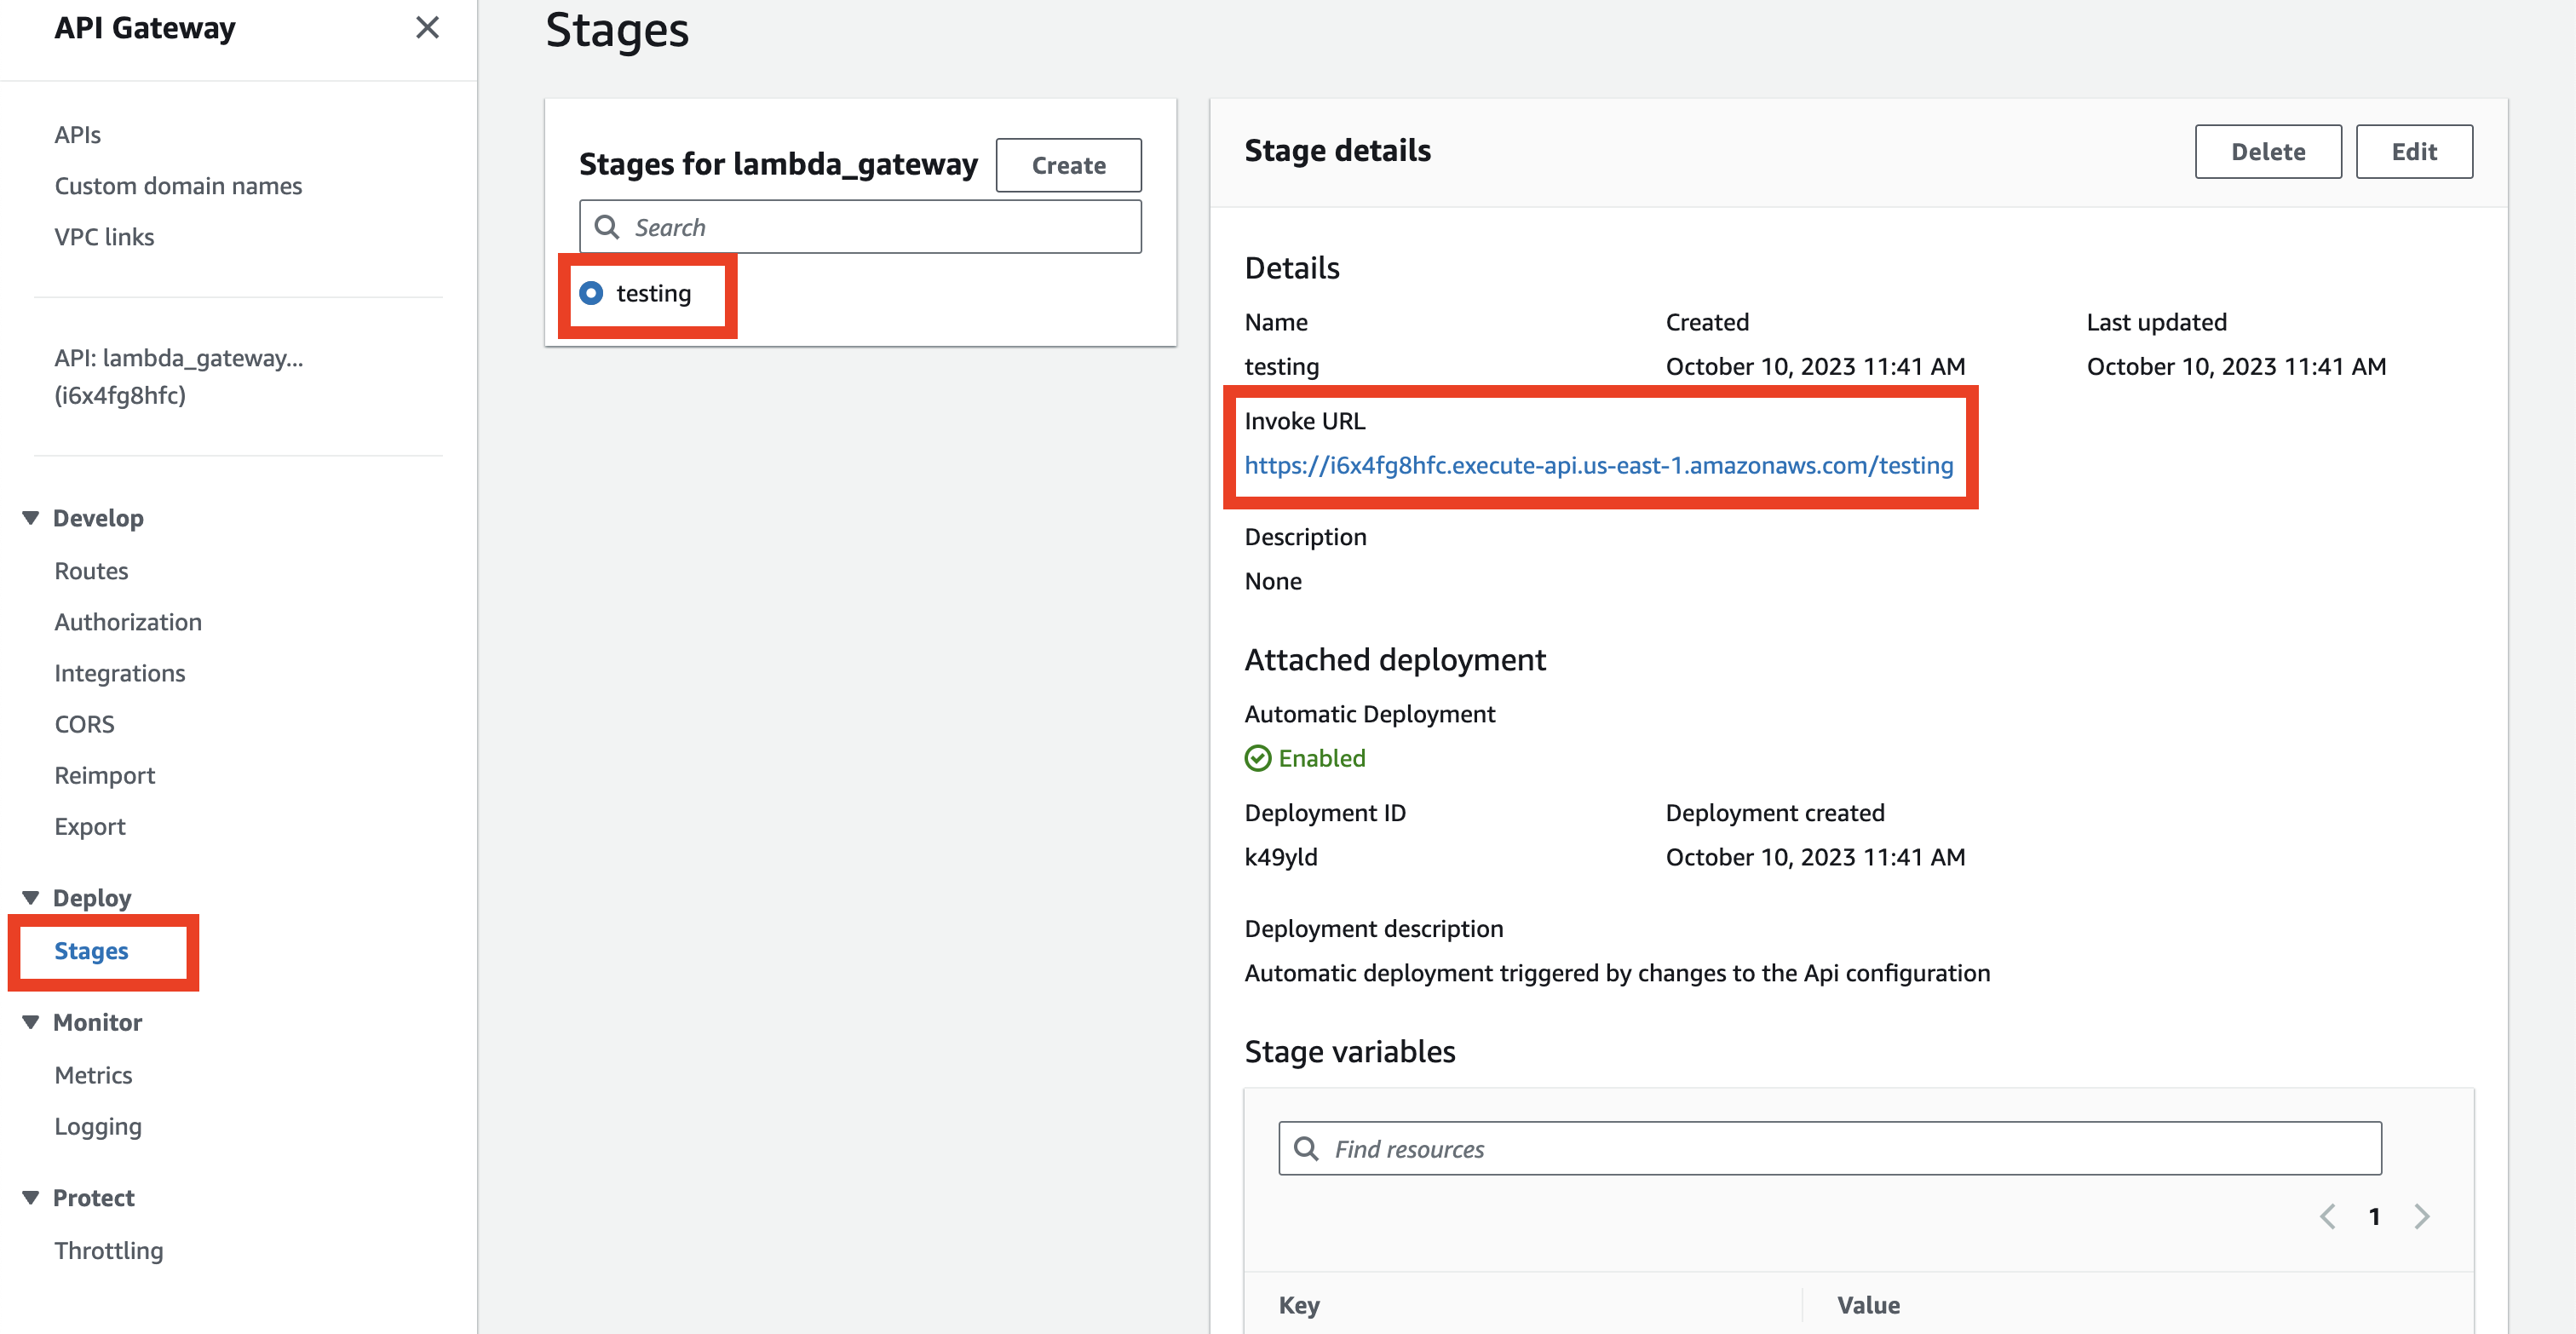
You can now find the public address of your echo function in the Stages tab.
Choose the Stages tab, click the test stage name, and you should see the URL.
To call a specific Lambda, add /echo at the end of the URL. So, for example, for https://i6x4fg8hfc.execute-api.us-east-1.amazonaws.com/testing you need to call https://i6x4fg8hfc.execute-api.us-east-1.amazonaws.com/testing/echo.
Verifying if API Gateway is working
Let's now use the public URL from the previous step to verify that our Lambda is available.
> curl https://[API ID].execute-api.us-east-1.amazonaws.com/test/echo

{"event":{"version":"1.0","routeKey":"","rawPath":"","rawQueryString":"","headers": // ...
If it doesn't work, please check the Troubleshooting page section at the end.
If it works, you can proceed to the next step and set up JWT validation with Gate.
Configuring Gate
Now you have a working Gateway, it's time to add Gate.
Deploying Gate
In the beginning, we need to deploy Gate as a Lambda function.
It's a similar process to what we did with the echo function.
We will prepare a zip file with Gate binary in the format required for Amazon Linux 2 runtime.
- Terraform
- AWS UI
resource "null_resource" "download_gate" {
  provisioner "local-exec" {
    command = "mkdir -p gate && cd gate && wget -O- https://cdn.slashid.com/releases/latest/gate-free_latest_linux_arm64.tar.gz | tar xz && mv gate-free bootstrap"
  }
}

data "archive_file" "gate_zip" {
  depends_on = [
    null_resource.download_gate
  ]

  source_dir  = "./gate/"
  output_path = "${path.module}/gate.zip"
  type        = "zip"
}

resource "aws_lambda_function" "gate" {
  function_name = "gate"
  role          = aws_iam_role.lambda_exec.arn
  handler       = "gate.handler"

  runtime       = "provided.al2"
  architectures = ["arm64"]

  filename         = "gate.zip"
  source_code_hash = data.archive_file.gate_zip.output_base64sha256

  environment {
    variables = {
      GATE_MODE      = "aws_lambda_auth"
      GATE_LOG_LEVEL = "debug"
    }
  }

  depends_on = [
    aws_iam_role_policy_attachment.lambda_logs,
  ]
}

output "gate_lambda_logs" {
  description = "Gate lambda logs"
  value       = format(
    "https://%s.console.aws.amazon.com/lambda/home?region=%s#/functions/%s?tab=monitoring",
    data.aws_region.current.name,
    data.aws_region.current.name,
    aws_lambda_function.gate.function_name,
  )
}
All available environment variables are described in the Configuration page.
terraform apply
You should now see one extra output from Terraform: gate_lambda_logs.
Please navigate again to https://console.aws.amazon.com/lambda/home,
and click the Create function button.
We will use slightly different options for deploying Gate than for the echo function.
Gate can be deployed in two ways:
- In Amazon Linux 2 Runtime with an uploaded zip file with the Gate binary.
- As a Docker container.
In this tutorial, we will use Amazon Linux 2 Runtime.
If you want to deploy Gate using a Docker image, you will need to push the Docker image to AWS ECR.
To push the Gate image to ECR, you can use the following commands:
docker pull slashid/gate-free:latest

aws ecr get-login-password --region us-east-1 | docker login --username AWS --password-stdin 123456789.dkr.ecr.us-east-1.amazonaws.com

docker tag slashid/gate-free:latest 123456789.dkr.ecr.us-east-1.amazonaws.com/gate-free:latest
docker push 123456789.dkr.ecr.us-east-1.amazonaws.com/gate-free:latest
Where 123456789 is your Amazon ECR repository ID and us-east-1 is your region.
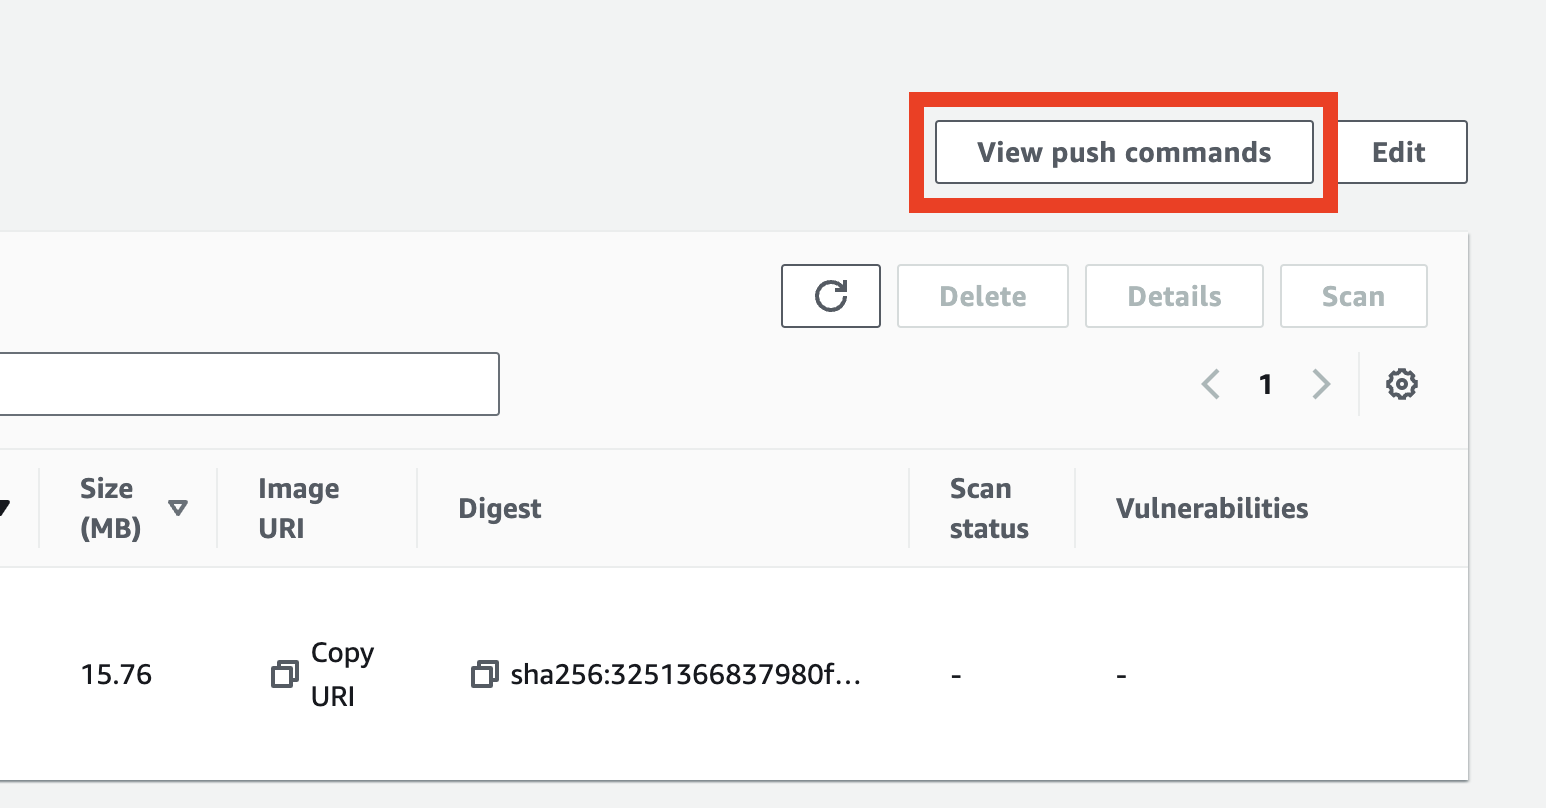
You can find exact commands to run in your AWS Console in the View push commands section.
The rest of the tutorial after creating the function will be the same whether you use a Docker image or a zip file.
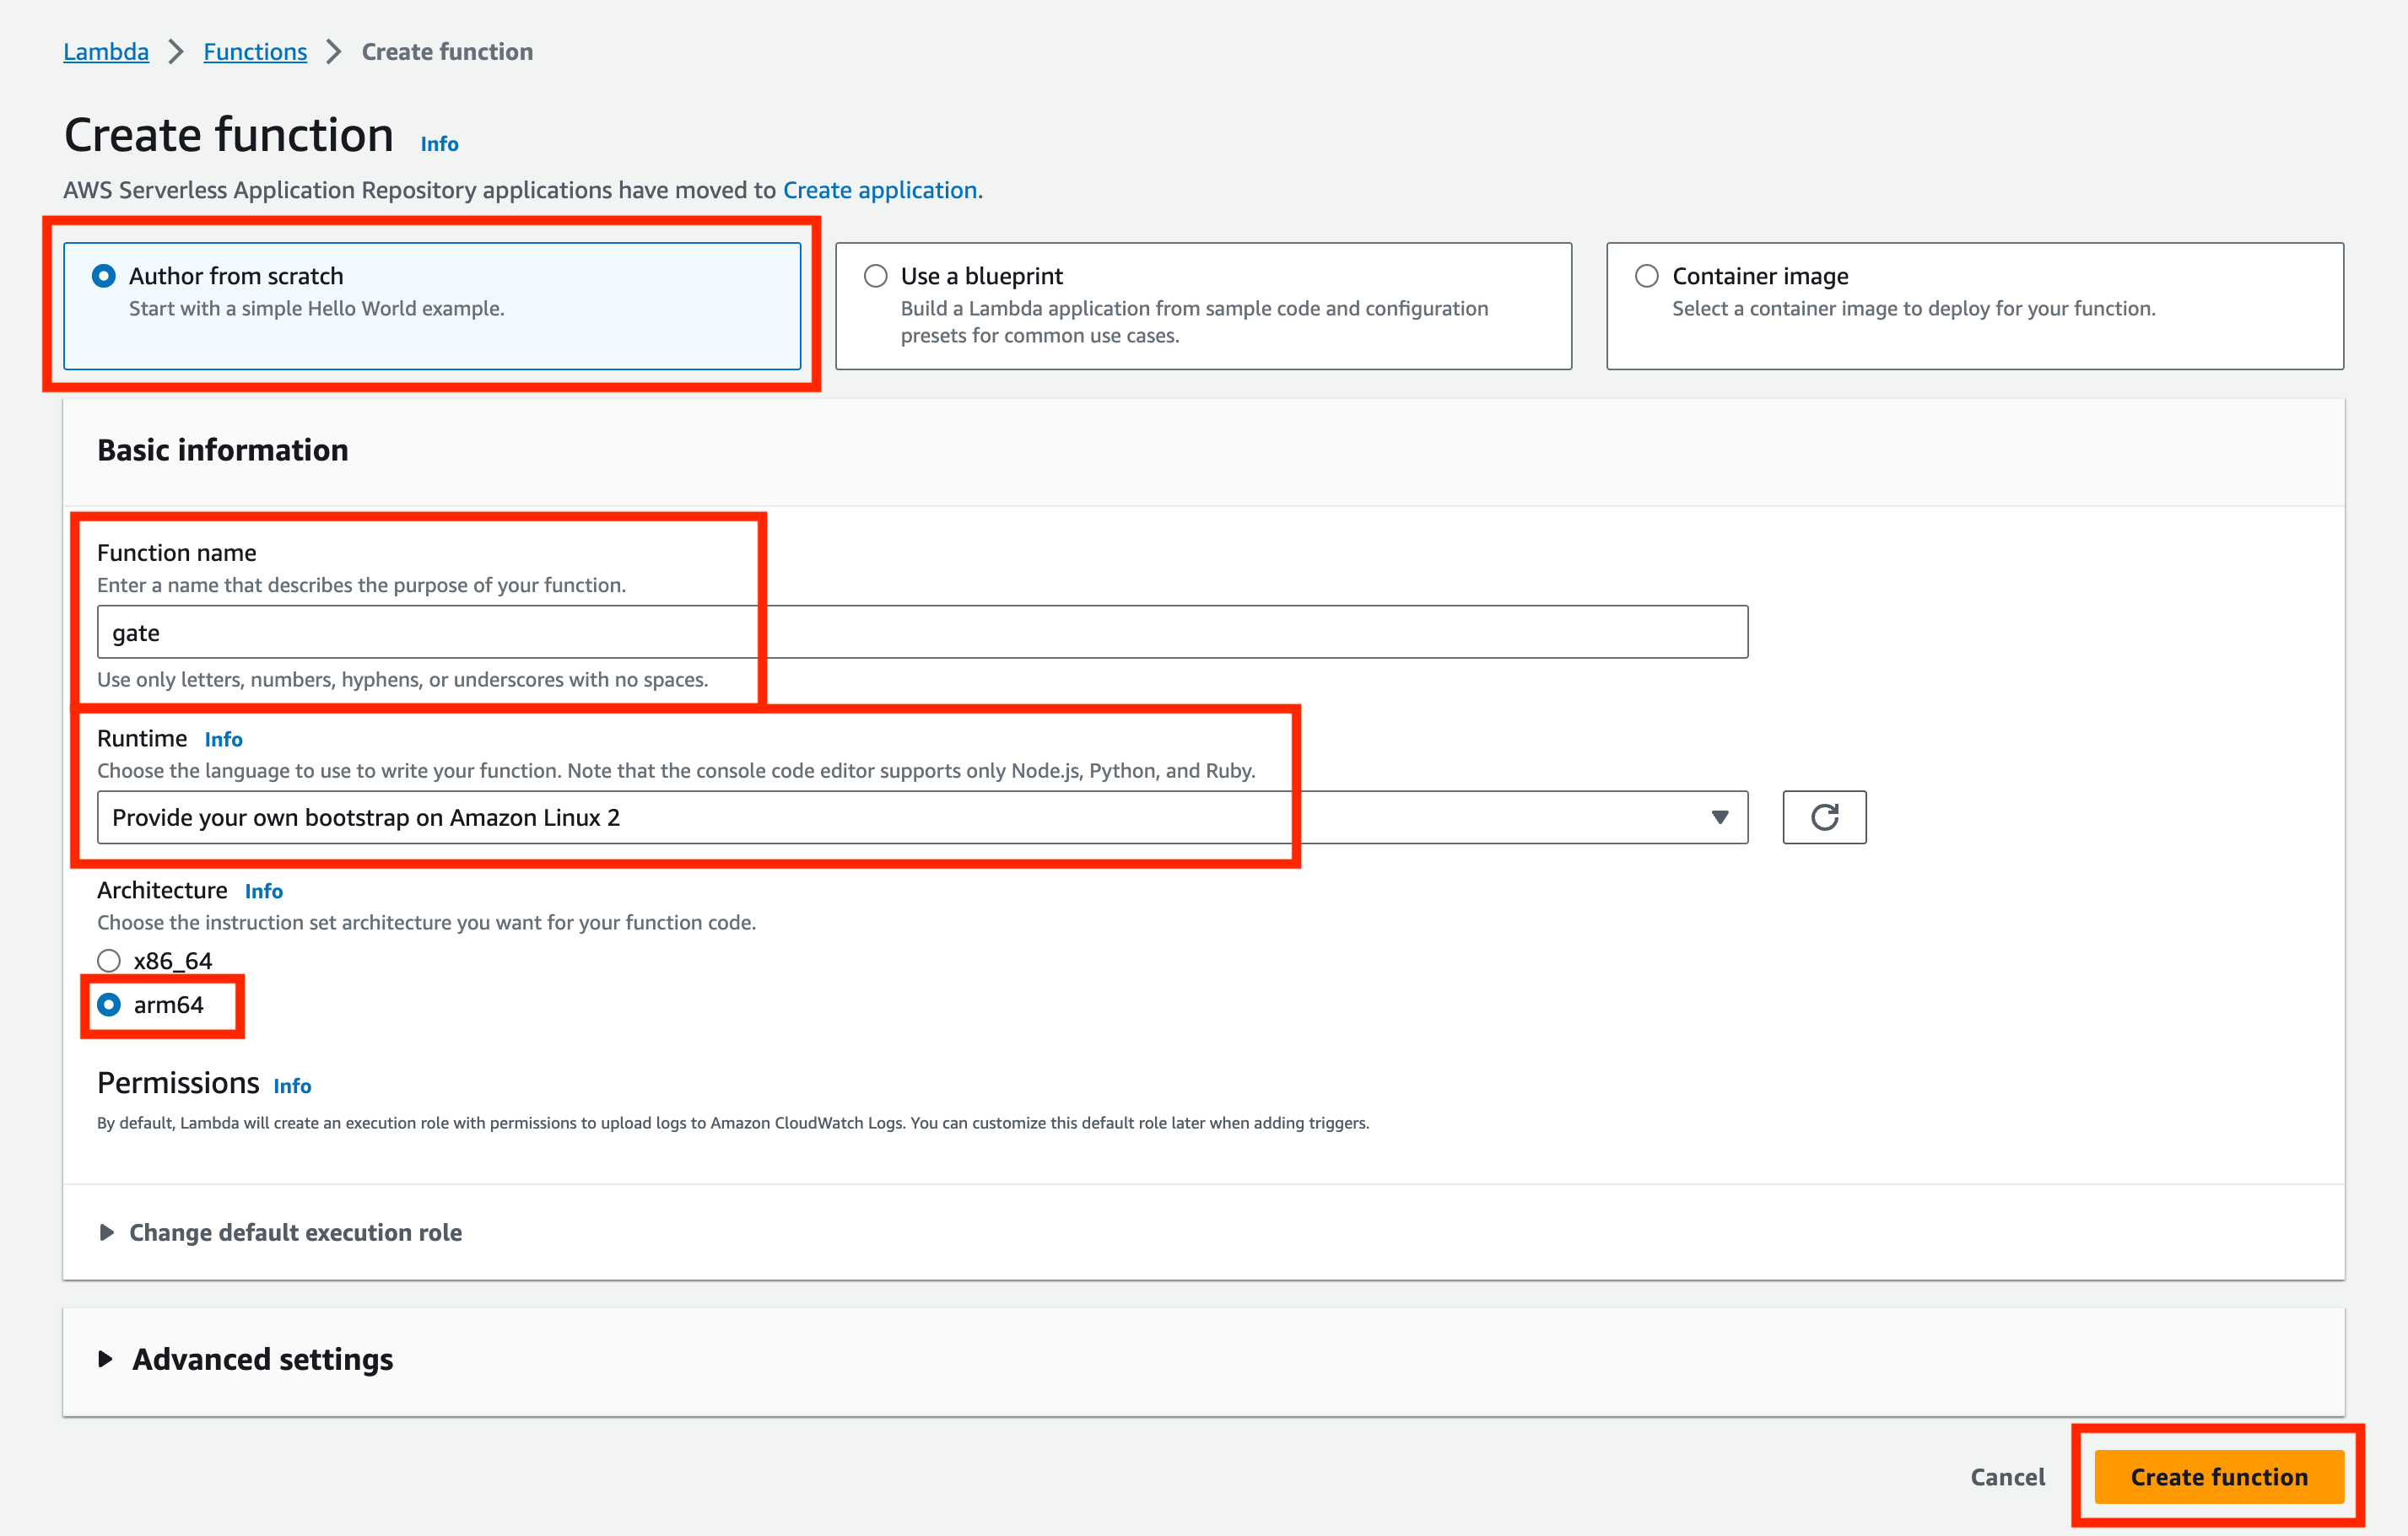
We want to choose the Author from scratch option (as long as you didn't decide to go with the Docker image).
Set the Function name to gate, choose Provide your bootstrap on Amazon Linux 2 as Runtime and architecture to ARM64.
You can also use x86_64 architecture, but we recommend using ARM64 as it's more cost-effective.
If you want to use x86_64 anyway, please use the correct binary.
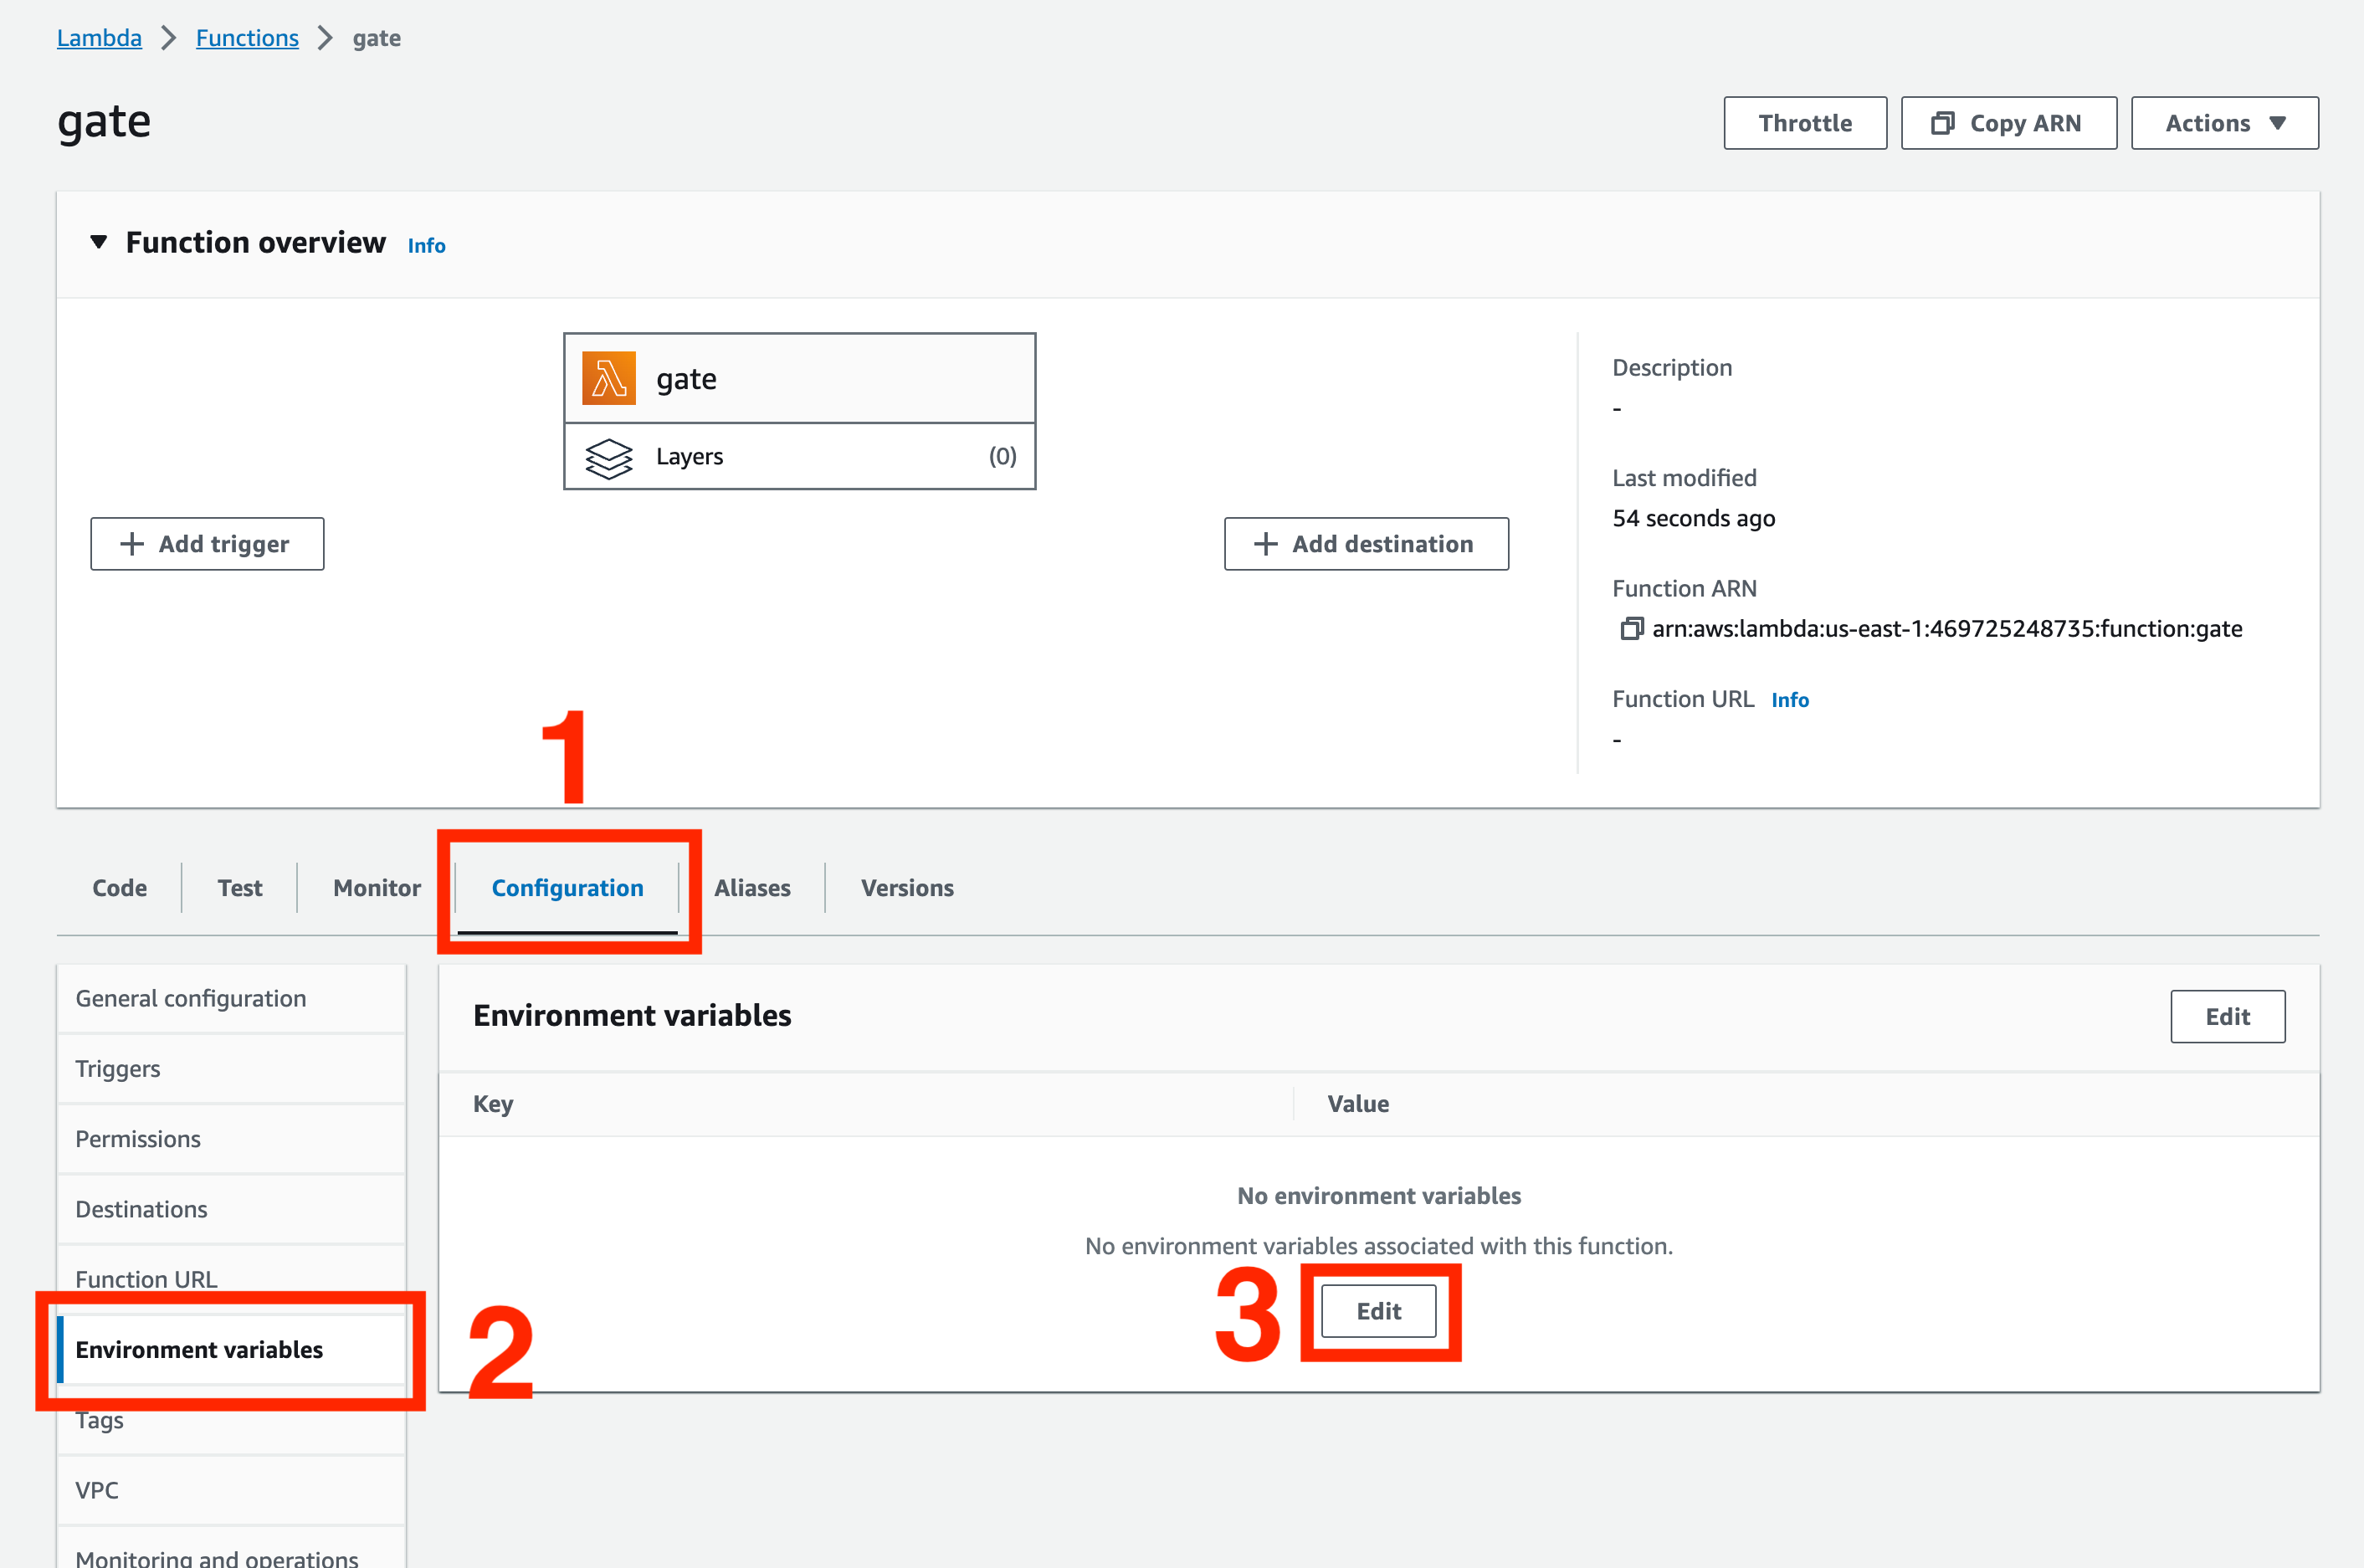
After creating the Gate Lambda function, we must configure it before deploying the binary. You can do it in the Configuration > Environment variables tab by clicking the Edit button.
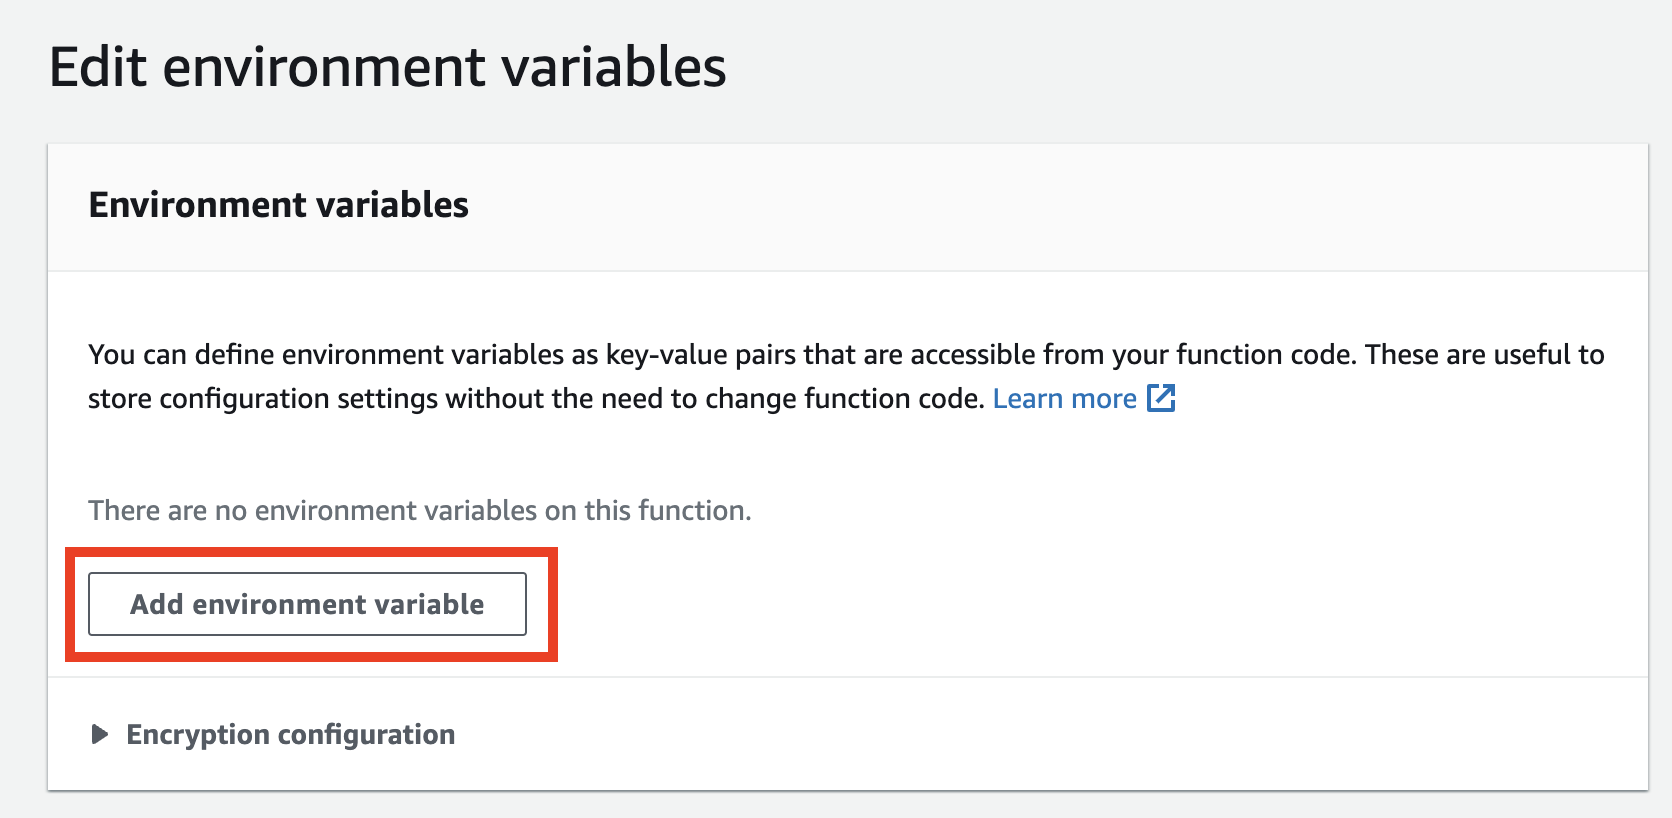
In this tab, please click the Add environment variable button and add the following variables:
GATE_LOG_LEVEL=debug
GATE_MODE=aws_lambda_auth
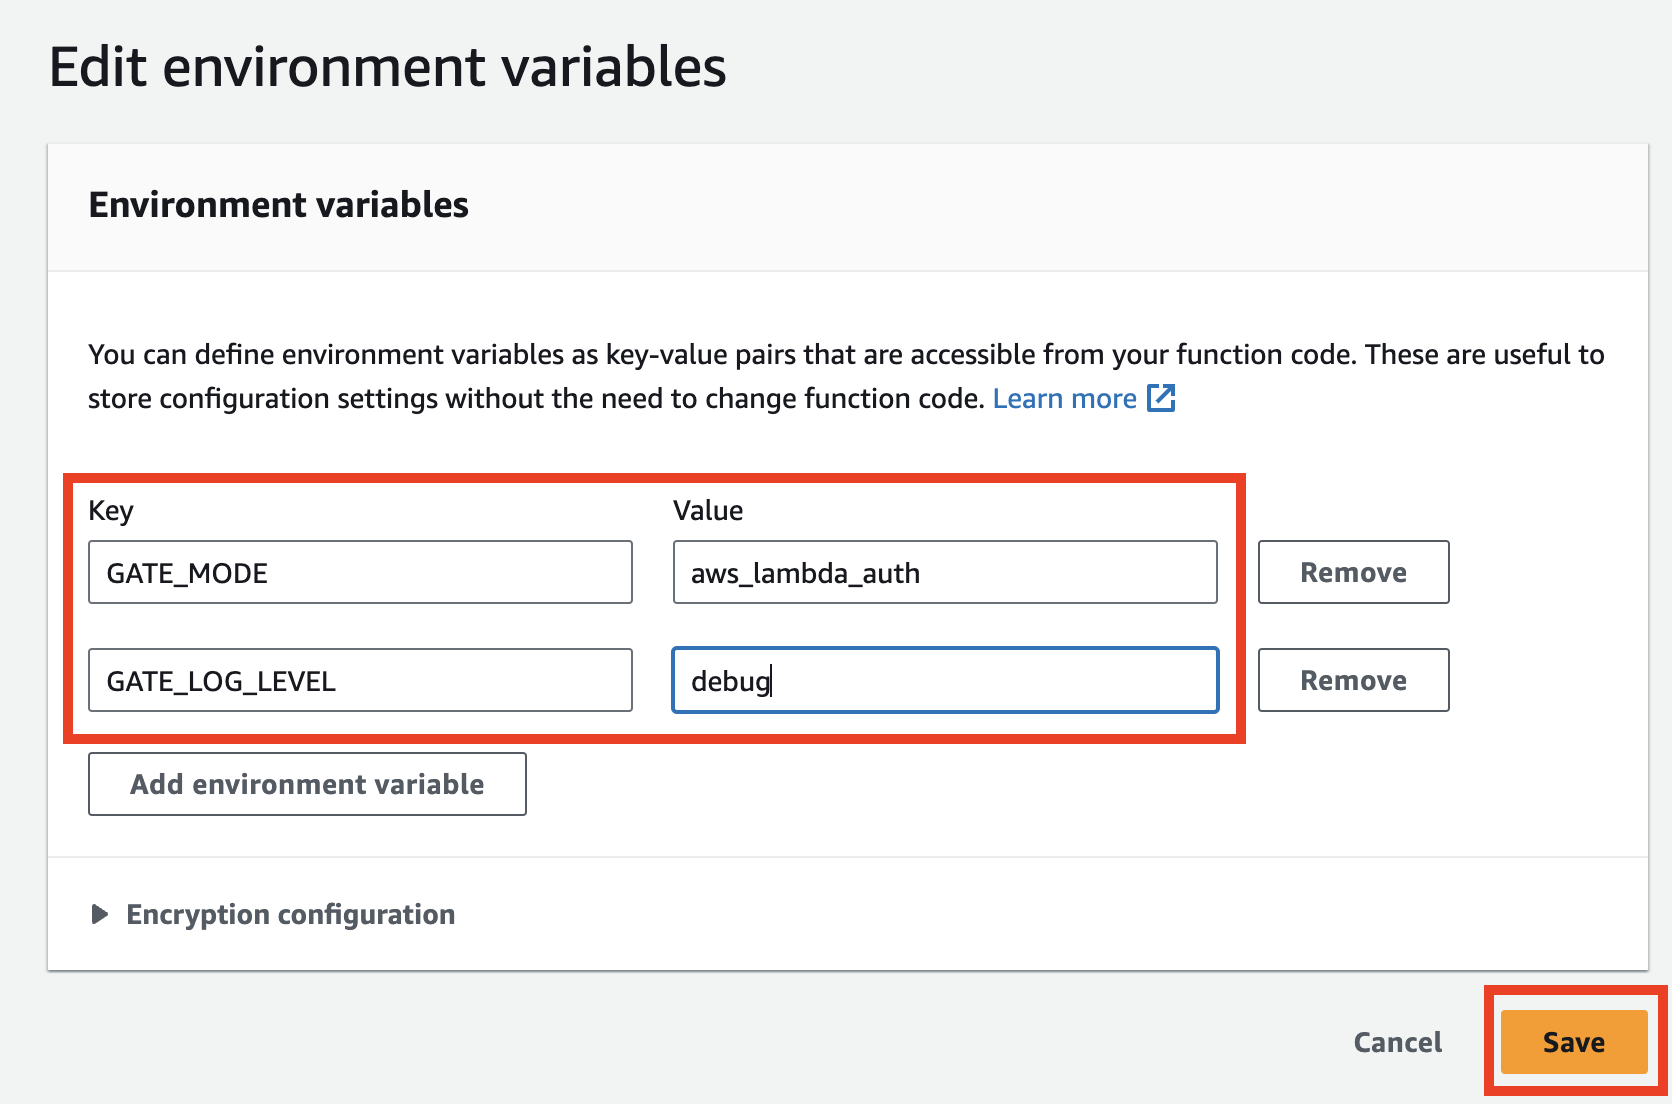
It will run Gate in AWS Lambda mode and enable debug logs.
All available environment variables are described in the Configuration page.
You must prepare a zip file with Gate binary in the format required for Amazon Linux 2 runtime. You can prepare it by running the following commands:
wget -O- https://cdn.slashid.com/releases/latest/gate-free_latest_linux_arm64.tar.gz | tar xz
mv gate-free bootstrap
zip gate.zip bootstrap
Now, you can upload the created gate.zip file to your gate Lambda by clicking Upload from > .zip file in the Code tab.

Verifying if Gate is working
Navigate to the Test tab in Lambda configuration and paste the following JSON to the Event JSON field:
{
  "version": "2.0",
  "type": "REQUEST",
  "routeArn": "arn:aws:execute-api:us-east-1:123456:i6x4fg8hfc/test/GET/echo",
  "routeKey": "GET /echo",
  "rawPath": "/test/echo",
  "rawQueryString": "",
  "cookies": null,
  "headers": {
    "accept": "*/*",
    "accept-encoding": "gzip, deflate",
    "authorization": "Bearer topsecret",
    "cache-control": "no-cache, no-store, must-revalidate,max-age=0",
    "content-length": "0",
    "host": "i6x4fg8hfc.execute-api.us-east-1.amazonaws.com",
    "pragma": "no-cache",
    "x-forwarded-for": "127.0.0.1",
    "x-forwarded-port": "443",
    "x-forwarded-proto": "https"
  },
  "queryStringParameters": null,
  "requestContext": {
    "routeKey": "GET /echo",
    "accountId": "123456789",
    "stage": "test",
    "requestId": "MX_NWiSDoAMEaRg=",
    "apiId": "i6x4fg8hfc",
    "domainName": "i6x4fg8hfc.execute-api.us-east-1.amazonaws.com",
    "domainPrefix": "i6x4fg8hfc",
    "time": "06/Oct/2023:10:19:13 +0000",
    "timeEpoch": 1696587553924,
    "http": {
      "method": "GET",
      "path": "/test/echo",
      "protocol": "HTTP/1.1",
      "sourceIp": "127.0.0.1",
      "userAgent": "curl"
    }
  }
}
Now click the Test button. If everything works correctly, you should see the banner:

When you extend the Details section, you should see logs and output from Gate Lambda.
Configuring Gate as Lambda Authorizer
Finally, we need to make API Gateway use Gate as a Lambda Authorizer. This needs to be configured explicitly. Let's start by adding a new authorizer.
- Terraform
- AWS UI
resource "aws_apigatewayv2_authorizer" "gate" {
  api_id                            = aws_apigatewayv2_api.lambda_gateway.id
  authorizer_type                   = "REQUEST"
  authorizer_uri                    = aws_lambda_function.gate.invoke_arn
  identity_sources                  = ["$request.header.Authorization"]
  name                              = "gate"
  authorizer_payload_format_version = "2.0"
  enable_simple_responses           = true

  authorizer_result_ttl_in_seconds = 0
}

resource "aws_lambda_permission" "authorizer_permission" {
  statement_id  = "AllowAPIGatewayInvoke"
  action        = "lambda:InvokeFunction"
  function_name = aws_lambda_function.gate.function_name
  principal     = "apigateway.amazonaws.com"

  source_arn = "${aws_apigatewayv2_api.lambda_gateway.execution_arn}/authorizers/${aws_apigatewayv2_authorizer.gate.id}"
}
Now you can run:
terraform apply
and see if everything worked properly.
Sometimes, AWS doesn't reflect changes in API Gateway configuration.
You can try to destroy the aws_apigatewayv2_stage.lambda_test resource
(for example, by removing it from terraform and running terraform apply, then putting it back and running terraform apply again).
in the AWS Console, open API Gateway configuration.
After choosing lambda_gateway API, click Authorization, open the Manage authorizers tab and then click the Create button.
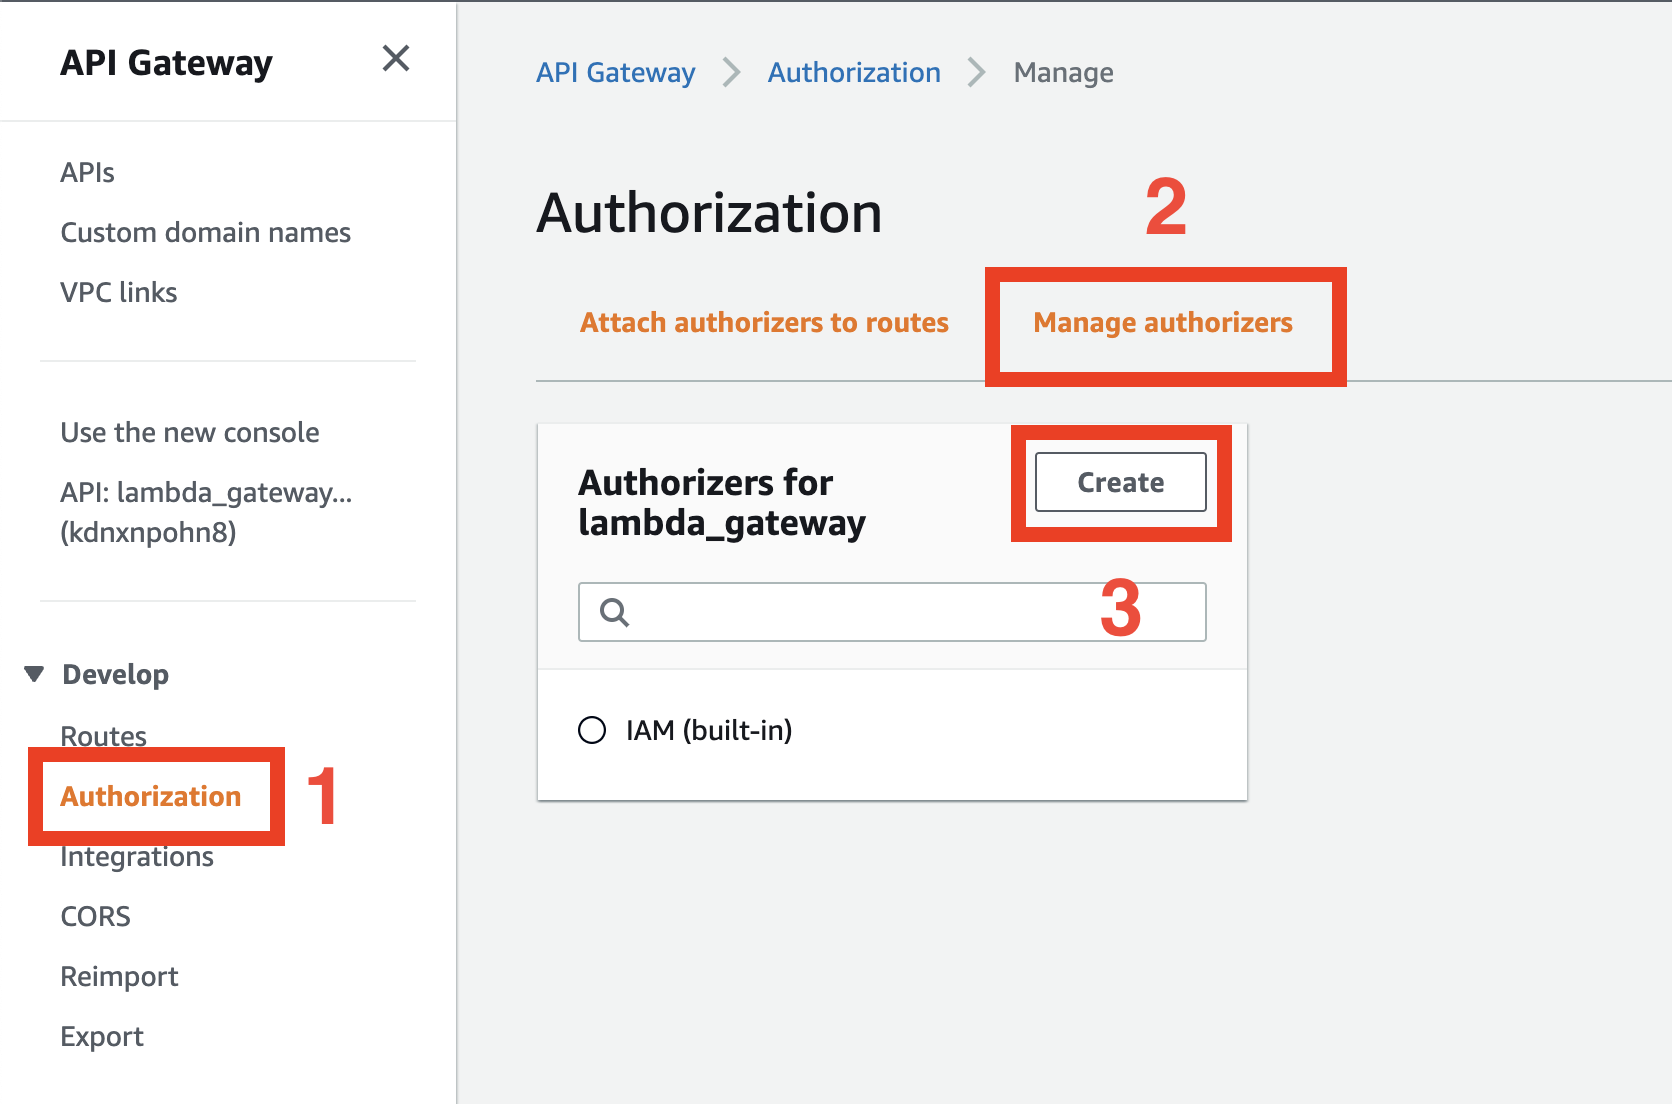
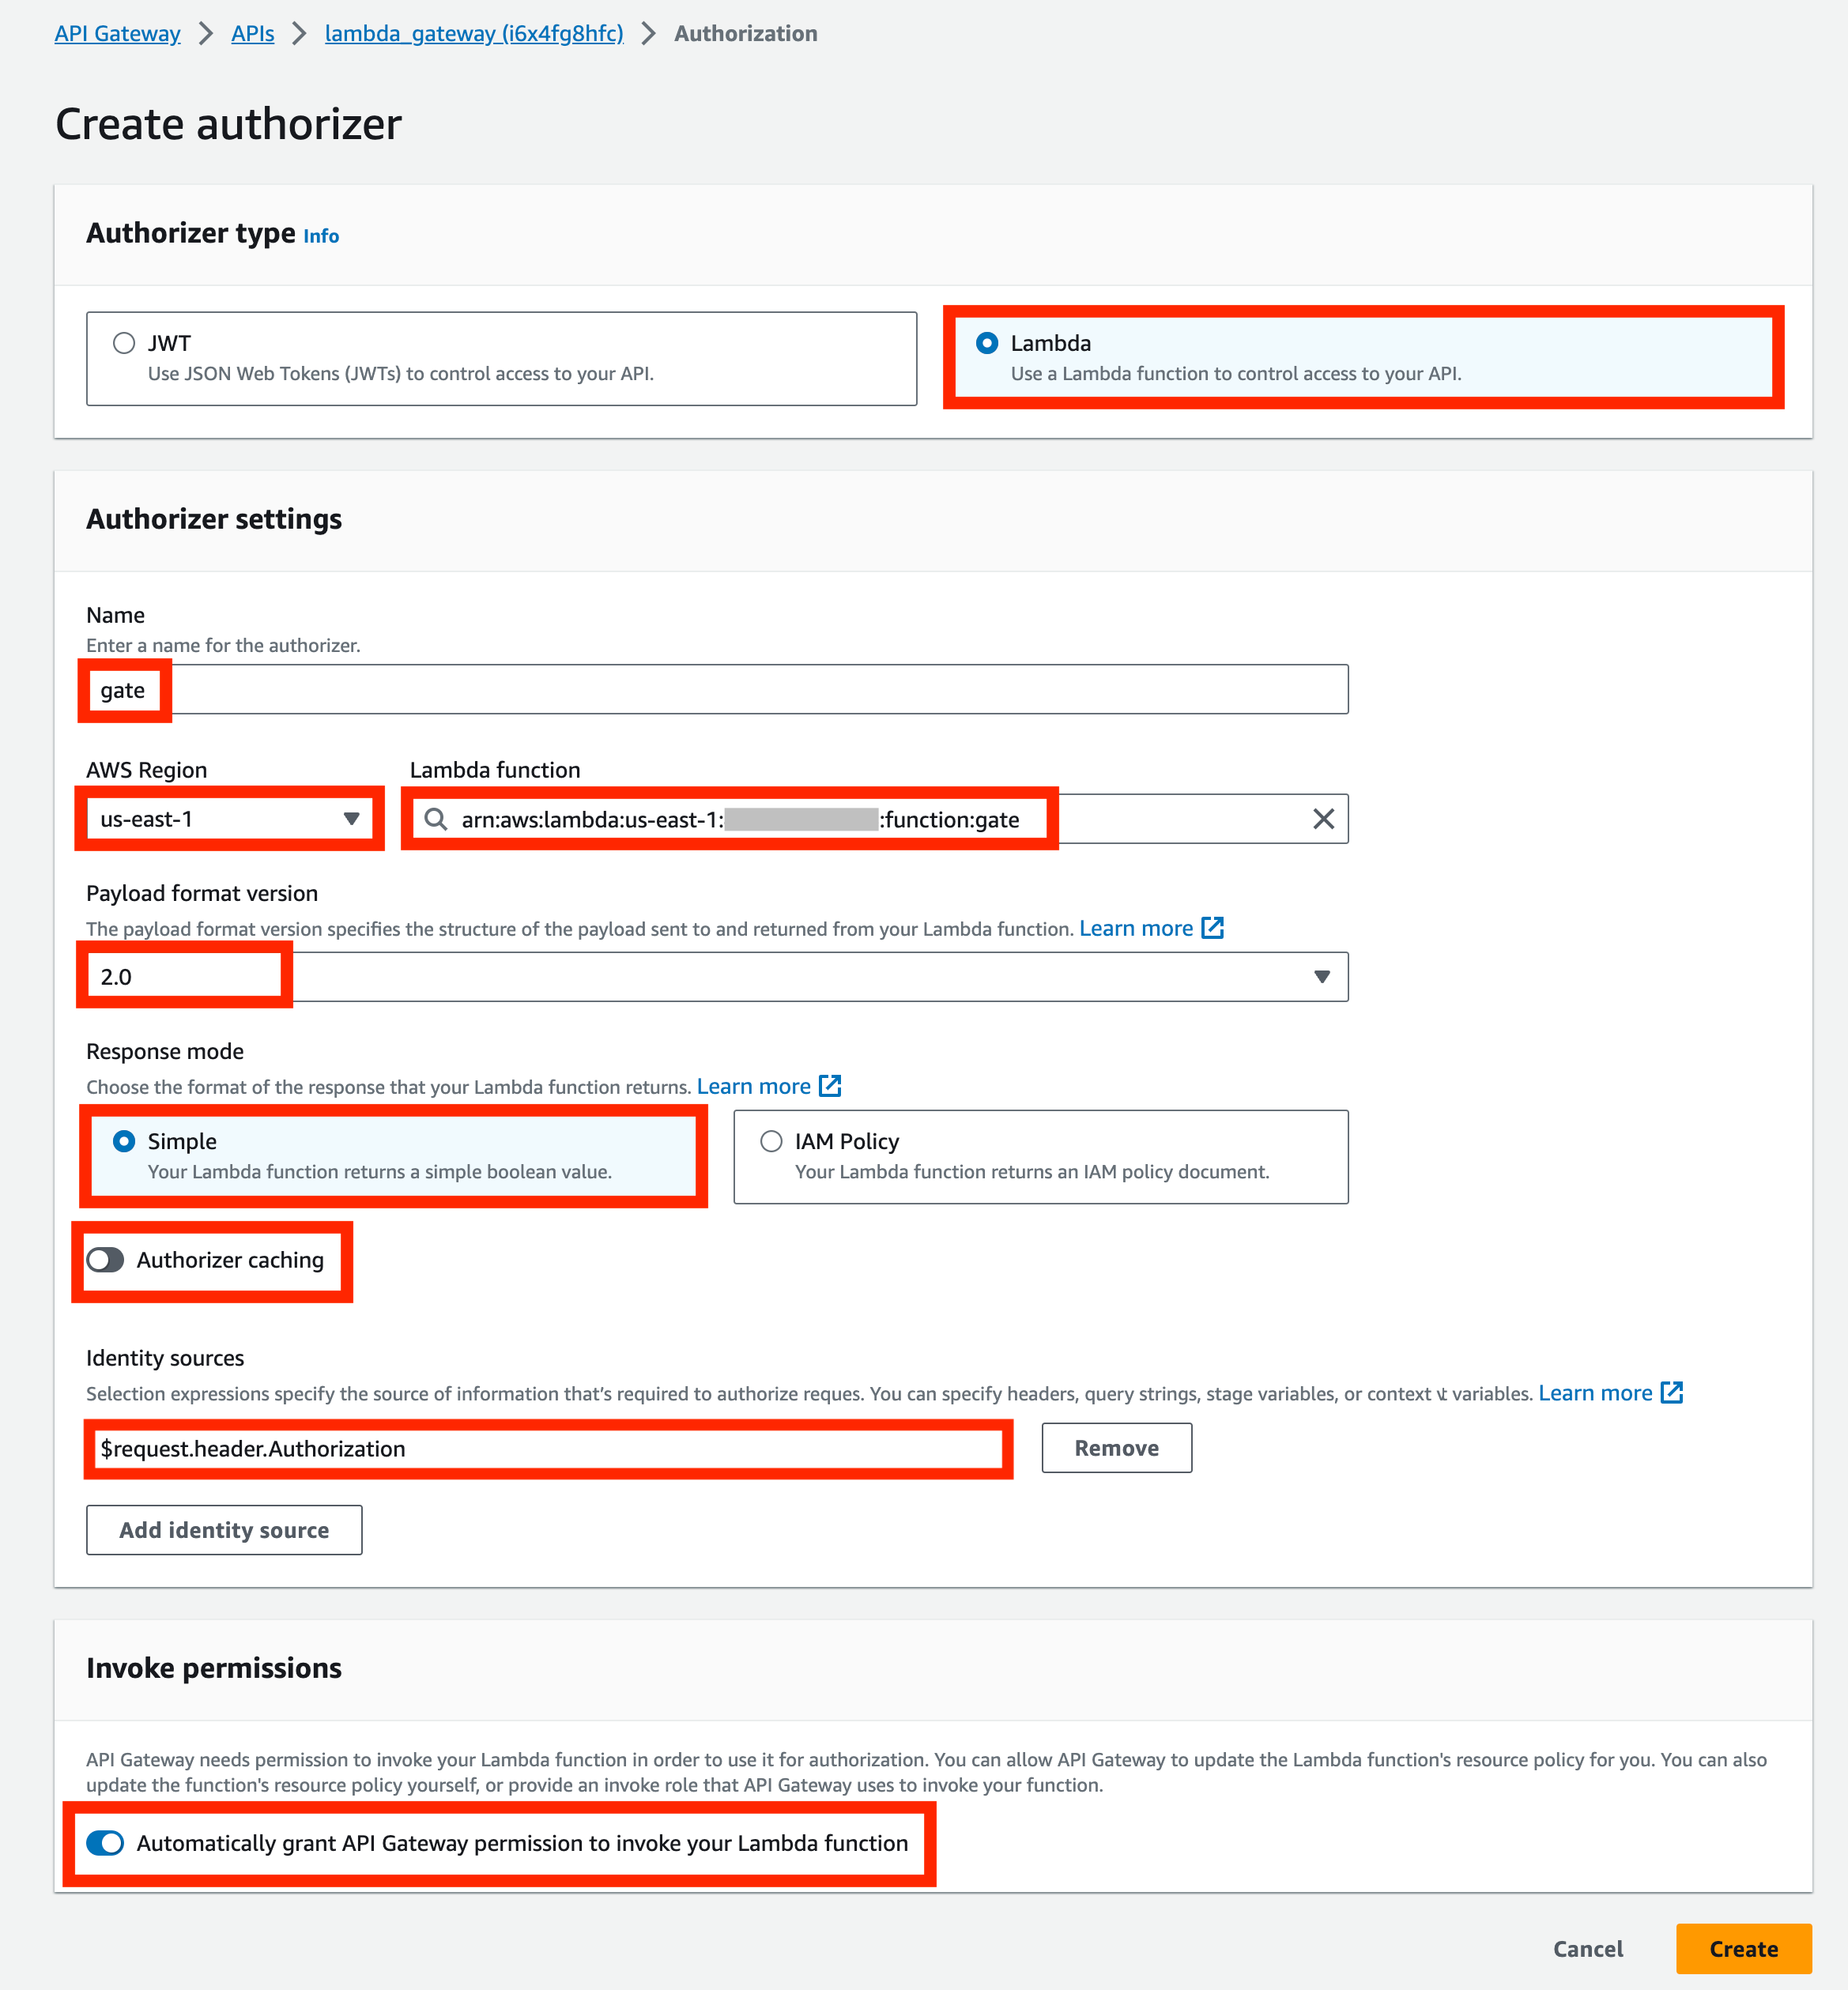
In the next screen, specify:
- Authorizer type - Lambda
- Authorizer name - let's use
gate - Region and name of the
gatelambda function - Payload version - must be set to
2.0 - Response mode - must be set to Simple
- Authorization caching - must be set to Disabled
- Identity source - leave as is; Gate ignores this value
- Ensure that Automatically grant API Gateway permission to invoke your Lambda function is checked
After that, we need to grant API Gateway permission to invoke the gate Lambda.
First, we need to know our API ID and Authorizer ID. Authorizer ID is available in the Authorizers tab.
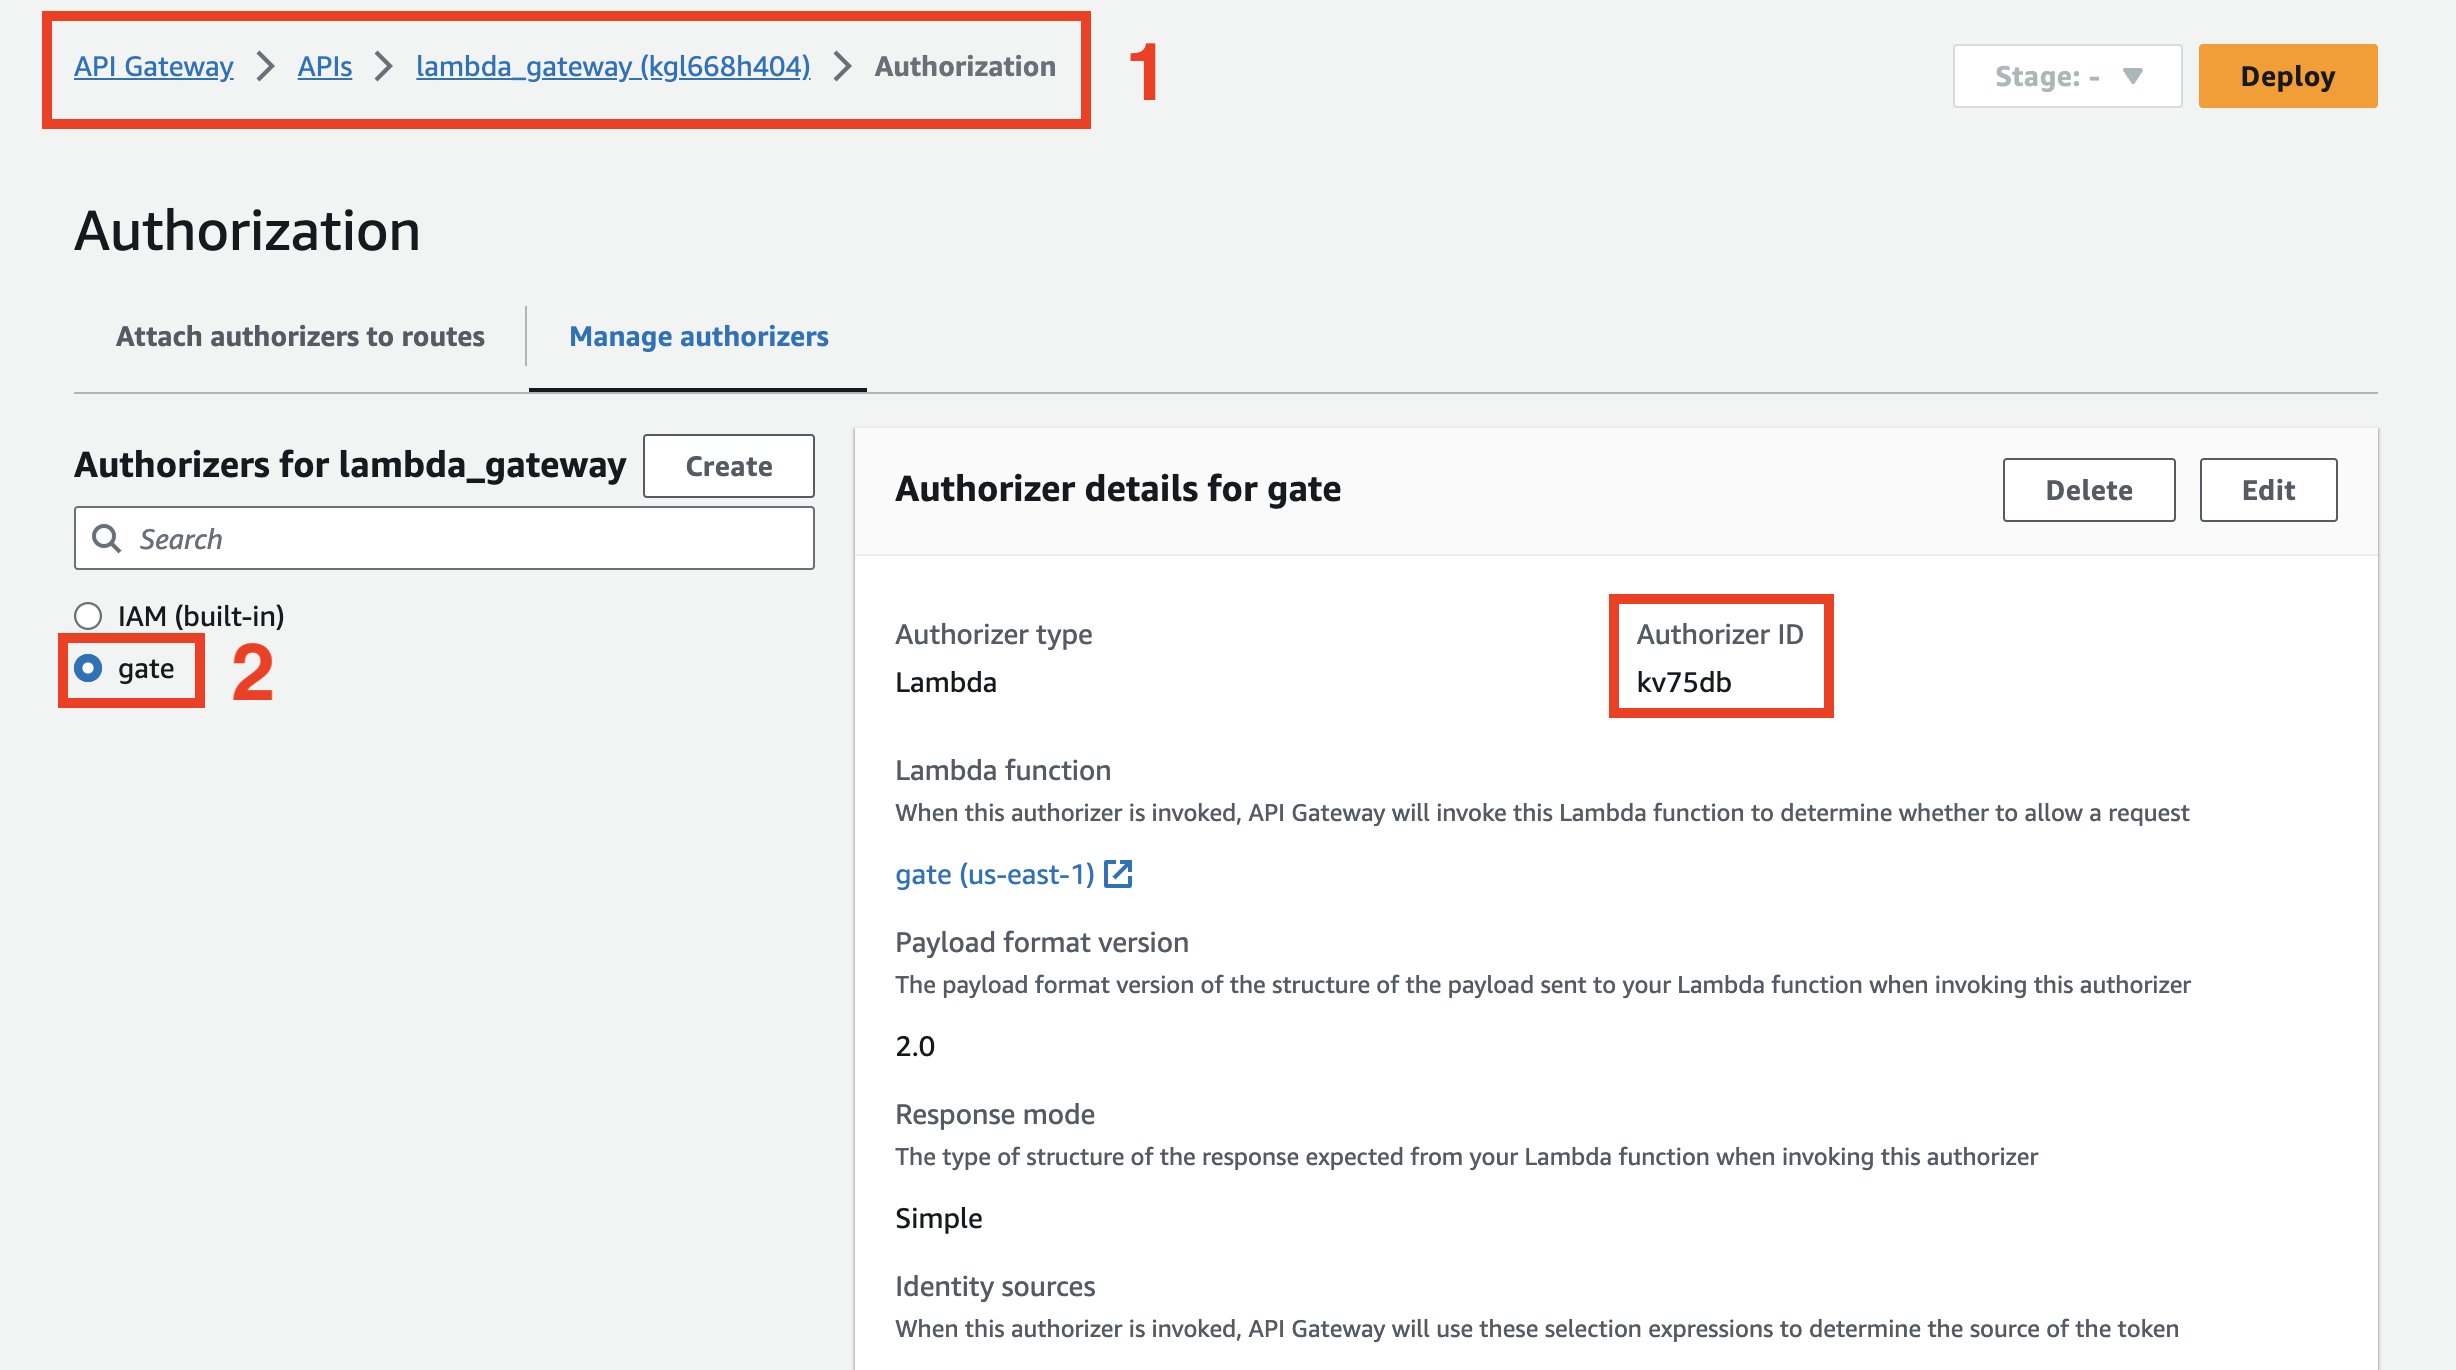
It's available on the API Gateway configuration page.

Note them down and go back to gate Lambda configuration and navigate to Configuration > Permissions and click Add permissions.
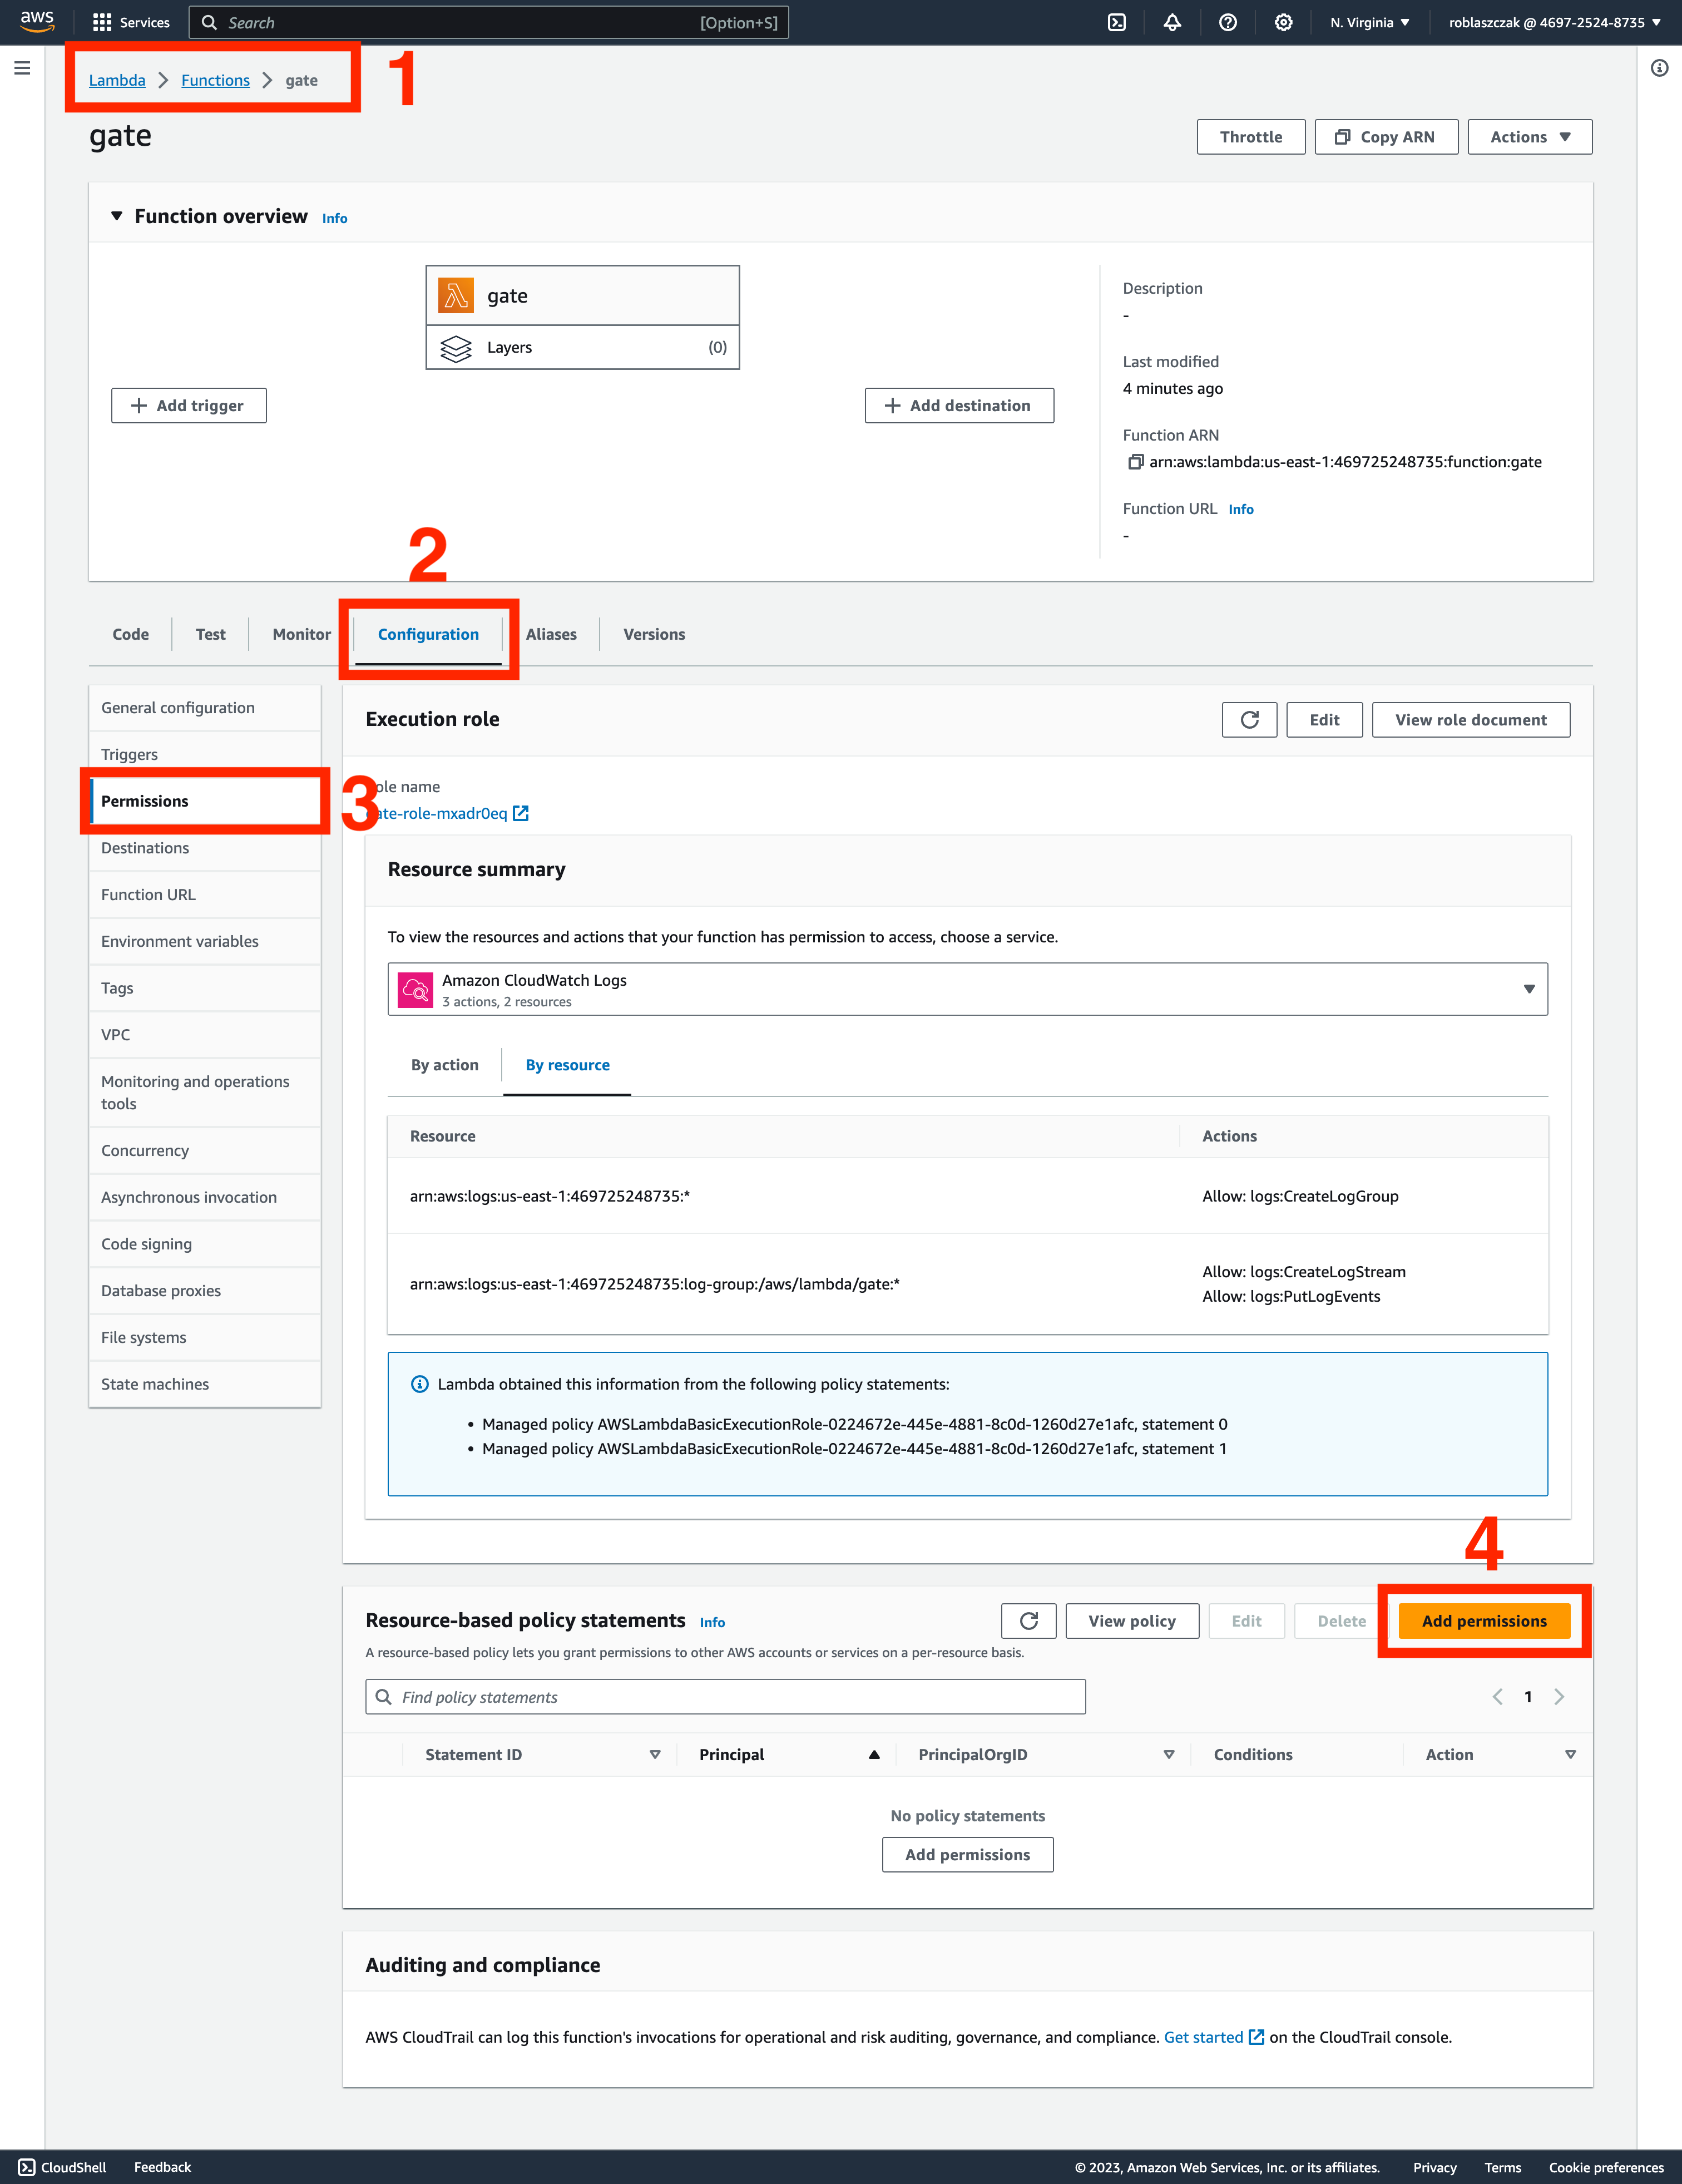
In this tab, you need to specify:
- AWS Service
- Service:
API Gateway - Statement ID:
AllowAPIGatewayInvoke - Principal:
apigateway.amazonaws.com - Source ARN:
arn:aws:execute-api:[REGION]:[ACCOUNT_ID]:[API_ID]/authorizers/[AUTHORIZER_ID] - Action:
lambda:InvokeFunction
and click Save.
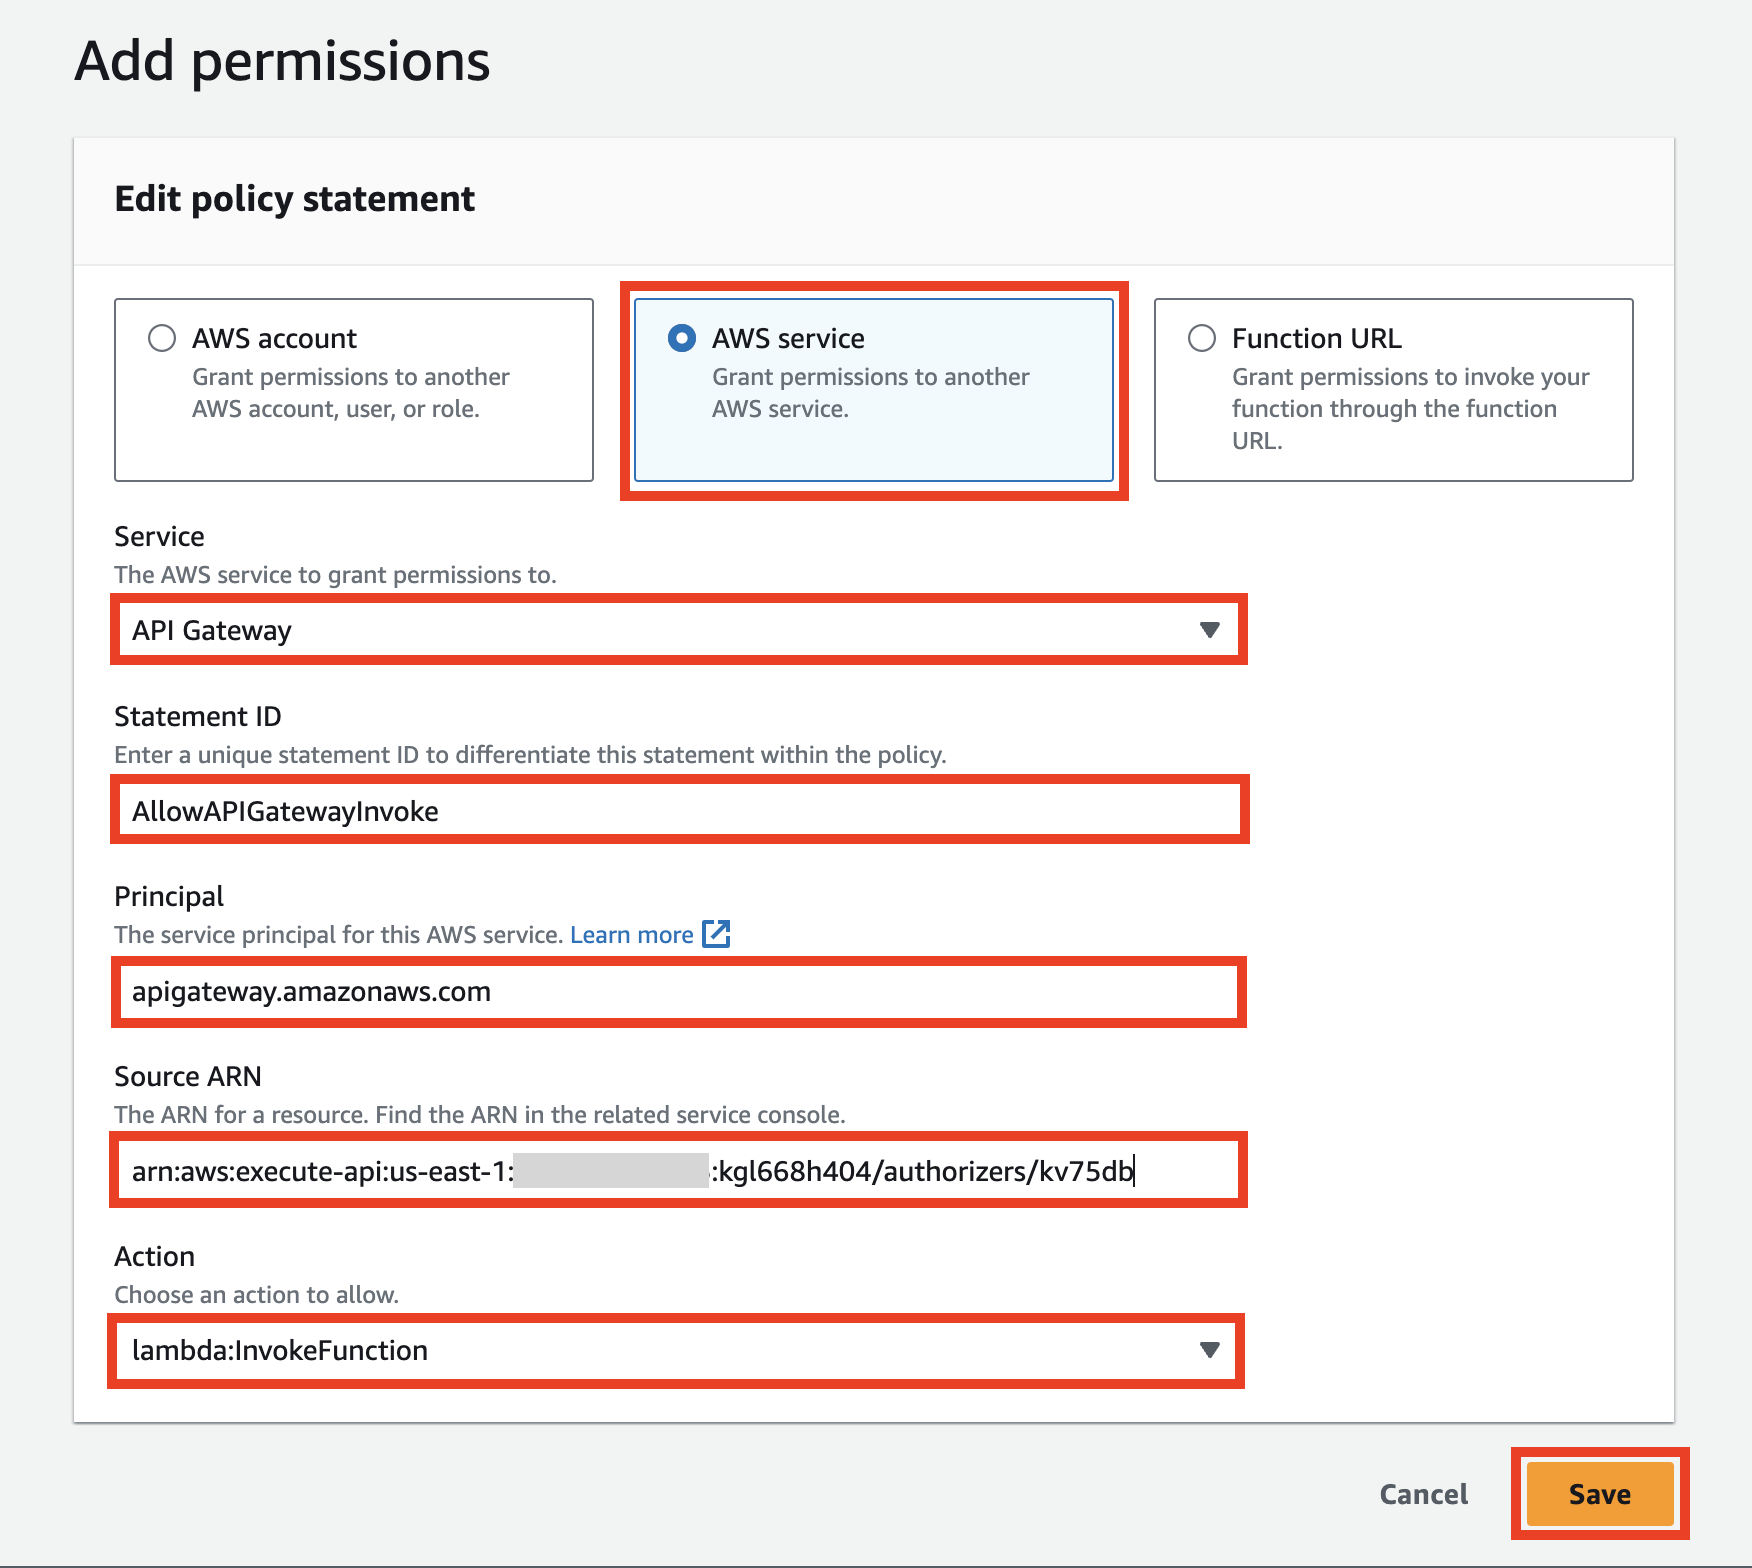
Adding an authorizer
Now it's time to enable Gate as an authorizer for our echo Lambda.
- Terraform
- AWS UI
You need to change aws_apigatewayv2_route.echo resource to use Gate as an authorizer.
resource "aws_apigatewayv2_route" "echo" {
  api_id = aws_apigatewayv2_api.lambda_gateway.id

  route_key          = "GET /echo"
  target             = "integrations/${aws_apigatewayv2_integration.echo_lambda.id}"
  authorization_type = "CUSTOM"
  authorizer_id      = "${aws_apigatewayv2_authorizer.gate.id}"

  depends_on = [
    aws_apigatewayv2_integration.echo_lambda,
    aws_apigatewayv2_authorizer.gate,
  ]
}
Don't forget to run terraform apply to apply the changes.
terraform apply
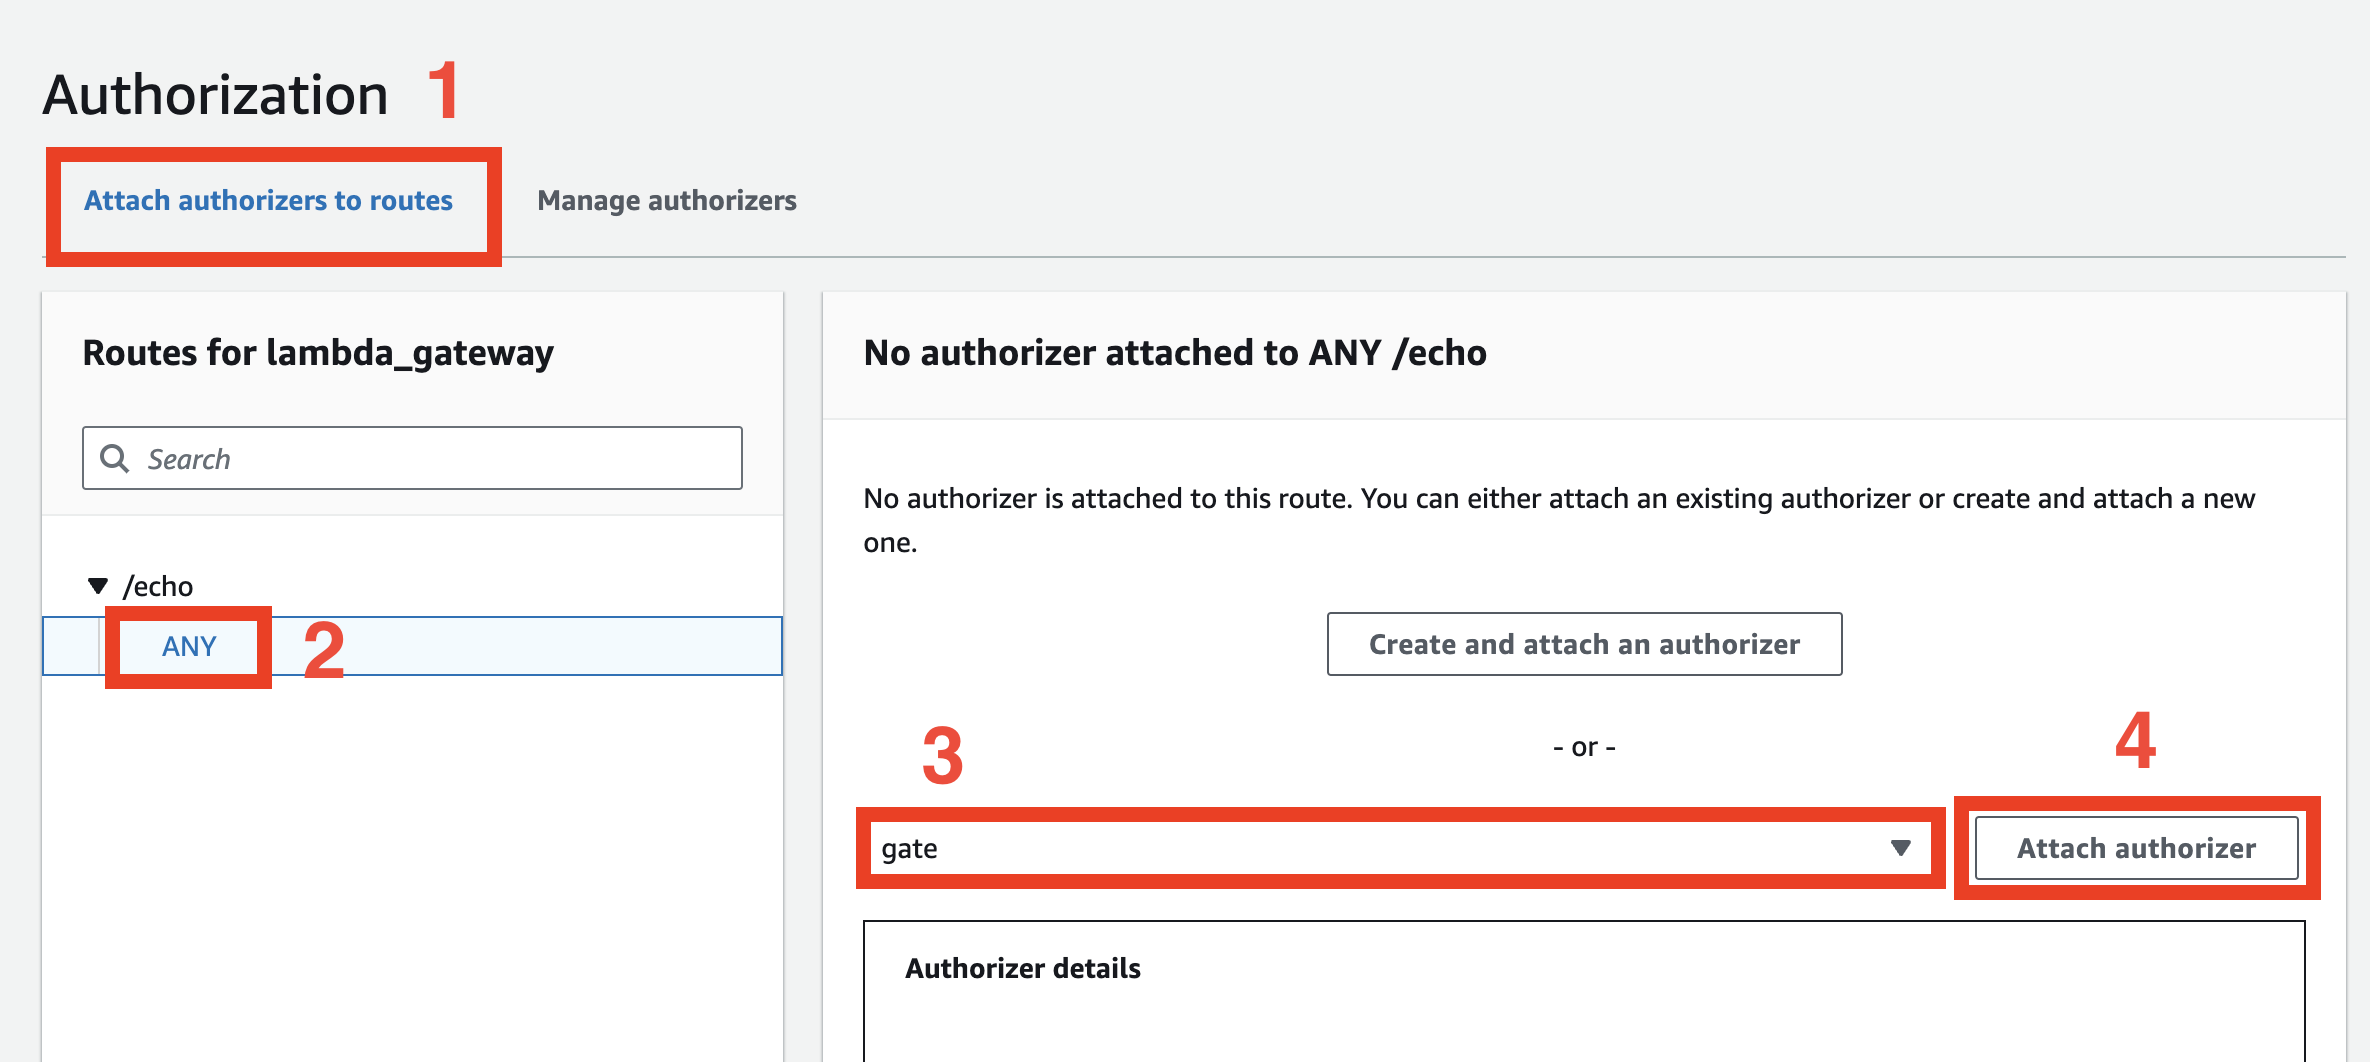
Navigate to the Attach authorizers to routes tab and click ANY method under the /echo route.
You should be able to choose the gate authorizer from the list and click the Attach authorizer button.
After that, your route should have a Lambda Auth badge.
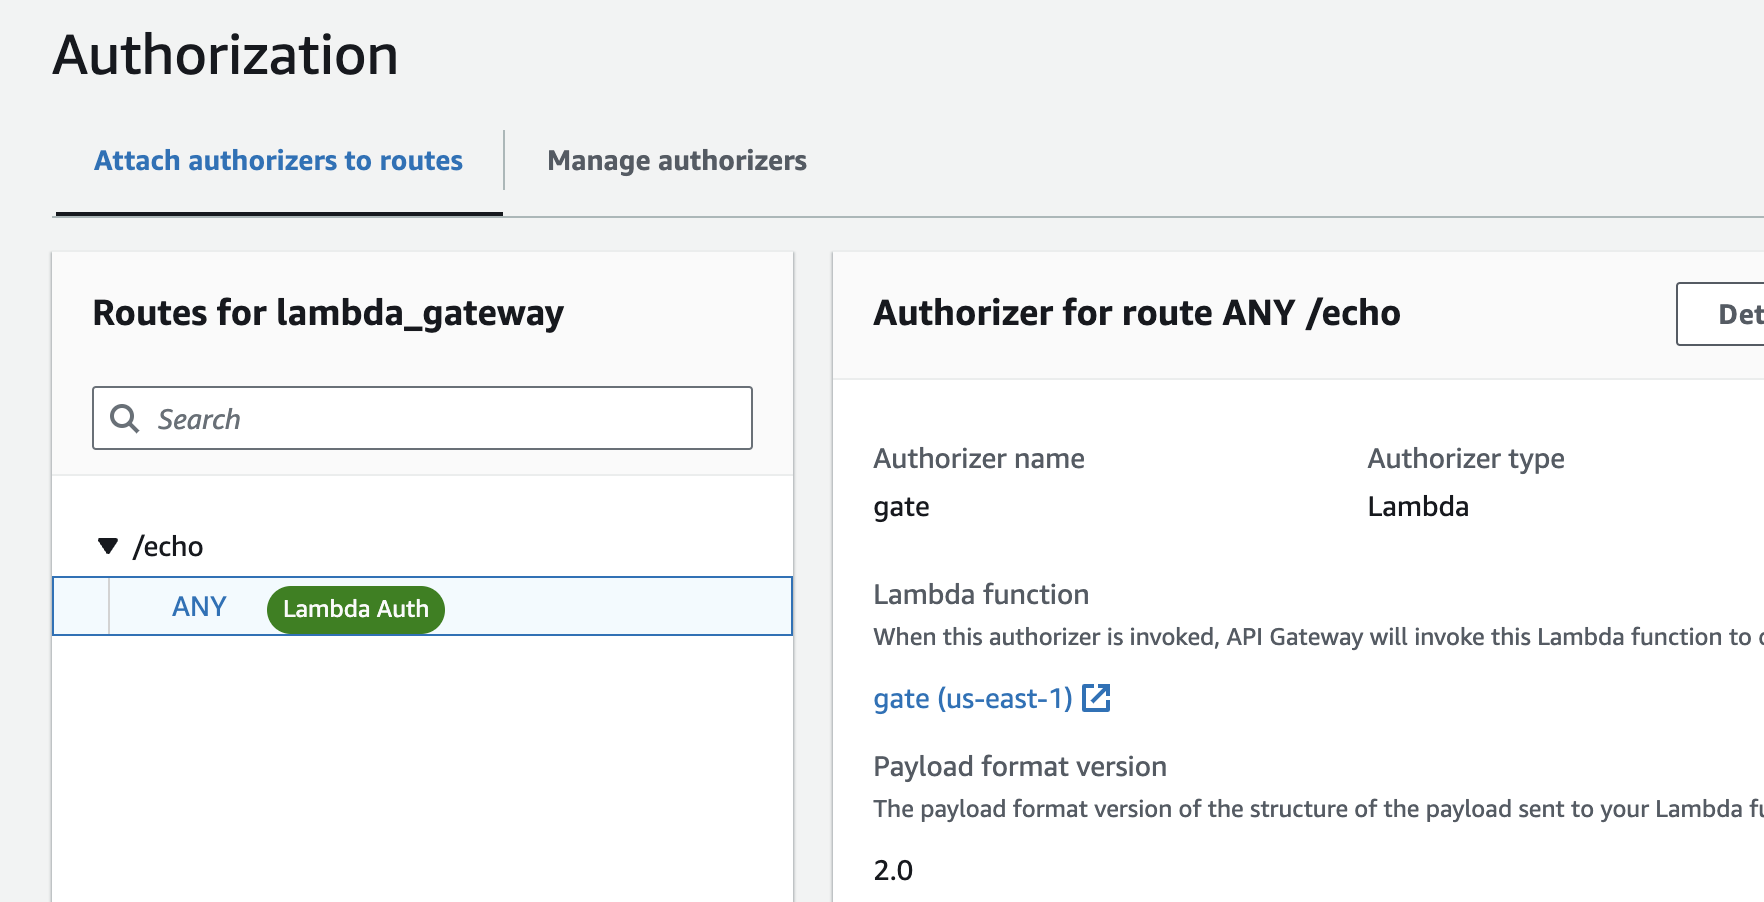
Verifying if Gate is working
Let's now verify if Gate works:
> curl https://[API ID].execute-api.us-east-1.amazonaws.com/test/echo --header 'Cache-Control:"max-age=0"'

{"message":"Unauthorized"}
Please note the Cache-Control:"max-age=0" request header - without that, the Gateway may cache your requests (even if they were unsuccessful).
You can see if your request was cached by checking the apigw-requestid response header.
You should receive an Unauthorized message. It means that Gate is working, and it's validating requests.
For security reasons, the default Gate configuration will reject all requests.
This protects against security issues if you accidentally misconfigure Gate.
Let's now configure Gate to validate JWT tokens.
Configuring Gate
In this guide, we are using environment variables to configure Gate. Gate supports multiple configuration formats, including environment variables, YAML, and JSON. All of them are described in the Configuration page.
We will use the JWT validation plugin to authorize incoming requests.
Let's modify the already existing gate Lambda to configure Gate.
You must replace <YOUR ORGANIZATION ID> with your organization ID.
If you don't have an organization yet, you can create it in 30 seconds by visiting SlashID Console.
- Terraform
- AWS UI
resource "null_resource" "download_gate" {
  provisioner "local-exec" {
    command = "mkdir -p gate && cd gate && wget -O- https://cdn.slashid.com/releases/latest/gate-free_latest_linux_arm64.tar.gz | tar xz && mv gate-free bootstrap"
  }
}

data "archive_file" "gate_zip" {
  depends_on = [
    null_resource.download_gate
  ]

  source_dir  = "./gate/"
  output_path = "${path.module}/gate.zip"
  type        = "zip"
}

resource "aws_lambda_function" "gate" {
  function_name = "gate"
  role          = aws_iam_role.lambda_exec.arn
  handler       = "gate.handler"

  runtime       = "provided.al2"
  architectures = ["arm64"]

  filename         = "gate.zip"
  source_code_hash = data.archive_file.gate_zip.output_base64sha256

  environment {
    variables = {
      GATE_MODE      = "aws_lambda_auth"
      GATE_LOG_LEVEL = "debug"

      GATE_PLUGINS_0_TYPE    = "validate-jwt"
      GATE_PLUGINS_0_ENABLED = "true"

      GATE_PLUGINS_0_PARAMETERS_JWKS_URL              = "https://api.slashid.com/.well-known/jwks.json"
      GATE_PLUGINS_0_PARAMETERS_JWT_ALLOWED_ALGORITHMS = "RS256"
      GATE_PLUGINS_0_PARAMETERS_JWT_EXPECTED_ISSUER    = "https://api.slashid.com"
      GATE_PLUGINS_0_PARAMETERS_JWT_EXPECTED_AUDIENCE  = var.organization_id
    }
  }

  depends_on = [
    aws_iam_role_policy_attachment.lambda_logs,
  ]
}
After changing the configuration, you can run:
terraform apply
Please go back to the gate Lambda Configuration tab and click Edit to add new environment variables.
Please add the following environment variables:
GATE_PLUGINS_0_TYPE: validate-jwt
GATE_PLUGINS_0_ENABLED: true
GATE_PLUGINS_0_PARAMETERS_JWKS_URL: https://api.slashid.com/.well-known/jwks.json
GATE_PLUGINS_0_PARAMETERS_JWT_ALLOWED_ALGORITHMS: RS256
GATE_PLUGINS_0_PARAMETERS_JWT_EXPECTED_ISSUER: https://api.slashid.com
GATE_PLUGINS_0_PARAMETERS_JWT_EXPECTED_AUDIENCE: <YOUR ORGANIZATION ID>
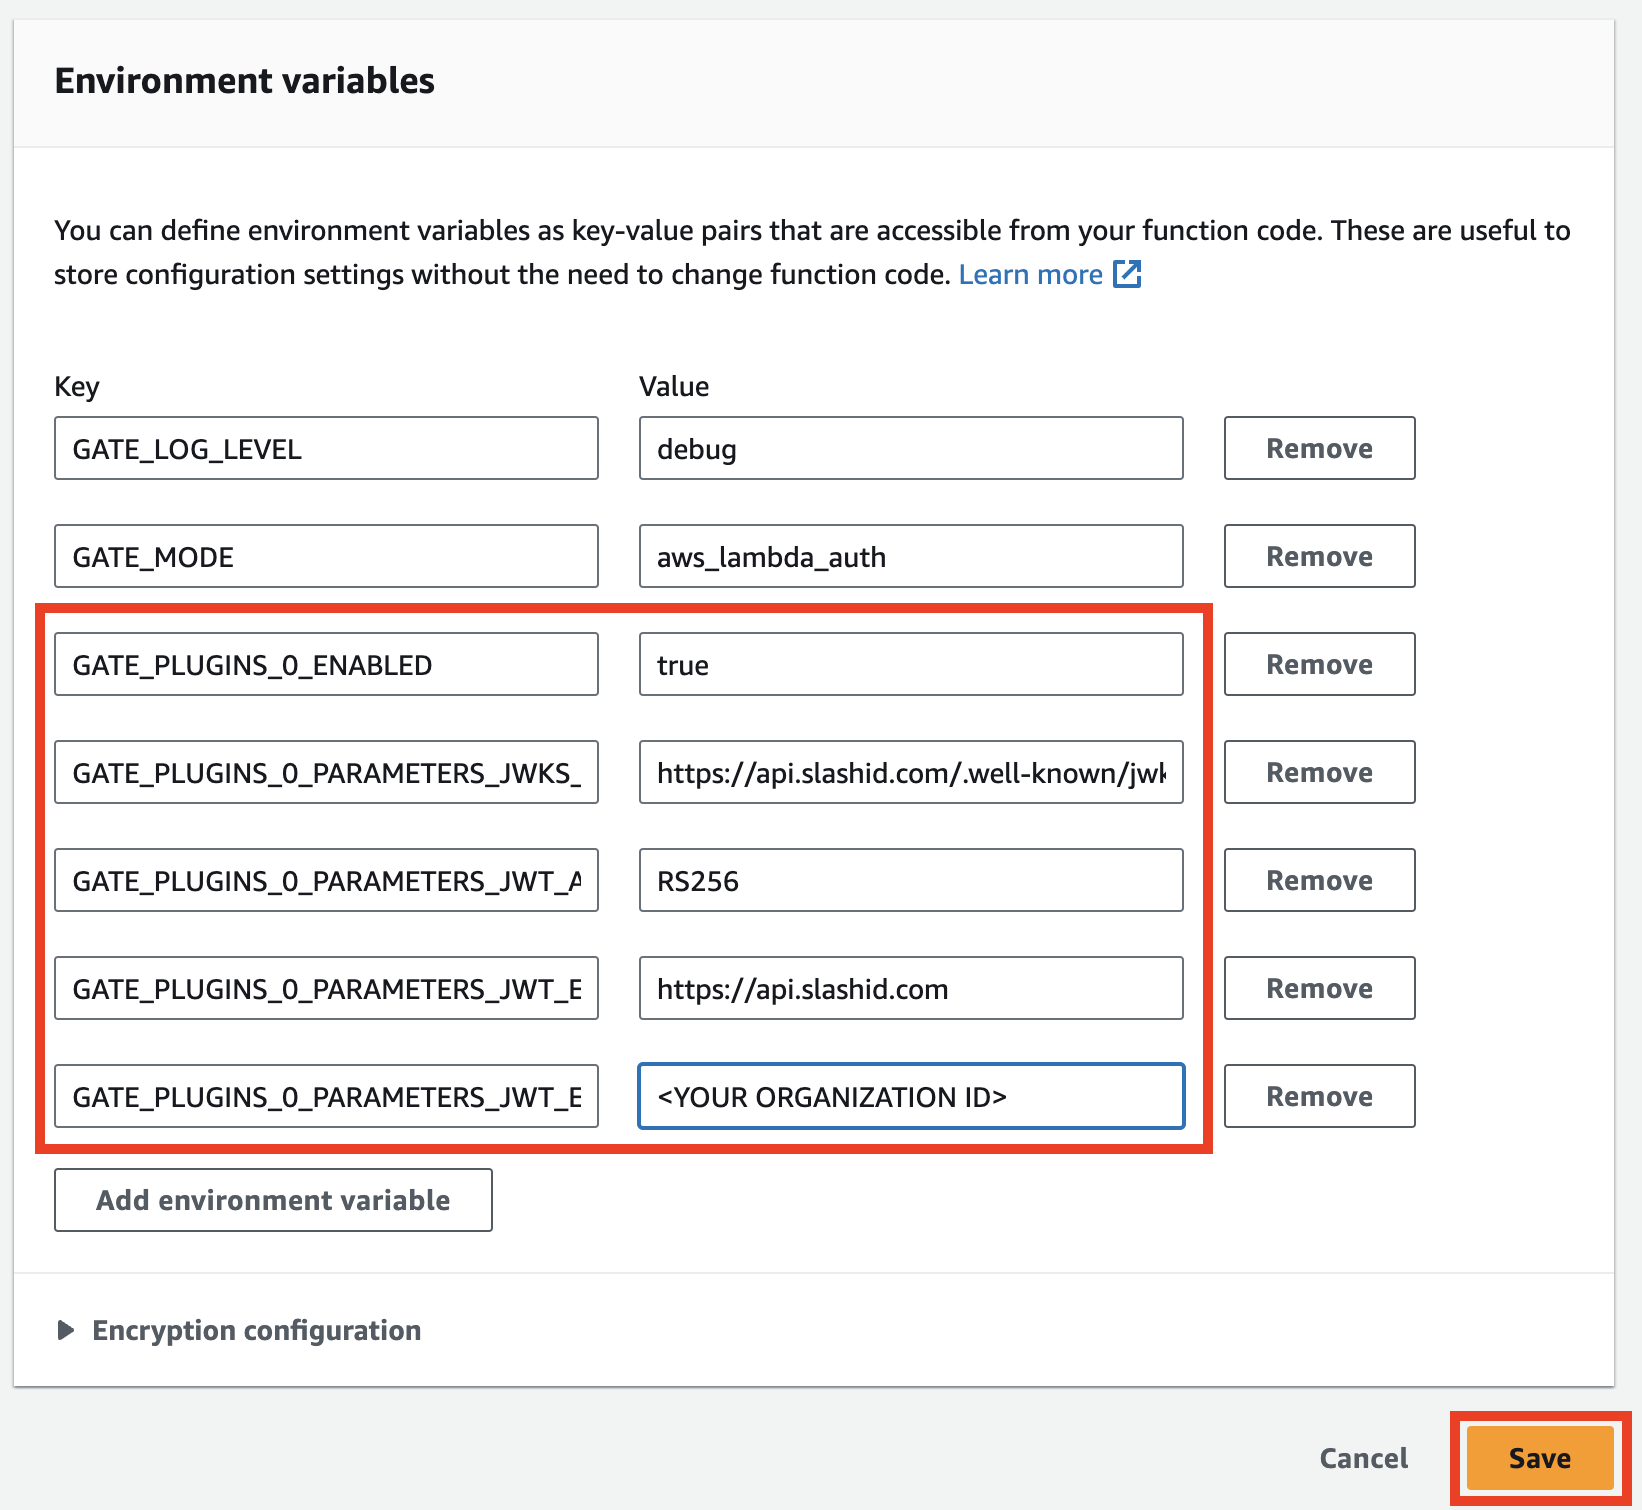
You can learn more about all available options in the Configuration page and JWT verification plugin. It's also possible to validate non-SlashID JWT by providing a custom JWKS URL, issuer, and audience.
Testing JWT validation
Let's ensure that requests without a token are rejected:
> curl https://[API ID].execute-api.us-east-1.amazonaws.com/test/echo --header 'Cache-Control:"max-age=0"'

{"message":"Unauthorized"}
Now we can verify that Gate allows requests with a valid token. First, we need to create a valid token.
We will use the SlashID mint token endpoint.
You may have no persons in your organization yet. You can create a new person by using the create person endpoint or in the SlashID Console.
> curl --location --request POST 'https://api.slashid.com/persons/<PERSON ID>/mint-token' \
--header 'Content-Type: application/json' \
--header 'Accept: application/json' \
--header 'SlashID-API-Key: <YOUR API KEY>' \
--header 'SlashID-OrgID: <YOUR ORG ID>'

{
    "result": "<TOKEN>"
}
Now, let's include the generated token in a request to the echo Lambda:
> curl https://[API ID].execute-api.us-east-1.amazonaws.com/test/echo \
--header 'Authorization:Bearer <TOKEN>' \
--header 'Cache-Control:max-age=0'

{
  "event": {
    "version": "1.0",
    "routeKey": "",
    "rawPath": "",
    "rawQueryString": "",
    "headers": {
      "Content-Length": "0",
      "Host": "<API ID>.execute-api.us-east-1.amazonaws.com",
      "User-Agent": "curl/7.84.0",
      "X-Amzn-Trace-Id": "Root=1-652015d6-10b9e01b65c0ef3a443d7fee",
      "X-Forwarded-For": "[REQUEST IP]",
      "X-Forwarded-Port": "443",
      "X-Forwarded-Proto": "https",
      "accept": "*/*",
      "authorization": "Bearer <TOKEN>",
      "cache-control": "max-age=0"
    },
    "requestContext": {
      "routeKey": "",
      "accountId": "<ACCOUNT ID>",
      "stage": "test",
      "requestId": "MYhZjgHNIAMES8g=",
      "authorizer": {},
      "apiId": "<API ID>",
      "domainName": "<API ID>.execute-api.us-east-1.amazonaws.com",
      "domainPrefix": "<API ID>",
      "time": "",
      "timeEpoch": 0,
      "http": {
        "method": "",
        "path": "",
        "protocol": "",
        "sourceIp": "",
        "userAgent": ""
      },
      "authentication": {
        "clientCert": {
          "clientCertPem": "",
          "issuerDN": "",
          "serialNumber": "",
          "subjectDN": "",
          "validity": {
            "notAfter": "",
            "notBefore": ""
          }
        }
      }
    },
    "isBase64Encoded": false
  },
  "message": "Hello World!"
}
You should check the Gate logs (gate_lambda_logs Terraform output) if it didn't work.
Remember that it takes AWS a couple of seconds to expose logs in their UI.
If you can't find a reason for failure, you can change the log level by changing the GATE_LOG_LEVEL env variable to trace.
Entire Terraform configuration
If you were using Terraform, this is the entire configuration that you should have at the end.
terraform {
  required_providers {
    aws = {
      source  = "hashicorp/aws"
      version = "~> 5.0"
    }
  }
}

provider "aws" {
  region = "<YOUR AWS REGION>"
}

variable "organization_id" {
  default = "<YOUR ORGANIZATION ID>"
}

data "aws_region" "current" {}

####

resource "aws_iam_role" "lambda_exec" {
  name = "serverless_lambda"

  assume_role_policy = jsonencode({
    Version   = "2012-10-17"
    Statement = [
      {
        Action    = "sts:AssumeRole"
        Effect    = "Allow"
        Sid       = ""
        Principal = {
          Service = "lambda.amazonaws.com"
        }
      }
    ]
  })
}

data "aws_iam_policy_document" "lambda_logging" {
  statement {
    effect = "Allow"

    actions = [
      "logs:CreateLogGroup",
      "logs:CreateLogStream",
      "logs:PutLogEvents",
    ]

    resources = ["arn:aws:logs:*:*:*"]
  }
}

resource "aws_iam_policy" "lambda_logging" {
  name        = "lambda_logging"
  path        = "/"
  description = "IAM policy for logging from a lambda"
  policy      = data.aws_iam_policy_document.lambda_logging.json
}

resource "aws_iam_role_policy_attachment" "lambda_logs" {
  role       = aws_iam_role.lambda_exec.name
  policy_arn = aws_iam_policy.lambda_logging.arn
}

####

data "http" "echo_lambda" {
  url = "https://storage.googleapis.com/slashid-sandbox-ad6b-cdn/static/echo-lambda.zip"
}

resource "local_sensitive_file" "echo_lambda" {
  content_base64 = data.http.echo_lambda.response_body_base64
  filename       = "${path.module}/echo-function.zip"
}

####

resource "aws_lambda_function" "echo" {
  function_name = "echo"
  handler       = "echo.handler"
  role          = aws_iam_role.lambda_exec.arn


  runtime       = "provided.al2"
  architectures = ["arm64"]

  filename         = "echo-function.zip"
  source_code_hash = sha256(data.http.echo_lambda.response_body_base64)

  depends_on = [
    aws_iam_role_policy_attachment.lambda_logs,
    local_sensitive_file.echo_lambda,
  ]
}


output "echo_lambda_logs" {
  description = "Echo lambda logs"
  value       = format(
    "https://%s.console.aws.amazon.com/lambda/home?region=%s#/functions/%s?tab=monitoring",
    data.aws_region.current.name,
    data.aws_region.current.name,
    aws_lambda_function.echo.function_name,
  )
}

####

resource "aws_apigatewayv2_api" "lambda_gateway" {
  name          = "lambda_gateway"
  protocol_type = "HTTP"
}

resource "aws_apigatewayv2_integration" "echo_lambda" {
  api_id = aws_apigatewayv2_api.lambda_gateway.id

  integration_uri    = aws_lambda_function.echo.invoke_arn
  integration_type   = "AWS_PROXY"
  integration_method = "POST"
}

resource "aws_lambda_permission" "lambda_permission" {
  statement_id  = "AllowExecutionFromAPIGateway"
  action        = "lambda:InvokeFunction"
  function_name = aws_lambda_function.echo.function_name
  principal     = "apigateway.amazonaws.com"

  source_arn = "${aws_apigatewayv2_api.lambda_gateway.execution_arn}/*/*"
}

resource "aws_apigatewayv2_route" "echo" {
  api_id = aws_apigatewayv2_api.lambda_gateway.id

  route_key          = "GET /echo"
  target             = "integrations/${aws_apigatewayv2_integration.echo_lambda.id}"
  authorization_type = "CUSTOM"
  authorizer_id      = "${aws_apigatewayv2_authorizer.gate.id}"

  depends_on = [
    aws_apigatewayv2_integration.echo_lambda,
    aws_apigatewayv2_authorizer.gate,
  ]
}

####

resource "aws_apigatewayv2_stage" "lambda_test" {
  api_id = aws_apigatewayv2_api.lambda_gateway.id

  name        = "test"
  auto_deploy = true

  default_route_settings {
    data_trace_enabled       = true
    logging_level            = "INFO"
    detailed_metrics_enabled = true

    throttling_rate_limit  = 100
    throttling_burst_limit = 100
  }
  access_log_settings {
    destination_arn = aws_cloudwatch_log_group.lambda_gateway.arn
    format          = "$context.identity.sourceIp $context.identity.caller $context.identity.user [$context.requestTime] \"$context.httpMethod $context.resourcePath $context.protocol\" $context.status $context.responseLength $context.requestId"
  }
}

resource "aws_cloudwatch_log_group" "lambda_gateway" {
  name = "/aws/apigateway/lambda_gateway"

  retention_in_days = 30
}


output "echo_url" {
  description = "Base URL for API Gateway stage."
  value       = format("%s/%s", aws_apigatewayv2_stage.lambda_test.invoke_url, "echo")
}


####

resource "null_resource" "download_gate" {
  provisioner "local-exec" {
    command = "mkdir -p gate && cd gate && wget -O- https://cdn.slashid.com/releases/latest/gate-free_latest_linux_arm64.tar.gz | tar xz && mv gate-free bootstrap"
  }
}

data "archive_file" "gate_zip" {
  depends_on = [
    null_resource.download_gate
  ]

  source_dir  = "./gate/"
  output_path = "${path.module}/gate.zip"
  type        = "zip"
}

resource "aws_lambda_function" "gate" {
  function_name = "gate"
  role          = aws_iam_role.lambda_exec.arn
  handler       = "gate.handler"

  runtime       = "provided.al2"
  architectures = ["arm64"]

  filename         = "gate.zip"
  source_code_hash = data.archive_file.gate_zip.output_base64sha256

  environment {
    variables = {
      GATE_MODE      = "aws_lambda_auth"
      GATE_LOG_LEVEL = "debug"

      GATE_PLUGINS_0_TYPE    = "validate-jwt"
      GATE_PLUGINS_0_ENABLED = "true"

      GATE_PLUGINS_0_PARAMETERS_JWKS_URL              = "https://api.slashid.com/.well-known/jwks.json"
      GATE_PLUGINS_0_PARAMETERS_JWT_ALLOWED_ALGORITHMS = "RS256"
      GATE_PLUGINS_0_PARAMETERS_JWT_EXPECTED_ISSUER    = "https://api.slashid.com"
      GATE_PLUGINS_0_PARAMETERS_JWT_EXPECTED_AUDIENCE  = var.organization_id
    }
  }

  depends_on = [
    aws_iam_role_policy_attachment.lambda_logs,
  ]
}

output "gate_lambda_logs" {
  description = "Gate lambda logs"
  value       = format(
    "https://%s.console.aws.amazon.com/lambda/home?region=%s#/functions/%s?tab=monitoring",
    data.aws_region.current.name,
    data.aws_region.current.name,
    aws_lambda_function.gate.function_name,
  )
}

####

resource "aws_apigatewayv2_authorizer" "gate" {
  api_id                            = aws_apigatewayv2_api.lambda_gateway.id
  authorizer_type                   = "REQUEST"
  authorizer_uri                    = aws_lambda_function.gate.invoke_arn
  identity_sources                  = ["$request.header.Authorization"]
  name                              = "gate"
  authorizer_payload_format_version = "2.0"
  enable_simple_responses           = true

  authorizer_result_ttl_in_seconds = 0
}

resource "aws_lambda_permission" "authorizer_permission" {
  statement_id  = "AllowAPIGatewayInvoke"
  action        = "lambda:InvokeFunction"
  function_name = aws_lambda_function.gate.function_name
  principal     = "apigateway.amazonaws.com"

  source_arn = "${aws_apigatewayv2_api.lambda_gateway.execution_arn}/authorizers/${aws_apigatewayv2_authorizer.gate.id}"
}
Troubleshooting
If you are stuck, please check the Troubleshooting page.
Advanced configuration
You can learn more about advanced configuration in the Advanced Configuration page.
Further reading
In this tutorial, we covered a simple use case. You can learn about other Gate use cases in Use Cases page.