Guide: SSO in 5 minutes
Introduction
Single Sign-On (SSO) is a popular choice amongst both services and users, increasing the service’s confidence in the user’s identity, and reducing the number of login credentials that users have to manage. You can now integrate SSO from third-party identity providers (IdPs) into your frontend with just a few lines of code using the SlashID SDK, and immediately start using additional features from SlashID.
Social logins can significantly boost user registration, for instance Pinterest reported a 47% registration increase after adding Google One Tap to their website.
For more details on SSO with SlashID including logging out and handling of refresh tokens, please refer to our full guide.
A primer on SSO
What is SSO and how does it work? SSO involves a user granting your service access to their identity information held by a third party IdP, such as Google, Apple, or Facebook. Your service can then retrieve this information and use it to build a user profile, which can be enriched with internal data you collect. This means you can immediately personalize your UX to the user based on the existing information, and you can have greater confidence in the user’s identity. From the user perspective, they use their existing credentials (e.g., Google account), and can continue to log in to your service with those same credentials, reducing friction and minimizing the number of accounts that they must track.
There are multiple standards for implementing SSO. SlashID supports OpenID Connect (OIDC), a standard for authentication built on top of OAuth 2.0, and Security Assertion Markup Language 2.0 (SAML).
OIDC is supported by many popular IdPs. In brief, OIDC works as follows:
- You register your app with the IdP and obtain a client ID and secret
- When a user wants to use SSO, you call an API exposed by the IdP with your client ID
- The user is prompted to log in with the IdP
- Your service receives an authorization code
- Your service exchanges the authorization code with the IdP for identity and access tokens, authenticated with the client secret
- The identity token is a JSON Web Token (JWT) that includes information about the user; the access token can be used subsequently to retrieve user information from the IdP, within the scopes that the user allowed.
SAML is an older protocol, widely used in the governmental, academic, and enterprise worlds. In brief, SAML works as follows:
- You register your IdP with your app - that is a SAML Service Provider (SP) - by providing the IdP's metadata
- You register your app with the IdP by providing the SP's metadata
- When a user wants to use SSO, you call an API exposed by the IdP with a SAML request
- The user is prompted to log in with the IdP
- Your service receives a SAML response signed with the IdP's private key
- Your service verifies the signature of the SAML response with the IdP's public key that is included in the IdP's metadata
- The SAML response contains a SAML assertion that includes information about the user
With SlashID, you simply need to provide us with the client ID and secret for an OIDC IdP, or a SAML IdP metadata. You can then call a single method from our SDK; we take care of the rest and return the tokens.
SSO in 5 minutes or less
OIDC
We will use Google as an example. First, you need to obtain a client ID and client secret from Google - our dedicated guide provides step-by-step instructions on how to do this. Once you have these OAuth2 credentials, enabling SSO with SlashID requires just two steps.
The first is to register the OAuth2 credentials through the SlashID APIs:
curl --location --request POST 'https://api.slashid.com/organizations/sso/oidc/provider-credentials' \
--header 'SlashID-OrgID: <YOUR ORG ID>' \
--header 'SlashID-API-Key: <YOUR API KEY>' \
--header 'Content-Type: application/json' \
--data-raw '{
    "client_id": "<CLIENT ID>",
    "client_secret": "<CLIENT SECRET>",
    "provider": "google",
    "label": "A label for this set of credentials"
}
The second is to invoke the .id() method from your frontend as follows:
import { SlashID } from "@slashid/slashid"
const sid = new slashid.SlashID()

const org_id = "my_org_id" // organization ID, provided on registration with SlashID
const clientId = "my.client.id" // client ID from the IdP
const provider = "google" // the identity provider to authenticate with

const user = await sid.id(org_id, null, {
  method: "oidc",
  options: {
    client_id: clientId,
    provider: provider,
    ux_mode: "popup",
  },
})
By default, SlashID will use a pop-up to prompt the user to login, but you can also decide to use a redirect flow instead. To do so, set ux_mode to ”redirect” and add an event listener to your webpage like the following:
addEventListener("load", async (event) => {
  let user = await sid.getUserFromURL()
  console.log("Retrieved user from URL", { user })
})
You can optionally set redirect_target to change the URL to redirect to after the flow is complete, by default it is the current page.
Behind the scenes, the SlashID SDK and backend will carry out the OIDC flow with the IdP using the credentials matching the client ID provided. If you set UX mode to popup, the SDK will return a User object, which is a SlashID token. If set to redirect, the URL specified will be loaded, with an additional URL query parameter appended. You can then use the getUserFromURL SDK method to obtain the User object.
In both cases, the User object represents a signed JWT that contains both a SlashID user token and the information about the OIDC tokens from the IdP, which can be used to retrieve the tokens using the SlashID API.
That’s it!
SAML
We'll use Microsoft Entra (formerly Microsoft Azure AD) in this example. Please refer to this guide to learn how to create a SAML application in Microsoft Entra.
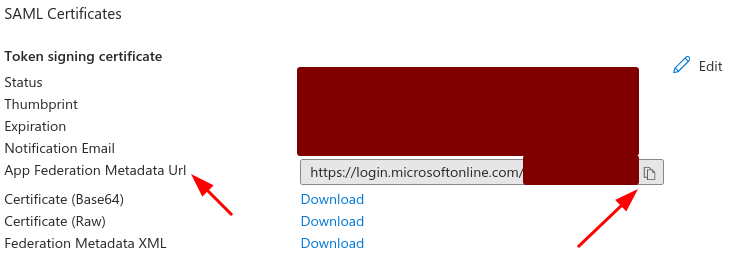
Once you created a SAML application in Microsoft Entra, you'll have the IdP metadata URL for that application:
Now, enabling SSO with SlashID requires just three steps. The first is to register the SAML provider credentials through the SlashID APIs:
curl --location --request POST 'https://api.slashid.com/organizations/sso/saml/provider-credentials' \
--header 'SlashID-OrgID: <YOUR ORG ID>' \
--header 'SlashID-API-Key: <YOUR API KEY>' \
--header 'Content-Type: application/json' \
--data-raw '{
    "idp_metadata_url": "https://login.microsoftonline.com/.../federationmetadata/2007-06/federationmetadata.xml?appid=...",
    "email_claims": ["http://schemas.xmlsoap.org/ws/2005/05/identity/claims/emailaddress"],
    "label": "Microsoft Entra"
}
http://schemas.xmlsoap.org/ws/2005/05/identity/claims/emailaddress is the default email claim and can be omitted when integrating with Microsoft Entra. It's here for clarity.
However, most commonly, you'll need to provide the name of the claim present in the SAML response that contains the user's email address.
The response will look as follows:
{
  "result": {
    "email_claims": [
      "http://schemas.xmlsoap.org/ws/2005/05/identity/claims/emailaddress"
    ],
    "id": "fe23e28d-4cb5-4477-a627-bd359fdd3d75",
    "idp_metadata_url": "https://login.microsoftonline.com/.../federationmetadata/2007-06/federationmetadata.xml?appid=...",
    "label": "Microsoft Entra"
  }
}
The second is to register SlashID with Microsoft Entra by uploading the SP metadata:

You can download the SP metadata from: https://api.slashid.com/saml/<YOUR SAML PROVIDER CREDENTIALS ID>/metadata.
Lastly, invoke the .id() method from your frontend as follows:
import { SlashID } from "@slashid/slashid"
const sid = new slashid.SlashID()

const org_id = "my_org_id" // organization ID, provided on registration with SlashID
const azure_saml_provider_credentials_id = "fe23e28d-4cb5-4477-a627-bd359fdd3d75" // the id you got in the previous step

const user = await sid.id(org_id, null, {
  method: "saml",
  options: {
    provider_credentials_id: azure_saml_provider_credentials_id,
    ux_mode: "popup",
  },
})
By default SlashID will use a pop-up to prompt the user to login, but you can also decide to use a redirect flow instead. To do so, set ux_mode to ”redirect” and add an event listener to your webpage like the following:
addEventListener("load", async (event) => {
  let user = await sid.getUserFromURL()
  console.log("Retrieved user from URL", { user })
})
You can optionally set redirect_target to change the URL to redirect to after the flow is complete, by default it is the current page.
Behind the scenes, the SlashID SDK and backend will carry out the SAML flow with the IdP. If you set UX mode to popup, the SDK will return a User object, which is a SlashID token. If set to redirect, the URL specified will be loaded, with an additional URL query parameter appended. You can then use the getUserFromURL SDK method to obtain the User object.
In both cases, the User object represents a signed JWT that contains a SlashID user token.
That's it!
Conclusion
SSO is a great tool to increase user registration as part of the onboarding process. While there’s a lot of complexity behind OIDC and SAML, our aim at SlashID is to handle that complexity for you so you quickly experiment with new features and new onboarding flows.
Please reach out to us if there’s a specific SSO provider you’d like us to support.