Use SlashID with Shopify
Follow this guide to set up and use the SlashID Login app in your Shopify store.
This application requires you to enable Multipass, a Shopify Plus plan feature.
Prerequisites
Before starting, you must register with SlashID to get an organization ID and API key.
1. Enable Multipass in your Shopify Store
In your Shopify Admin panel, go to Settings > Customer Accounts and scroll down to the Multipass section. Enable Multipass and copy your secret — you will need it in the next step. Check the Shopify docs for more details.
2. Store your Multipass secret as External Credentials
Now, you need to store the Multipass secret you just copied as an External Credential in your SlashID Organization.
Let's prepare the following values:
- <SLASHID_API_KEY>: your SlashID API Key
- <SLASHID_ORG_ID>: your SlashID Organization ID
- <MULTIPASS_SECRET>: your Multipass secret
- <STORE_NAME>: your Shopify store name
Then simplest way to do so is by running the following cURL command in your terminal:
curl --request POST \
  --url https://api.slashid.com/organizations/config/external-credentials \
  --header 'Accept: application/json' \
  --header 'Content-Type: application/json' \
  --header 'SlashID-API-Key: <SLASHID_API_KEY>' \
  --header 'SlashID-OrgID: <SLASHID_ORG_ID>' \
  --data '{
  "extcred_provider": "shopify",
  "extcred_type": "json_credentials",
  "extcred_label": "<STORE_NAME>",
  "json_blob": {
        "multipass_secret": "<MULTIPASS_SECRET>"
    }
}'
Remember to replace the placeholders with your own values!
Once you make a successful API request, you should receive the following response:
{
  "result": ["<EXTERNAL_CREDENTIALS_ID>"]
}
Make sure to save the External Credentials ID as we will need it for the next step!
3. Install the SlashID Login app from the Shopify App Store
Install the SlashID Login app from the Shopify App Store. Once done, navigate to the app Settings page in the Admin panel and follow the instructions in the sidebar to set up and customize your Login & Register pages.
4. Configure the SlashID Login app
App settings will be displayed as soon as the app is enabled.
In the theme editor, go to the Customer login page settings and choose App embeds in the sidebar. You should see these options:
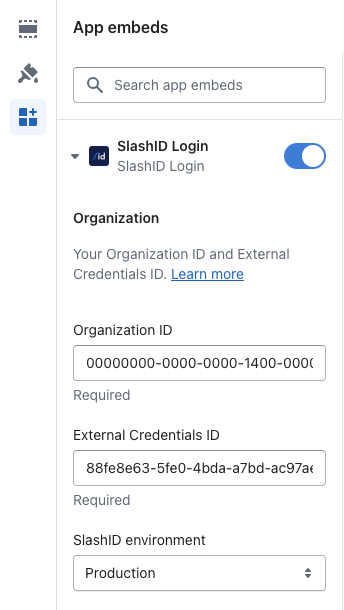
Fill in the following fields:
SLASHID_ORG_ID=> your SlashID Organization IDSLASHID_EXT_CRED_ID=> the SlashID External Credentials ID assigned to the Multipass secret
The SlashID environment field lets you choose whether you want to use the SlashID production environment or the sandbox environment. This should correspond to the environment you used to register your SlashID Organization - in most cases you should default to the production environment.
Once these values are set, you are ready to start using the app! The standard Shopify login form will be replaced with your customised SlashID form.
5. Choose your authentication methods
You can easily choose which authentication methods your customers can use to log in to your store. Pick any combination of methods displayed below:
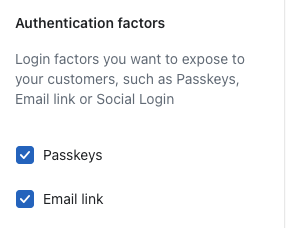
Passkeys and email links do not require any further setup. However, if you want to enable single sign-on (SSO) with social accounts (e.g., Facebook, Google, etc), you will need to set up the corresponding login providers in your SlashID Organization.
Social login
Follow either one of the following guides to enable social login with one of the supported providers:
After configuring the identity providers in SlashID, you will need to enable the corresponding social login method in the settings of your SlashID Login Shopify app, and enter the Client ID that you previously set up:
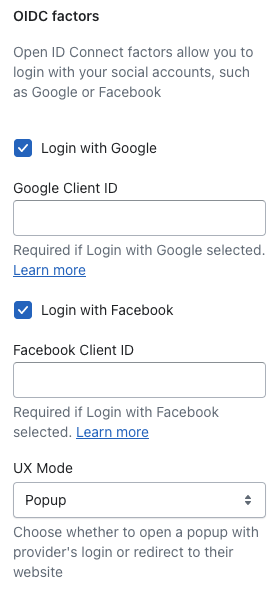
Use the UX Mode setting to choose whether the social login flow will redirect your customers to the IdP login page or display a popup window with the login form instead.
6. Optional: Customize the SlashID Login app
Finally, use the final sections of the App embeds settings to customize the SlashID Login app to match your store's theme.
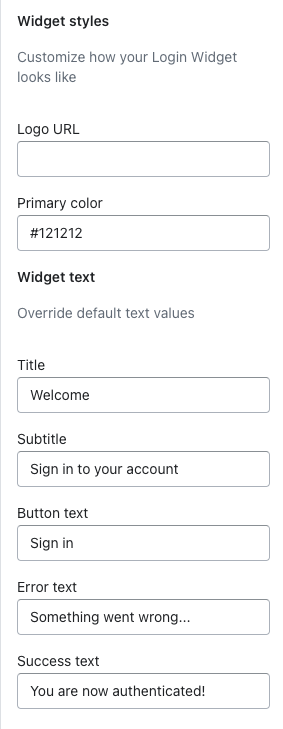
The Widget styles section lets you set your logo by providing a URL pointing to the image you want to use. You can also change the Sign in button color to match your color theme.
The Widget text section lets you customize the text that is displayed on the login form.
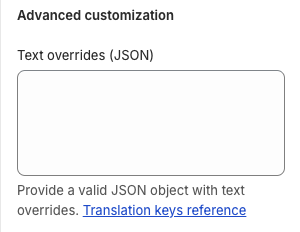
Advanced text configuration
Alternatively, you can provide a JSON object with overrides for Form text in the Advanced customization section:
See <ConfigurationProvider> docs for more information.
Due to technical constraints, when using template variables in overrides, you need to escape the curly brackets ({}) with backslashes (\):
✅ \{\{VARIABLE\}\}
❌ {{VARIABLE}}
7. Optional: Integrate the SlashID Shopify SDK in your web app
If your store is not the only place where your customers can log in, you can use the SlashID JS SDK to authenticate users with SlashID in your web app. This way, your customers will be able to log in to your store and your web app with the same SlashID account.
When your customers log in with the SlashID JS SDK, they'll get a token you can then exchange for a Shopify Customer Access Token using the SlashID Shopify SDK. This requires you to enable the Storefront API in your Shopify store and generate a Storefront API token.
Enabling the Storefront API
The easiest way of enabling the Storefront API is by following the official guide. Once done, please record the Storefront API private access token as we'll need it in the next step. Also take note of your store's name (e.g., my-store.myshopify.com).
Storing the credentials in SlashID
We'll record these values as External Credentials in your SlashID Organization. Let's prepare the following values:
- <SLASHID_API_KEY>: your SlashID API Key
- <SLASHID_ORG_ID>: your SlashID Organization ID
- <MULTIPASS_SECRET>: your Multipass secret
- <STOREFRONT_SECRET>: your Storefront API private access token
- <STORE_NAME>: your Shopify store name
Run the following cURL command in your terminal:
curl --request POST \
  --url https://api.slashid.com/organizations/config/external-credentials \
  --header 'Accept: application/json' \
  --header 'Content-Type: application/json' \
  --header 'SlashID-API-Key: <SLASHID_API_KEY>' \
  --header 'SlashID-OrgID: <SLASHID_ORG_ID>' \
  --data '{
  "extcred_provider": "shopify",
  "extcred_type": "json_credentials",
  "extcred_label": "<STORE_NAME>",
  "json_blob": {
        "multipass_secret": "<MULTIPASS_SECRET>",
        "storefront_secret": "<STOREFRONT_SECRET>",
        "store_name": "<STORE_NAME>"
    }
}'
Once you make a successful API request, you should receive the following response:
{
  "result": ["<EXTERNAL_CREDENTIALS_ID>"]
}
The external credentials ID will be used as documented in the SlashID Shopify SDK.